Isolation sewing

I had exceptionally good reasons to decide to take a four week break between jobs. I’d never chosen to do that before, but the chance to spend quality time with my mum was really important to me. Little did we know how the universe would laugh at us for making such a plan.

In week one, mum was in hospital. I spent as much time there as I could, but there’s this thing called Covid, you may have heard of it? It makes hospitals antsy, and very anti-visitors at the moment. Still, they made an exception in our case, and l took advantage of it to stay as long as I could each day.

Until, one week in, Daughter 3 got a sore throat, and headache, and fever – and the next day, a double line. Clearly I couldn’t justify going to a hospital when I had Covid in my household, so I stayed away, relied on lovely other friends to help pick mum up and get her back in her own home, and kept my fingers crossed.

Daughter 2 got it two days in, and my husband four days in. And on day five it was me with the sore throat, and headache, and fever. And a bastard second line.

This is a blog about sewing rather than screaming at the universe, so I’m not going to shout about how frustrating and angry this period has made me. You can fill in the blanks for yourself. Imagine that time is limited and precious; imagine that you’d taken a chunk of unpaid leave to spend with your dearest mum; and then imagine having to stay at home and away from her for two of those weeks. I’m trying not to cry, just writing these words down.

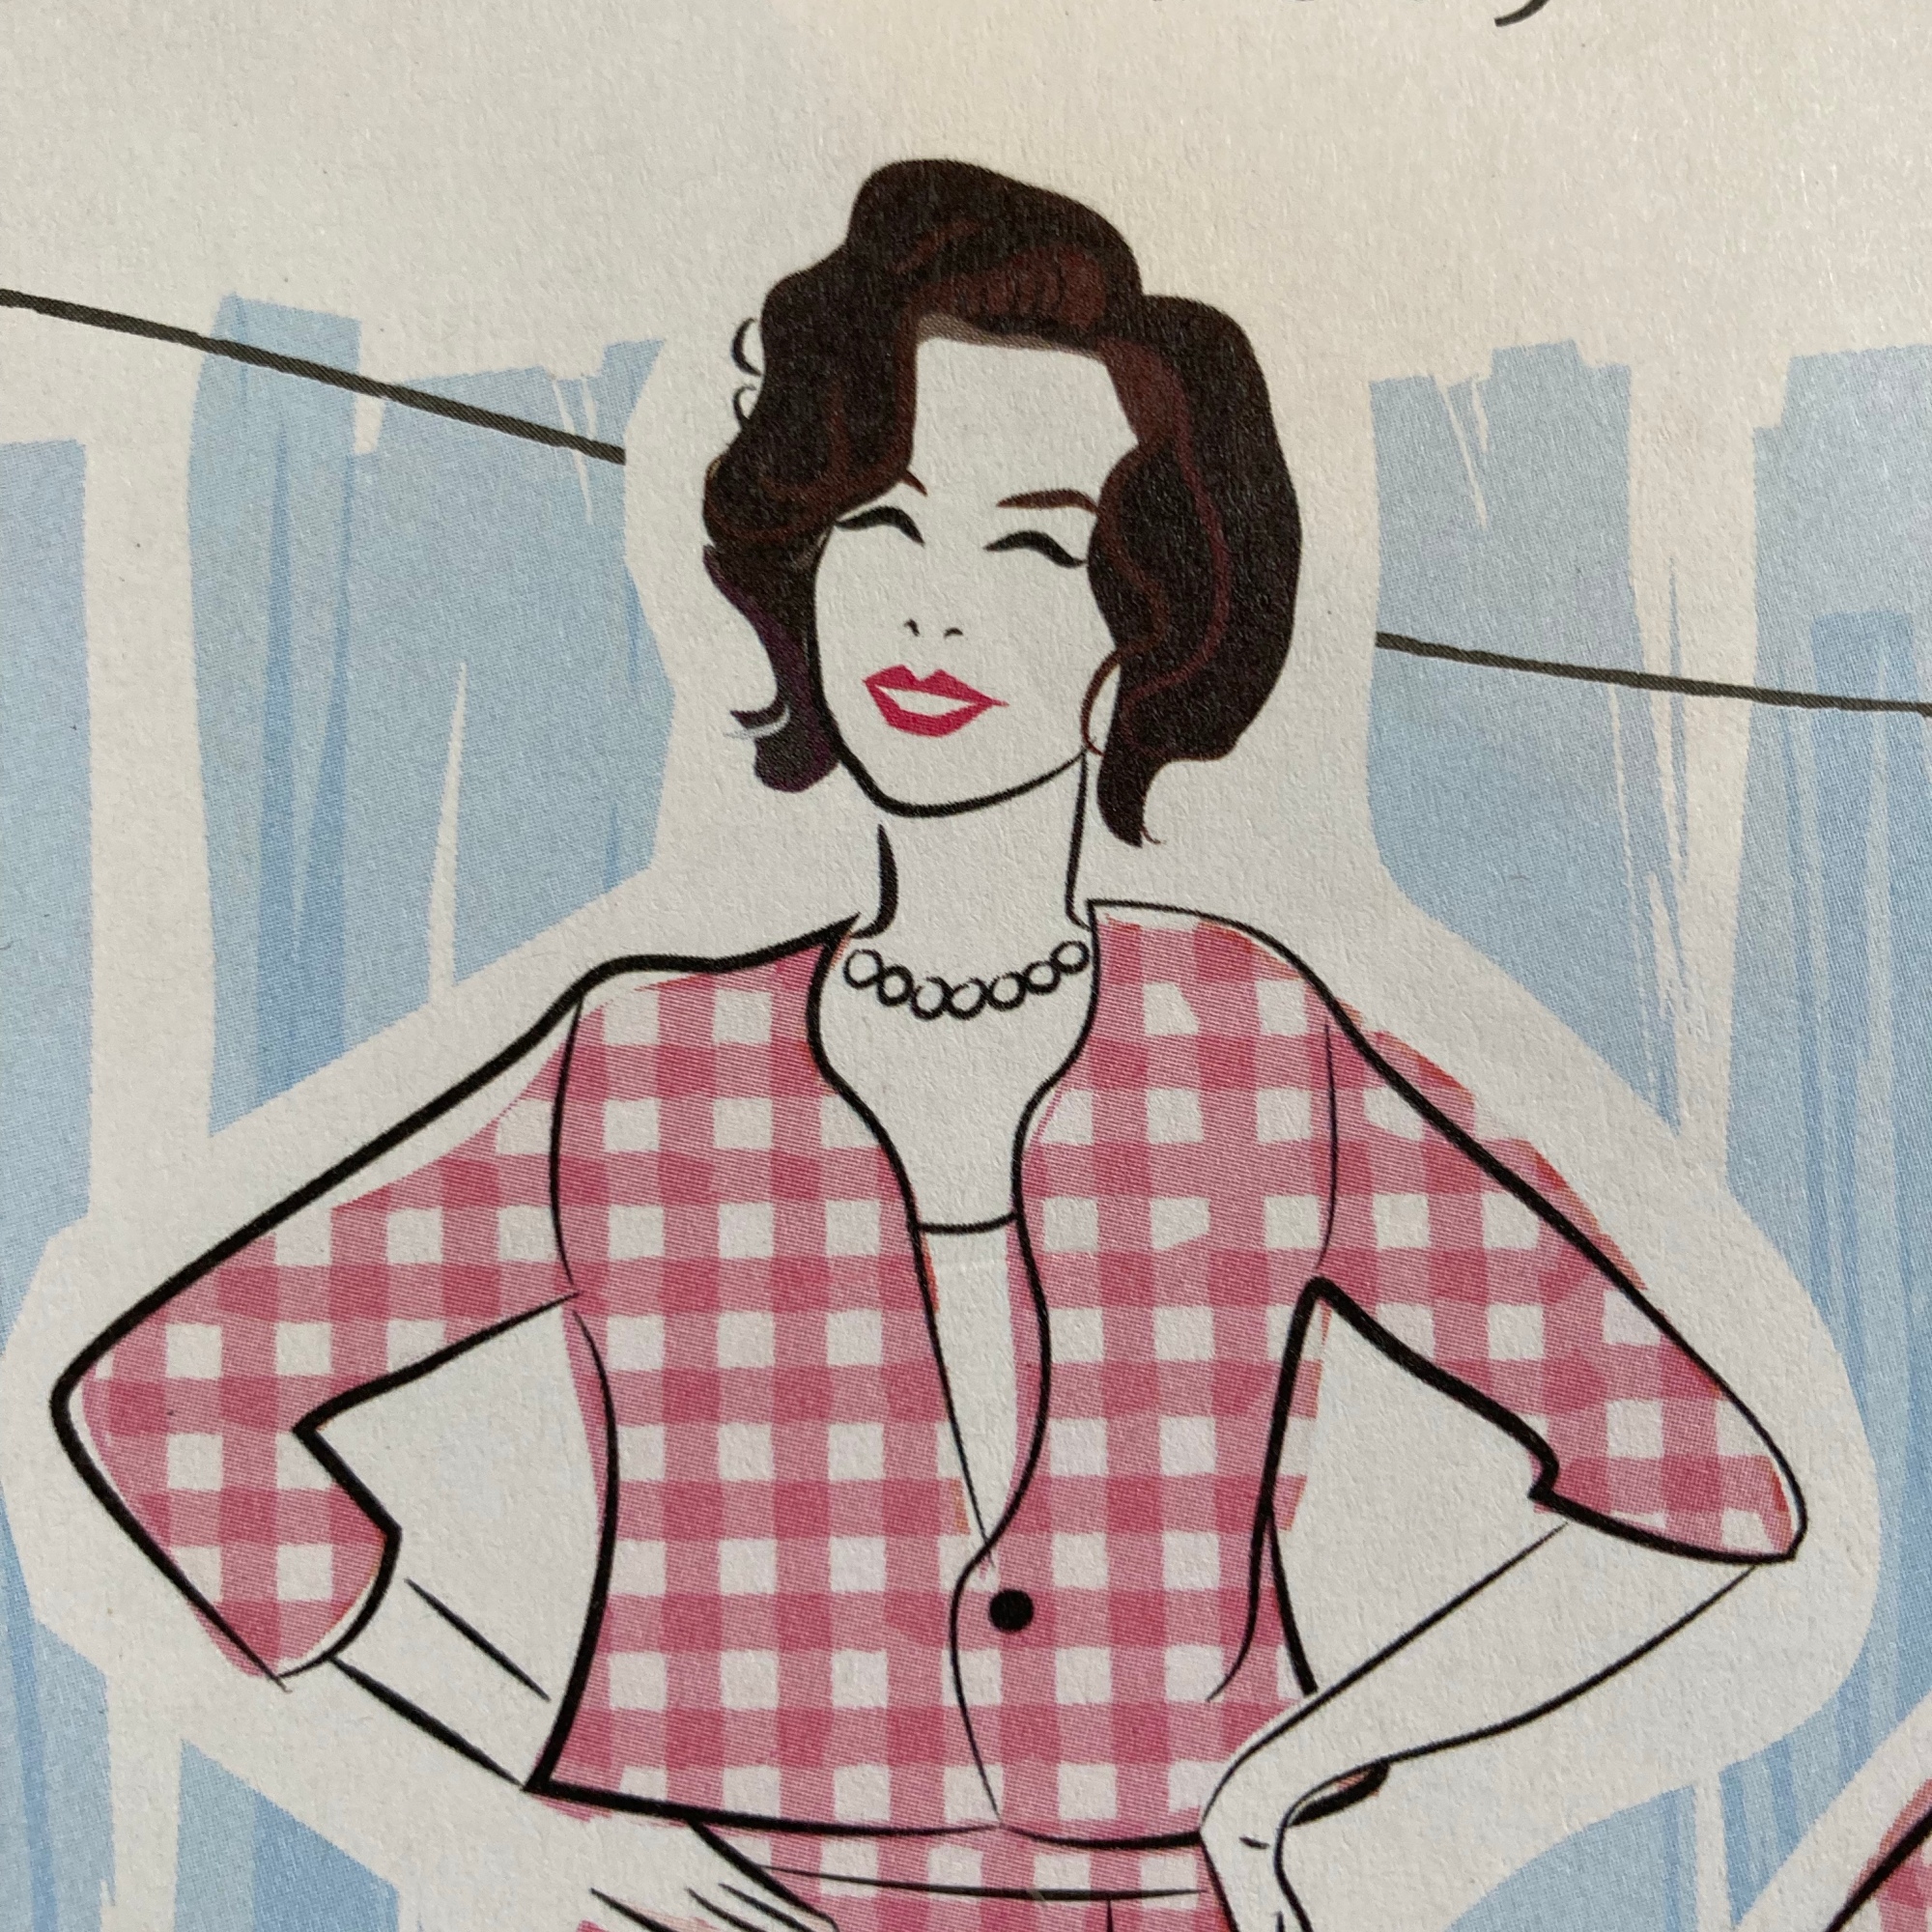
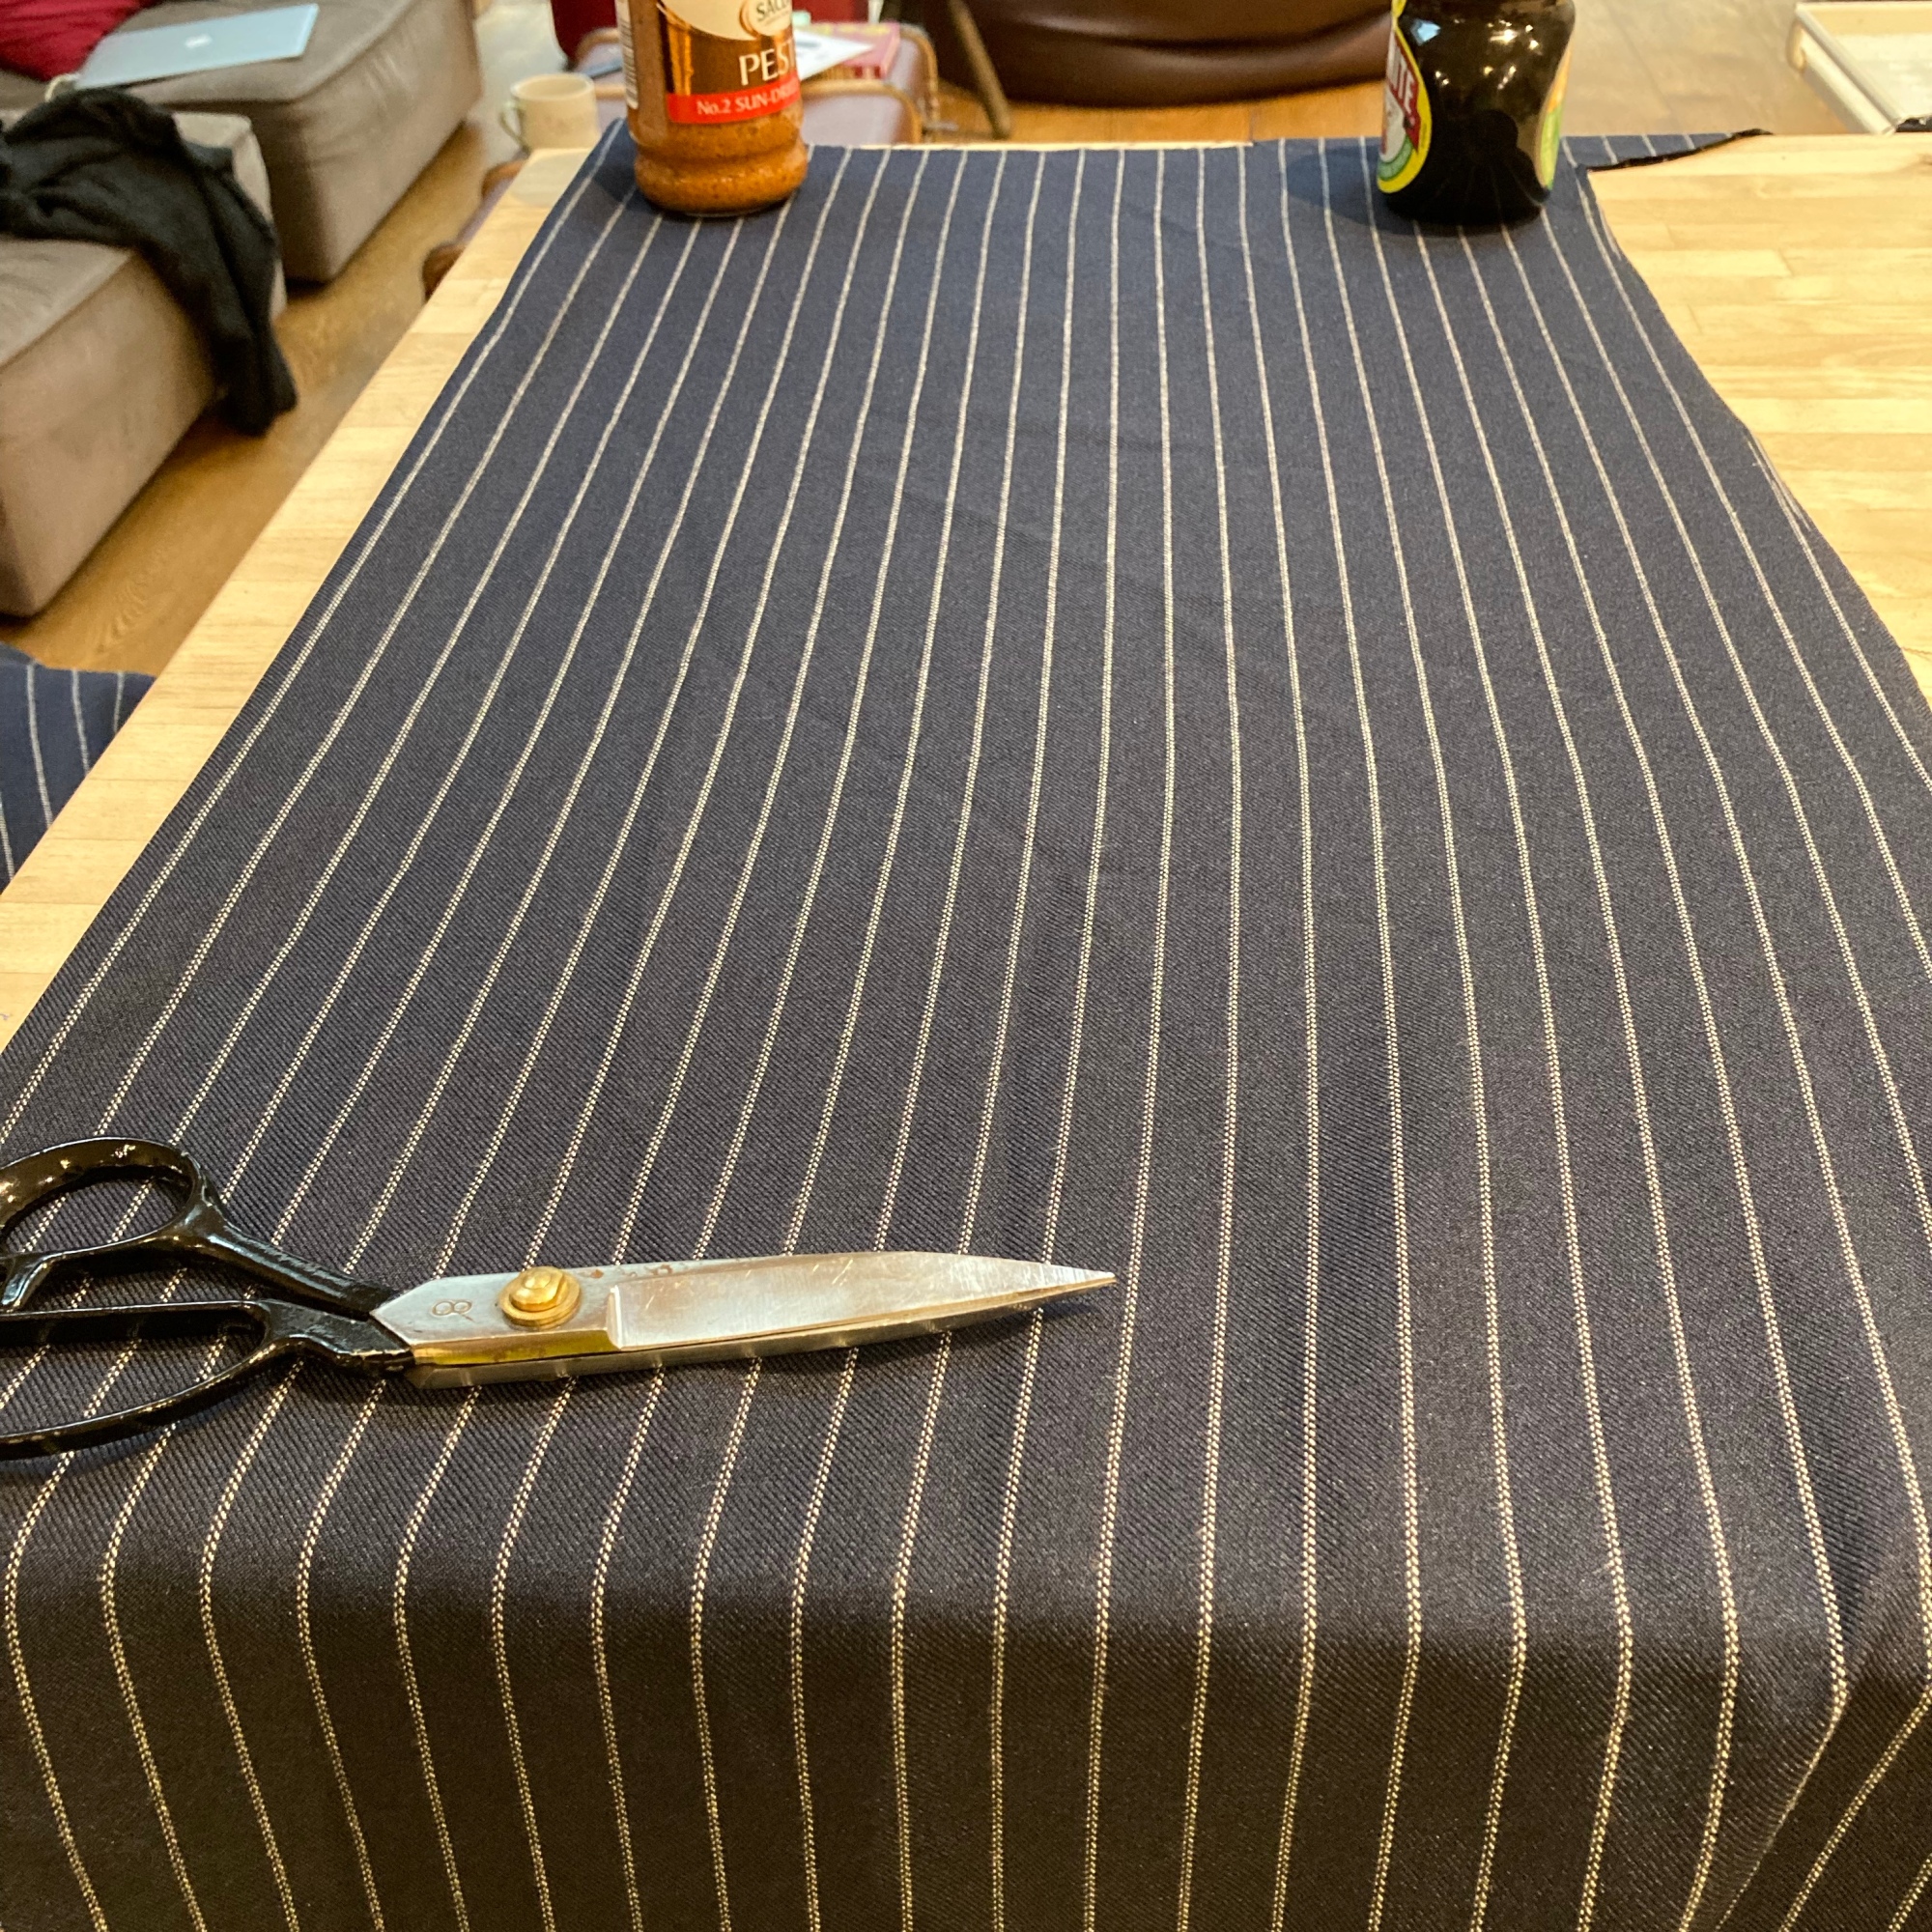
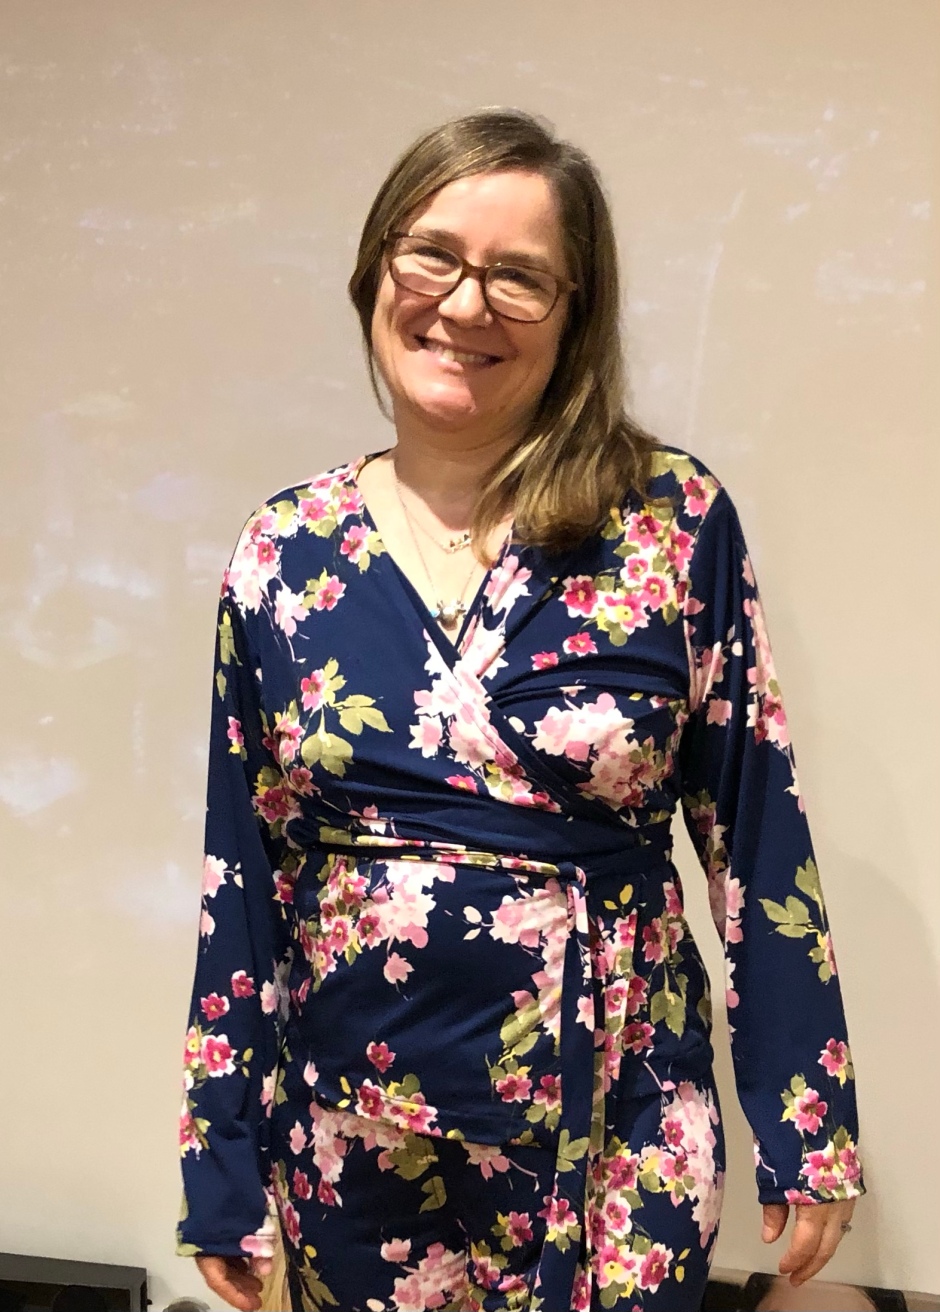
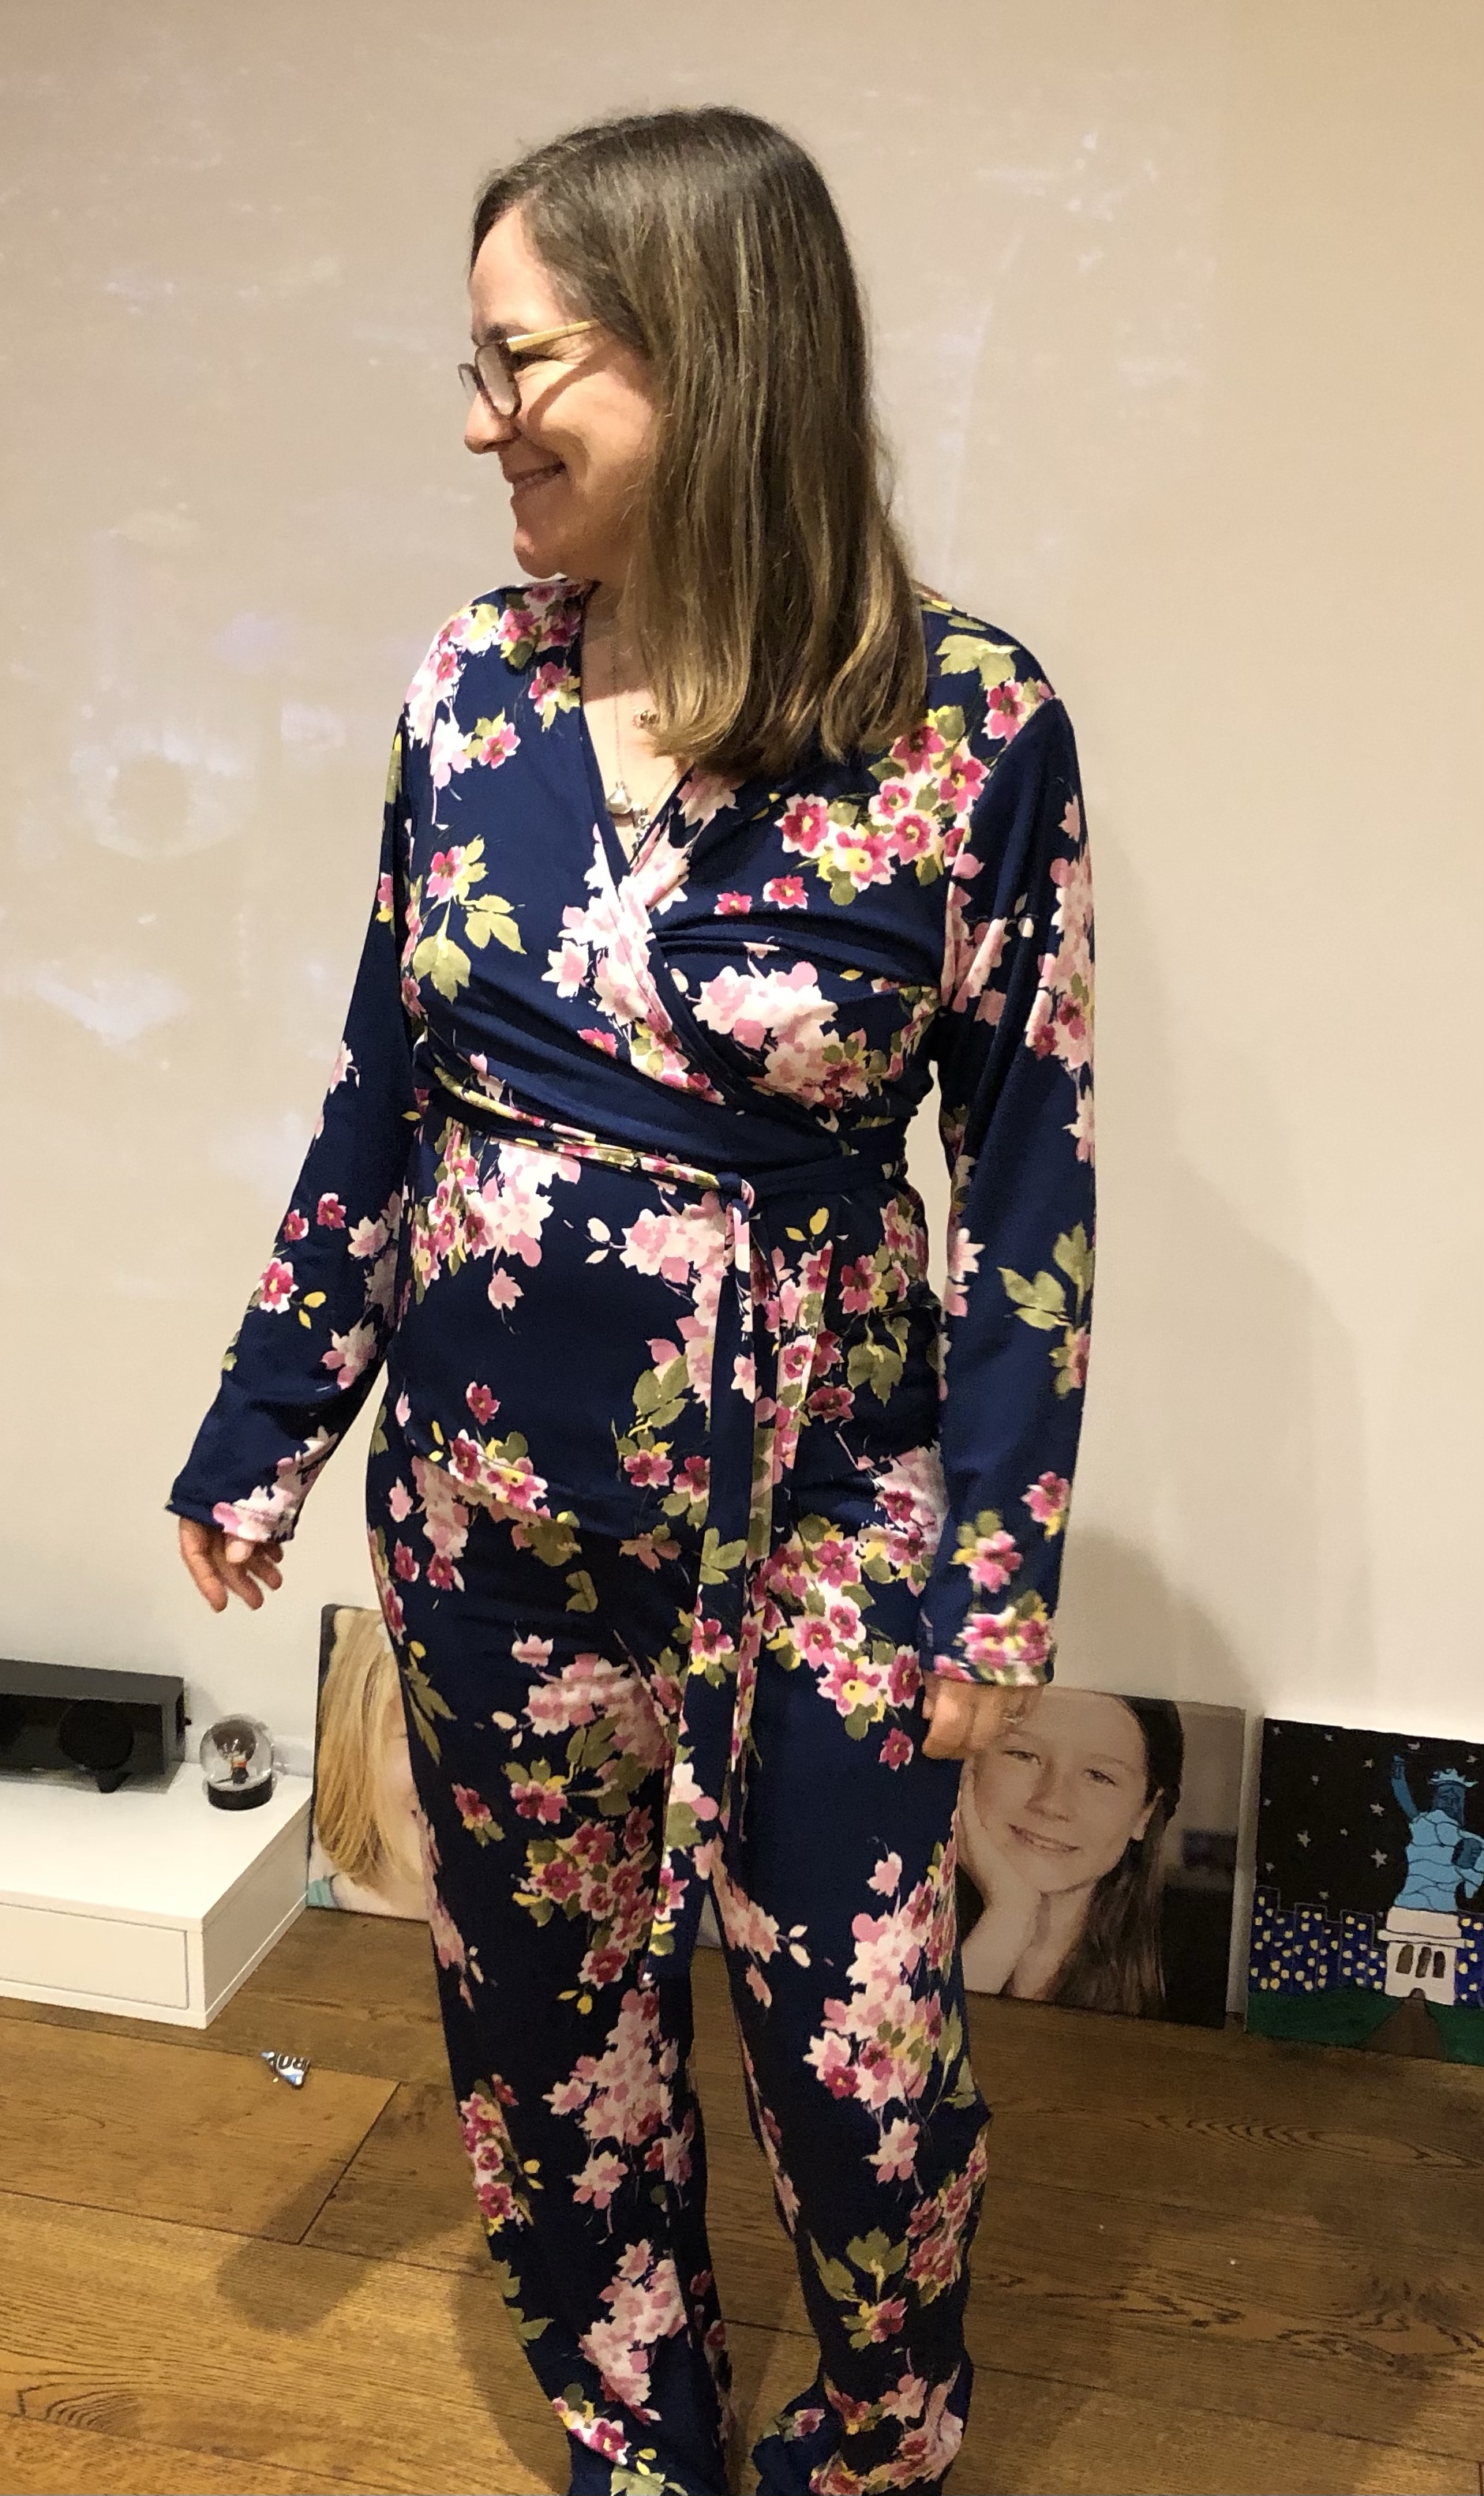
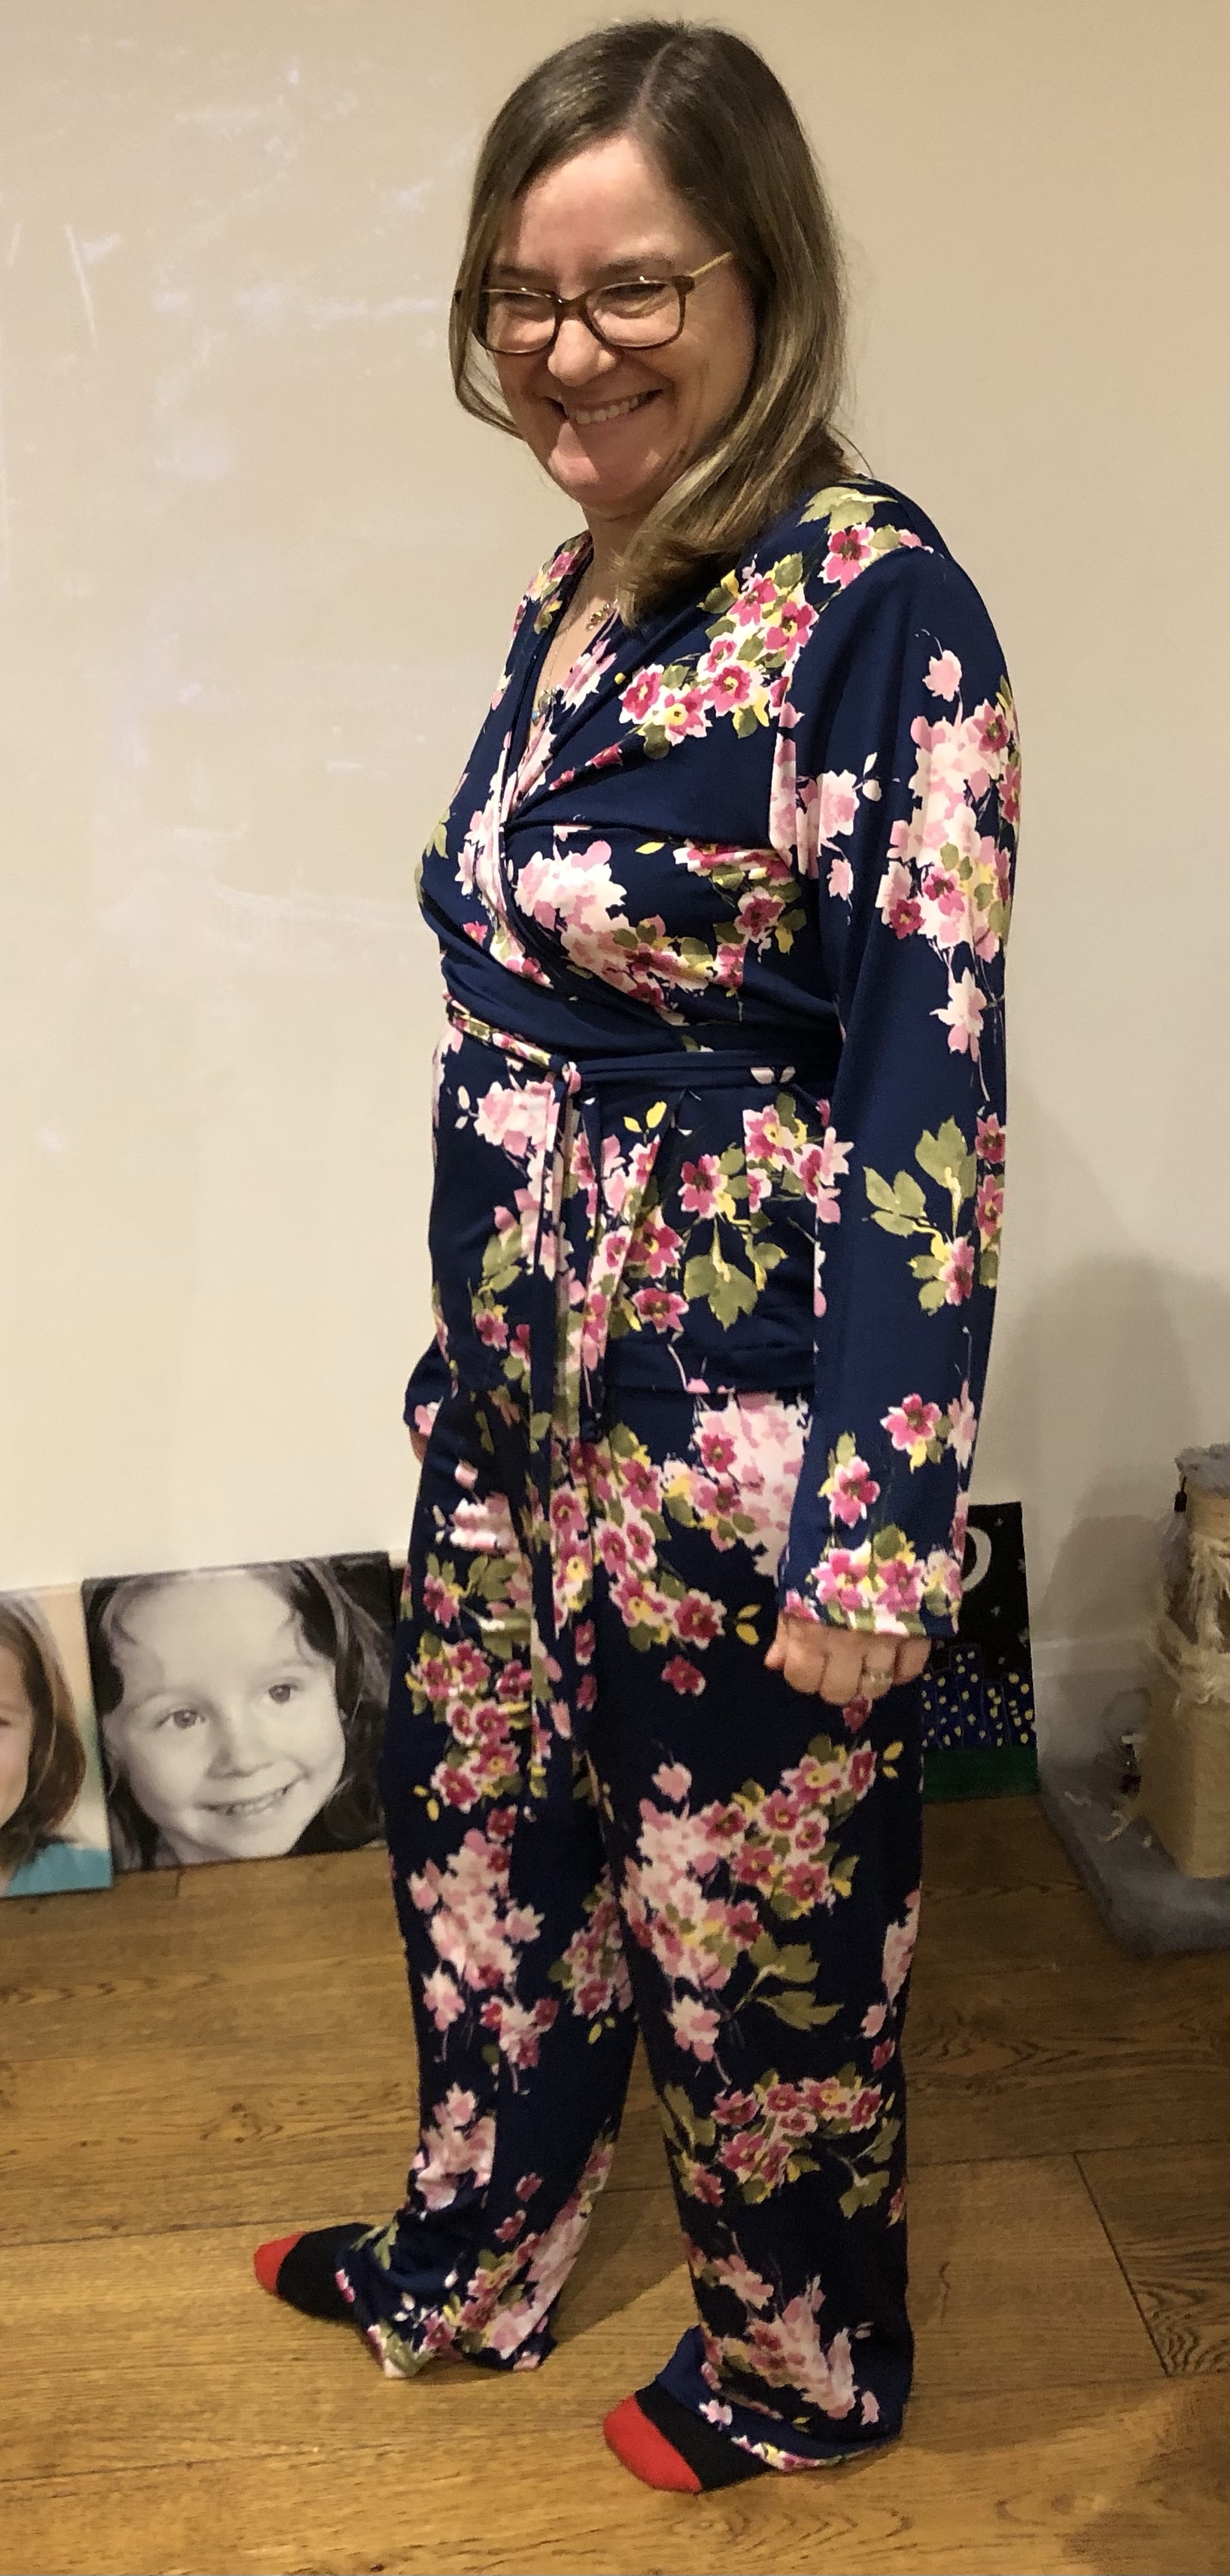
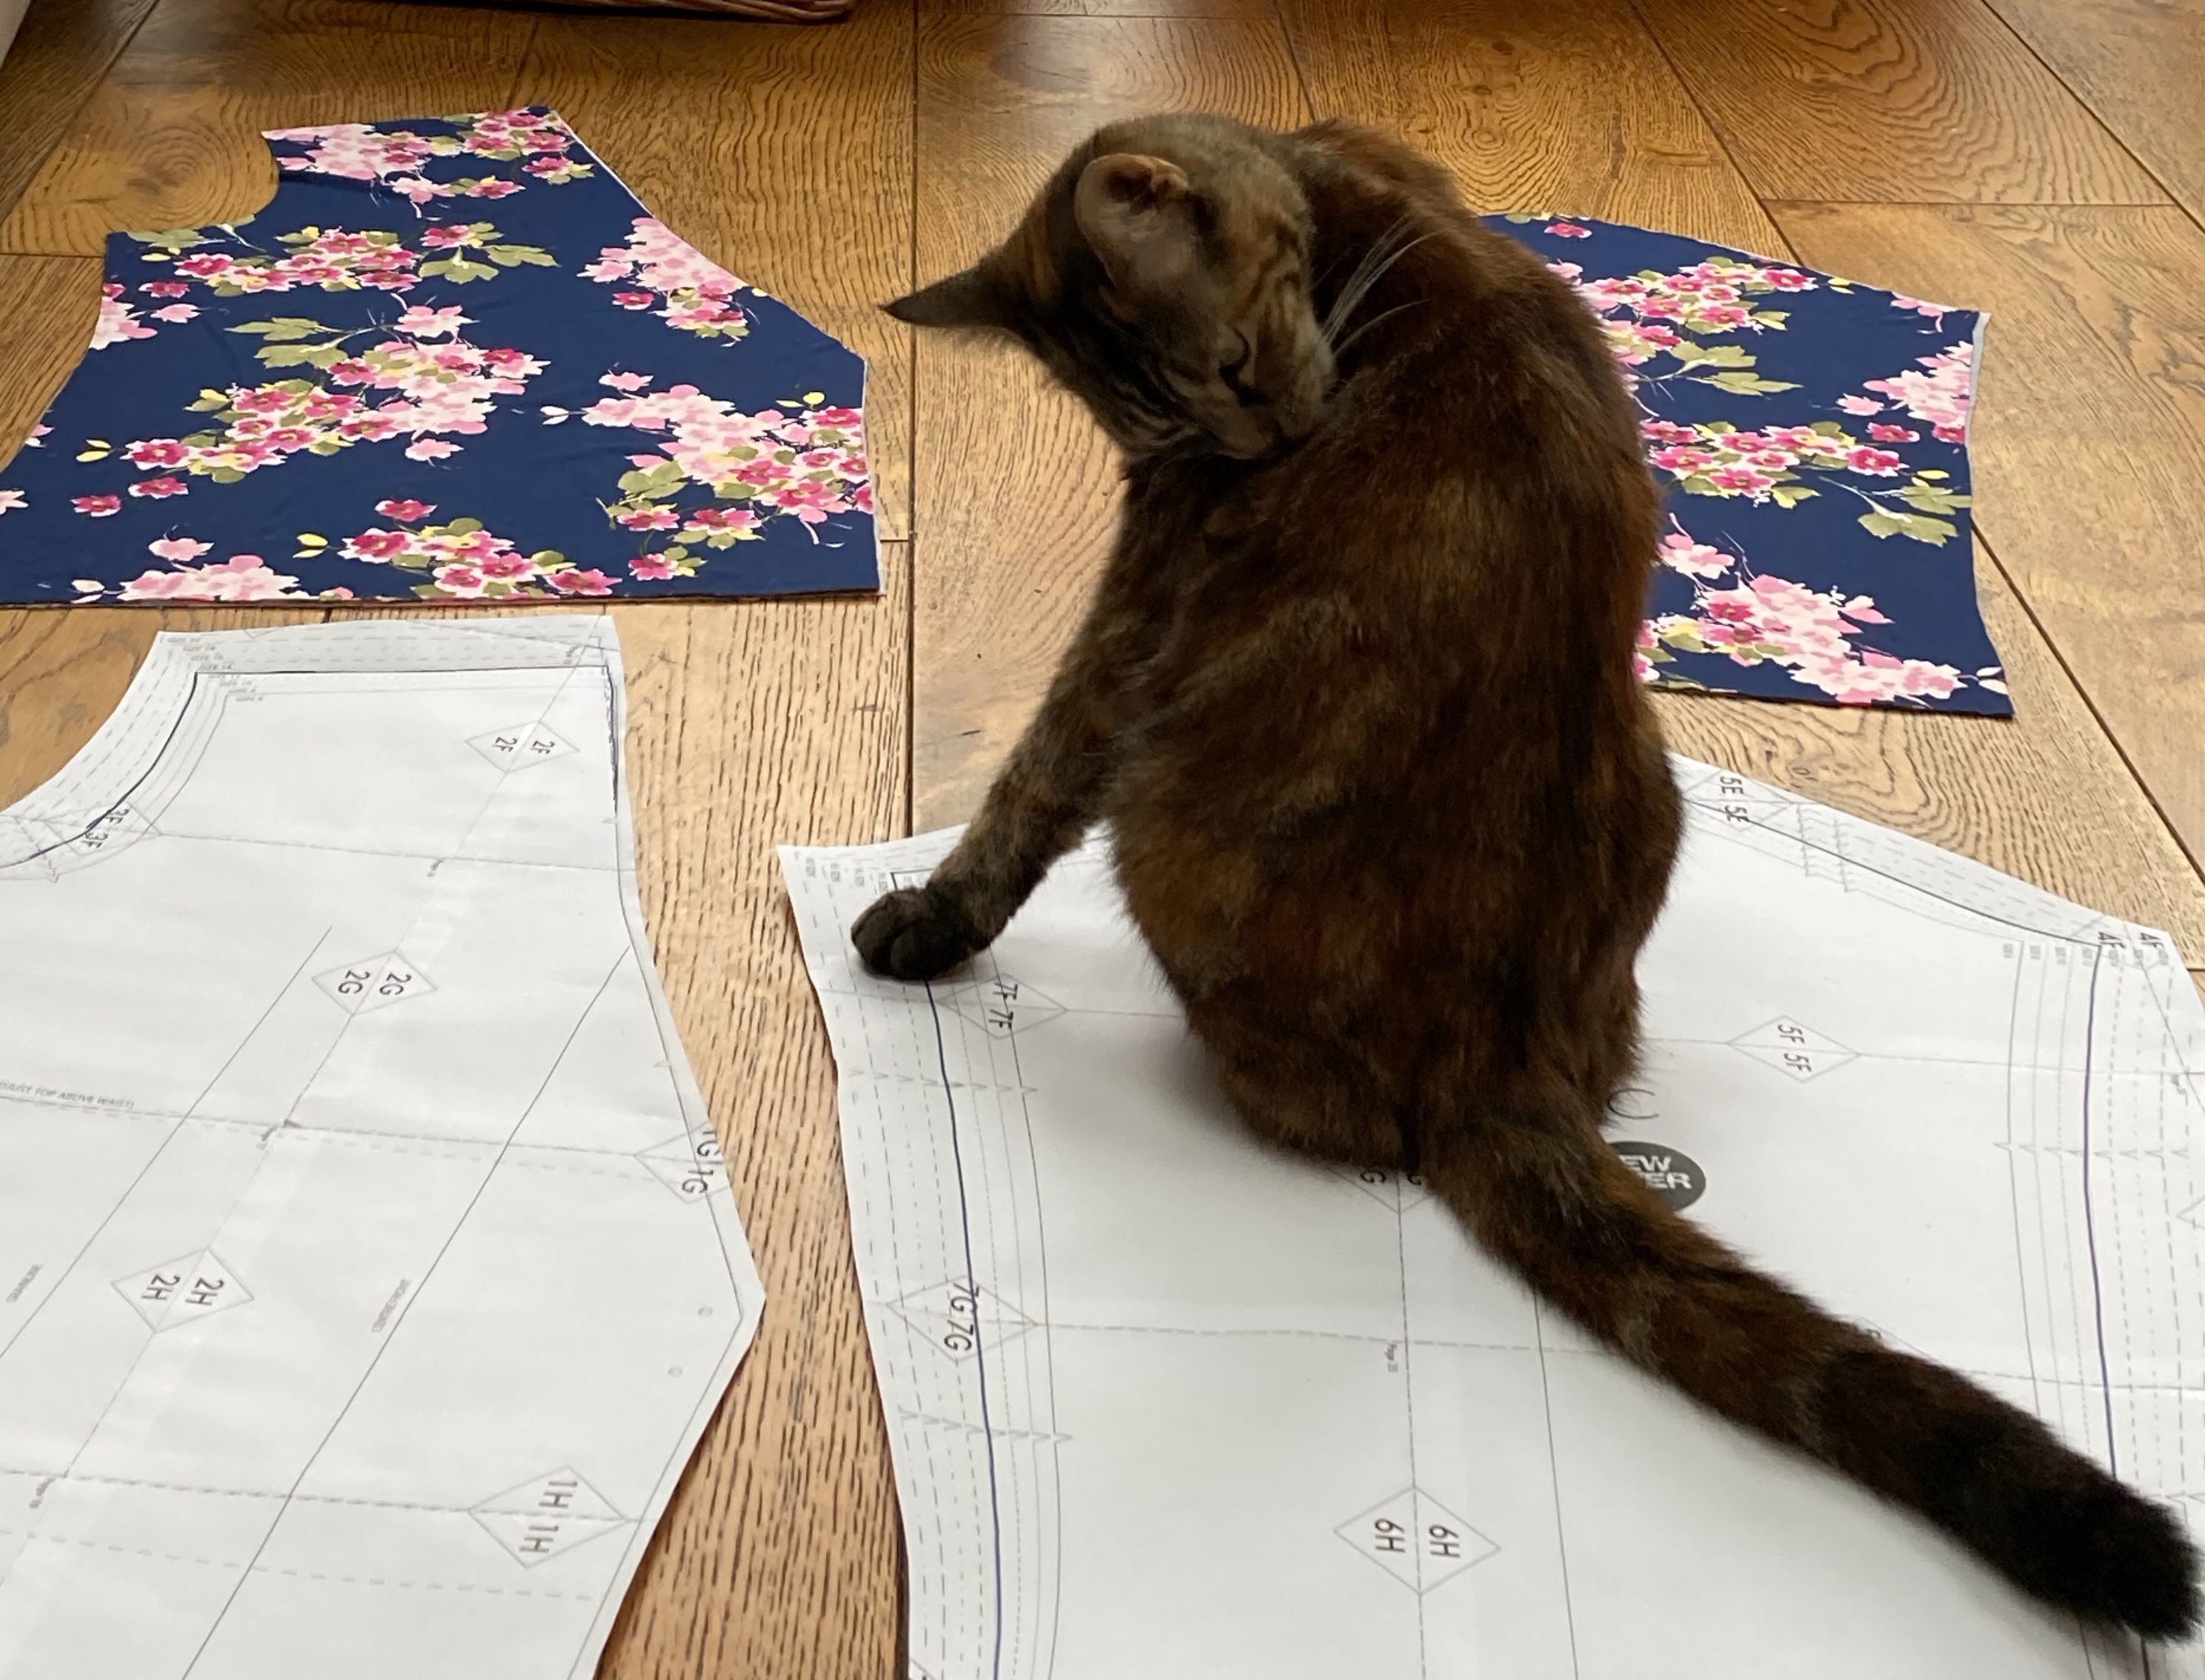
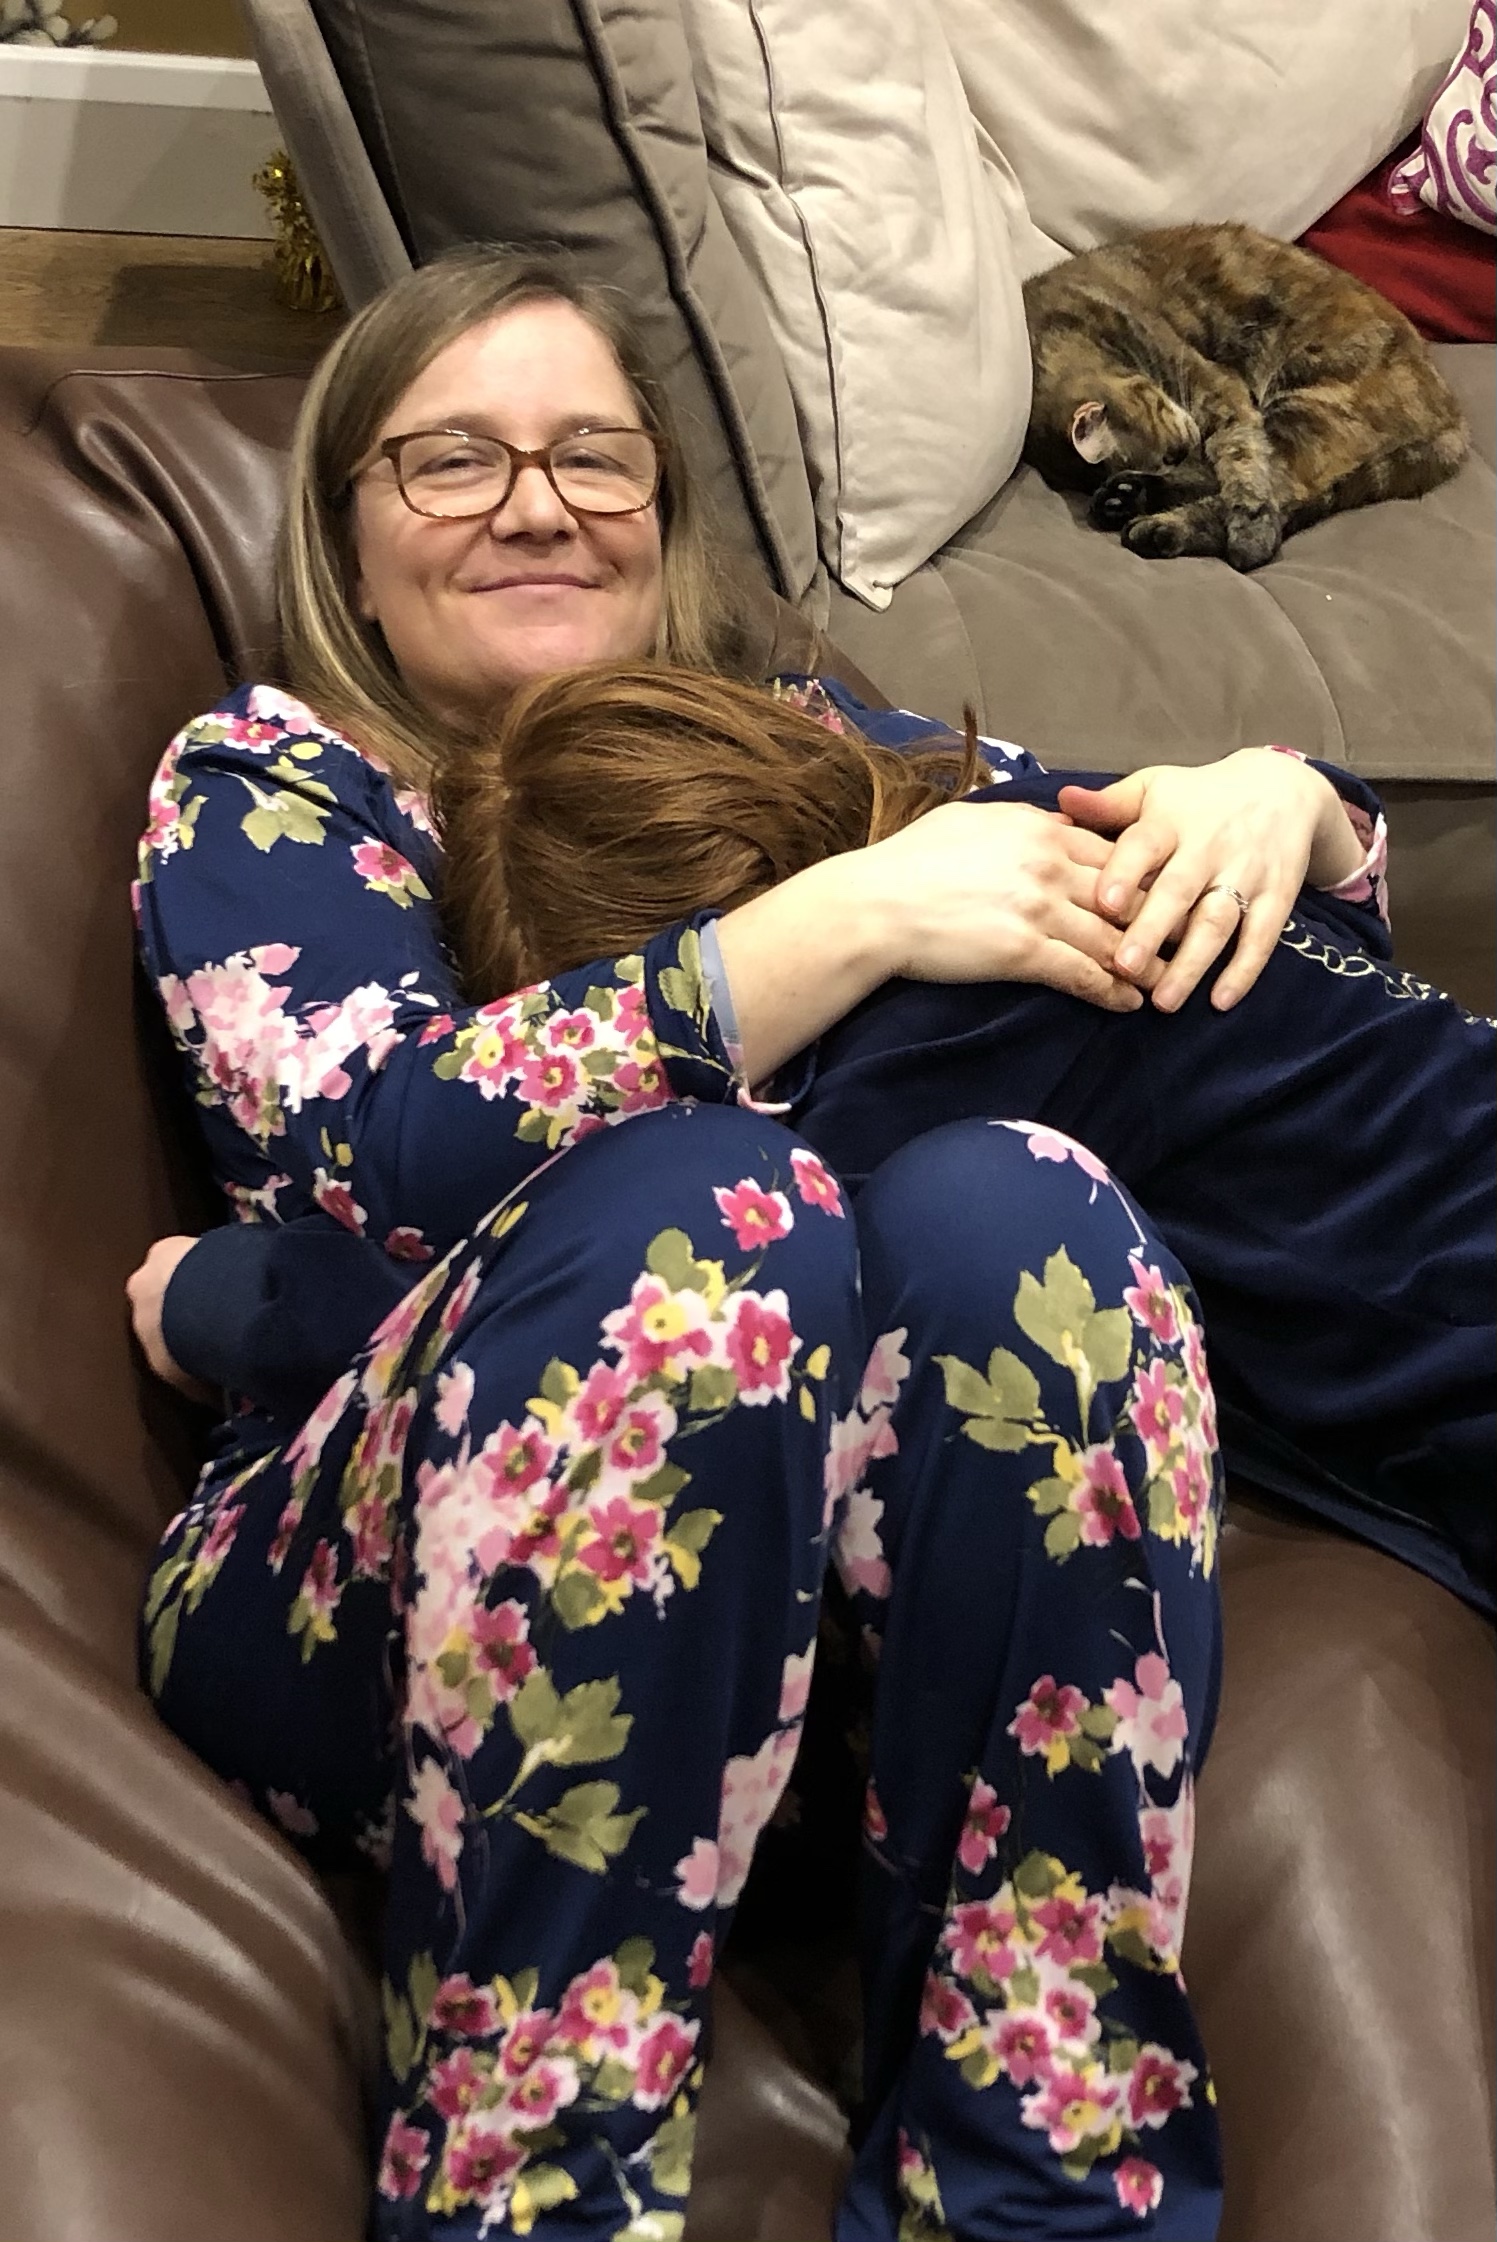
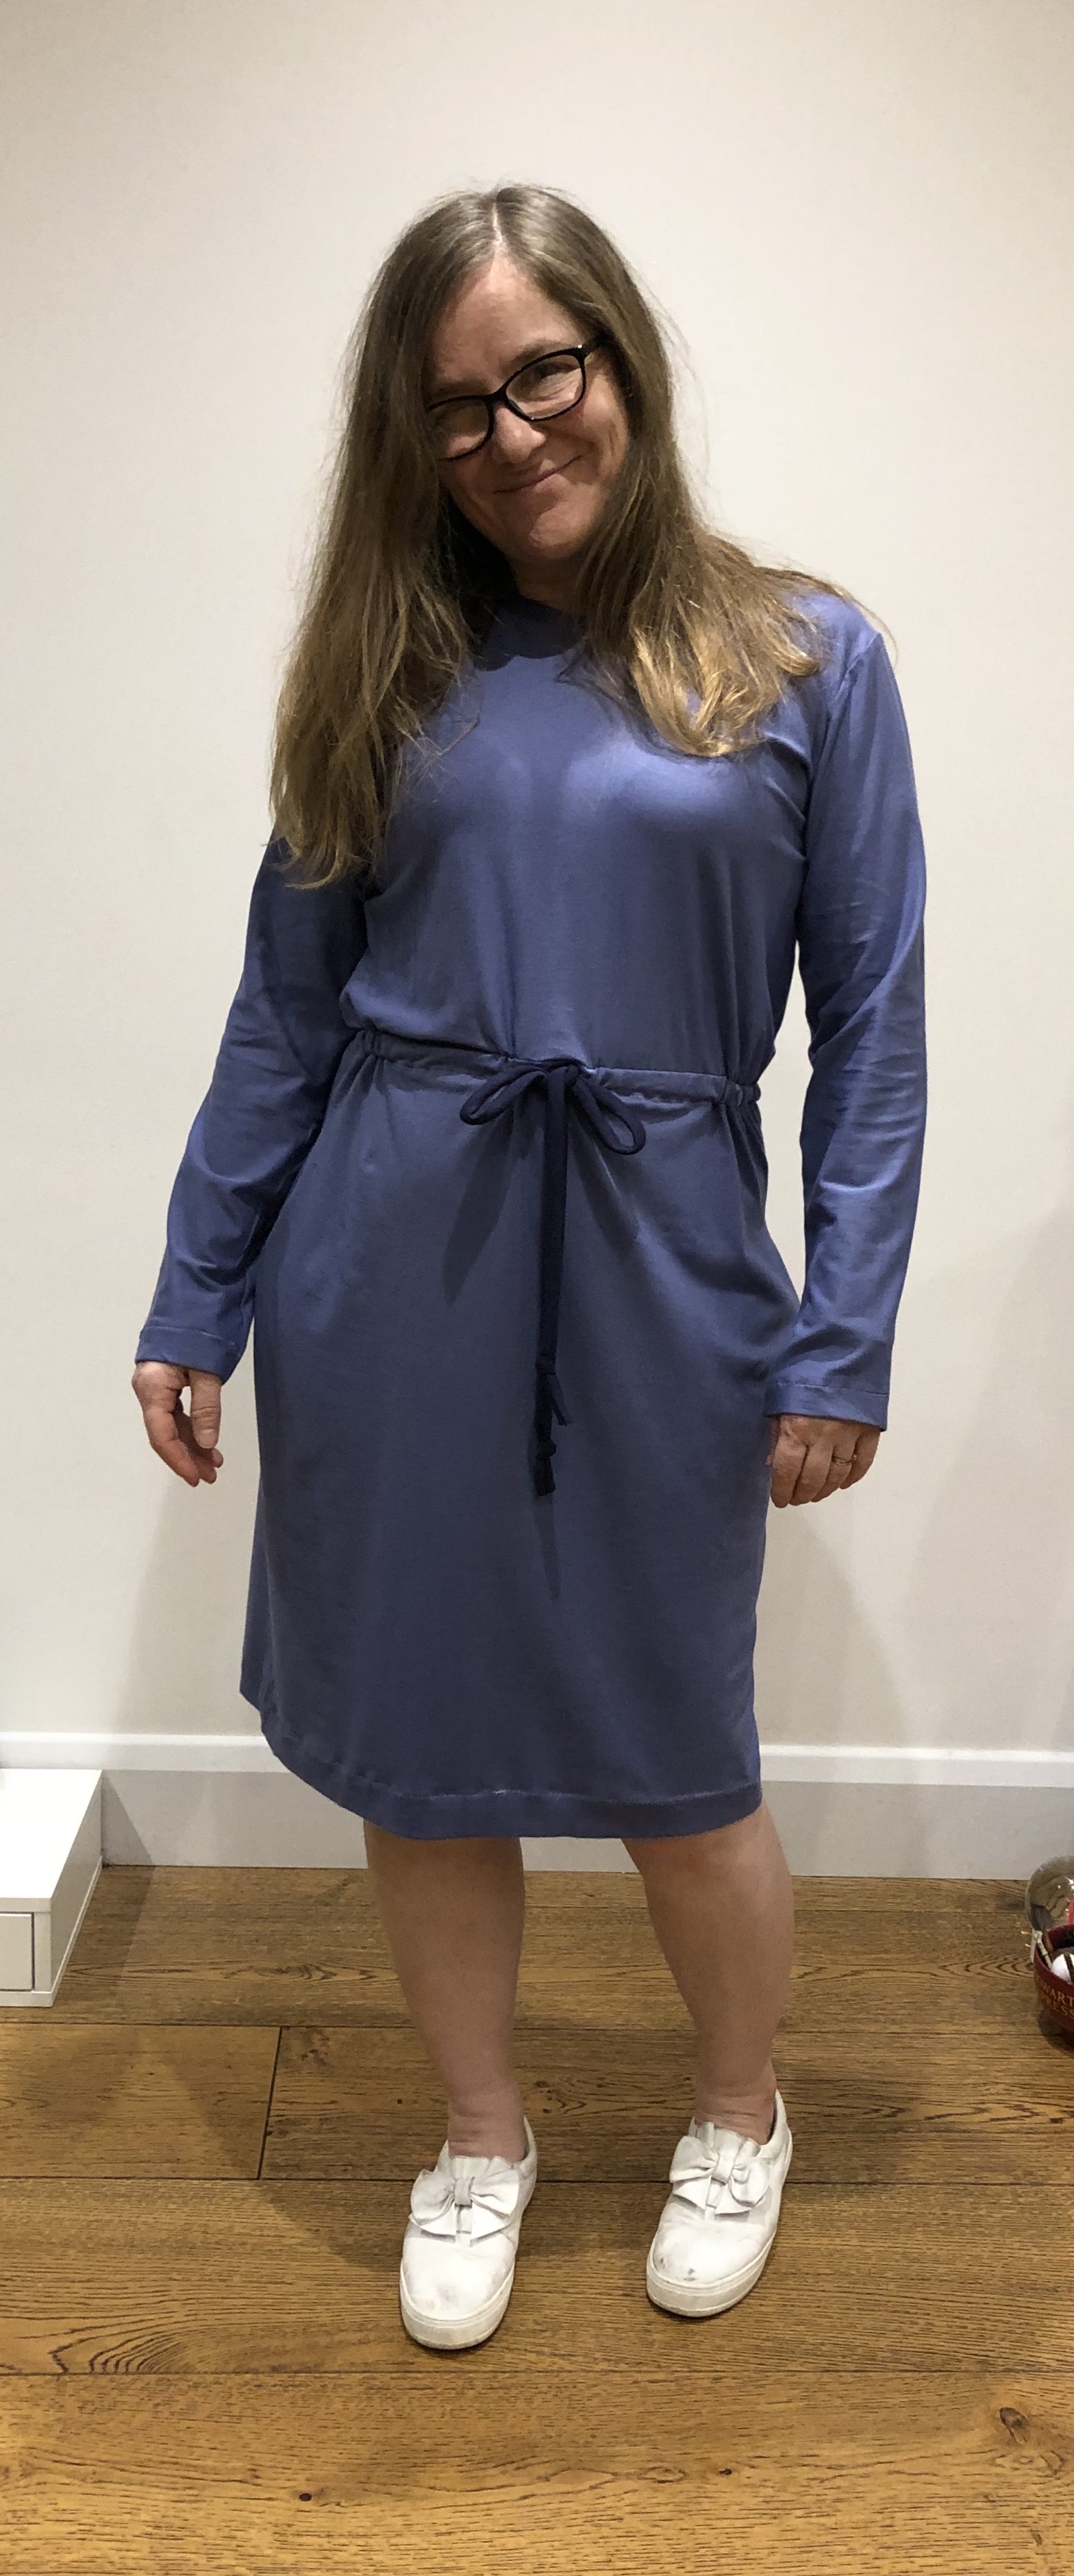
Focusing on planning for the new job rather than screaming at the universe, I decided to do some sewing. I ordered some navy pin stripe suiting from Fabricland, and sorted through my patterns. I chose the Esther trousers by Victory Patterns which I first made almost four years ago, and a new-to-me Jackie O jacket by Simple Sew. I also found some petrol-green-blue bamboo jersey originally from RayStitch in my stash, which I felt needed to be a new Somerset top by Maven Patterns.

The universe being right on track with pissing me off, the moment I started stitching the bamboo jersey my sewing machine flipped out. It decided that stitching a zig zag was not something that needed to happen consistently – one stitch in four was plenty. In fact stitching at all wasn’t something it wanted to do.

Fortunately, it isn’t just Covid that we share in this family, but also a love of sewing. Daughter 1 is at university studying costume design. Daughter 2 is obsessed with embroidery, but chose a sewing machine as her 18th birthday present a few months ago so that she could start experimenting with freemotion machine embroidery. She is also a generous soul, and said that I could use her machine. [Thank you lovely Alice.]

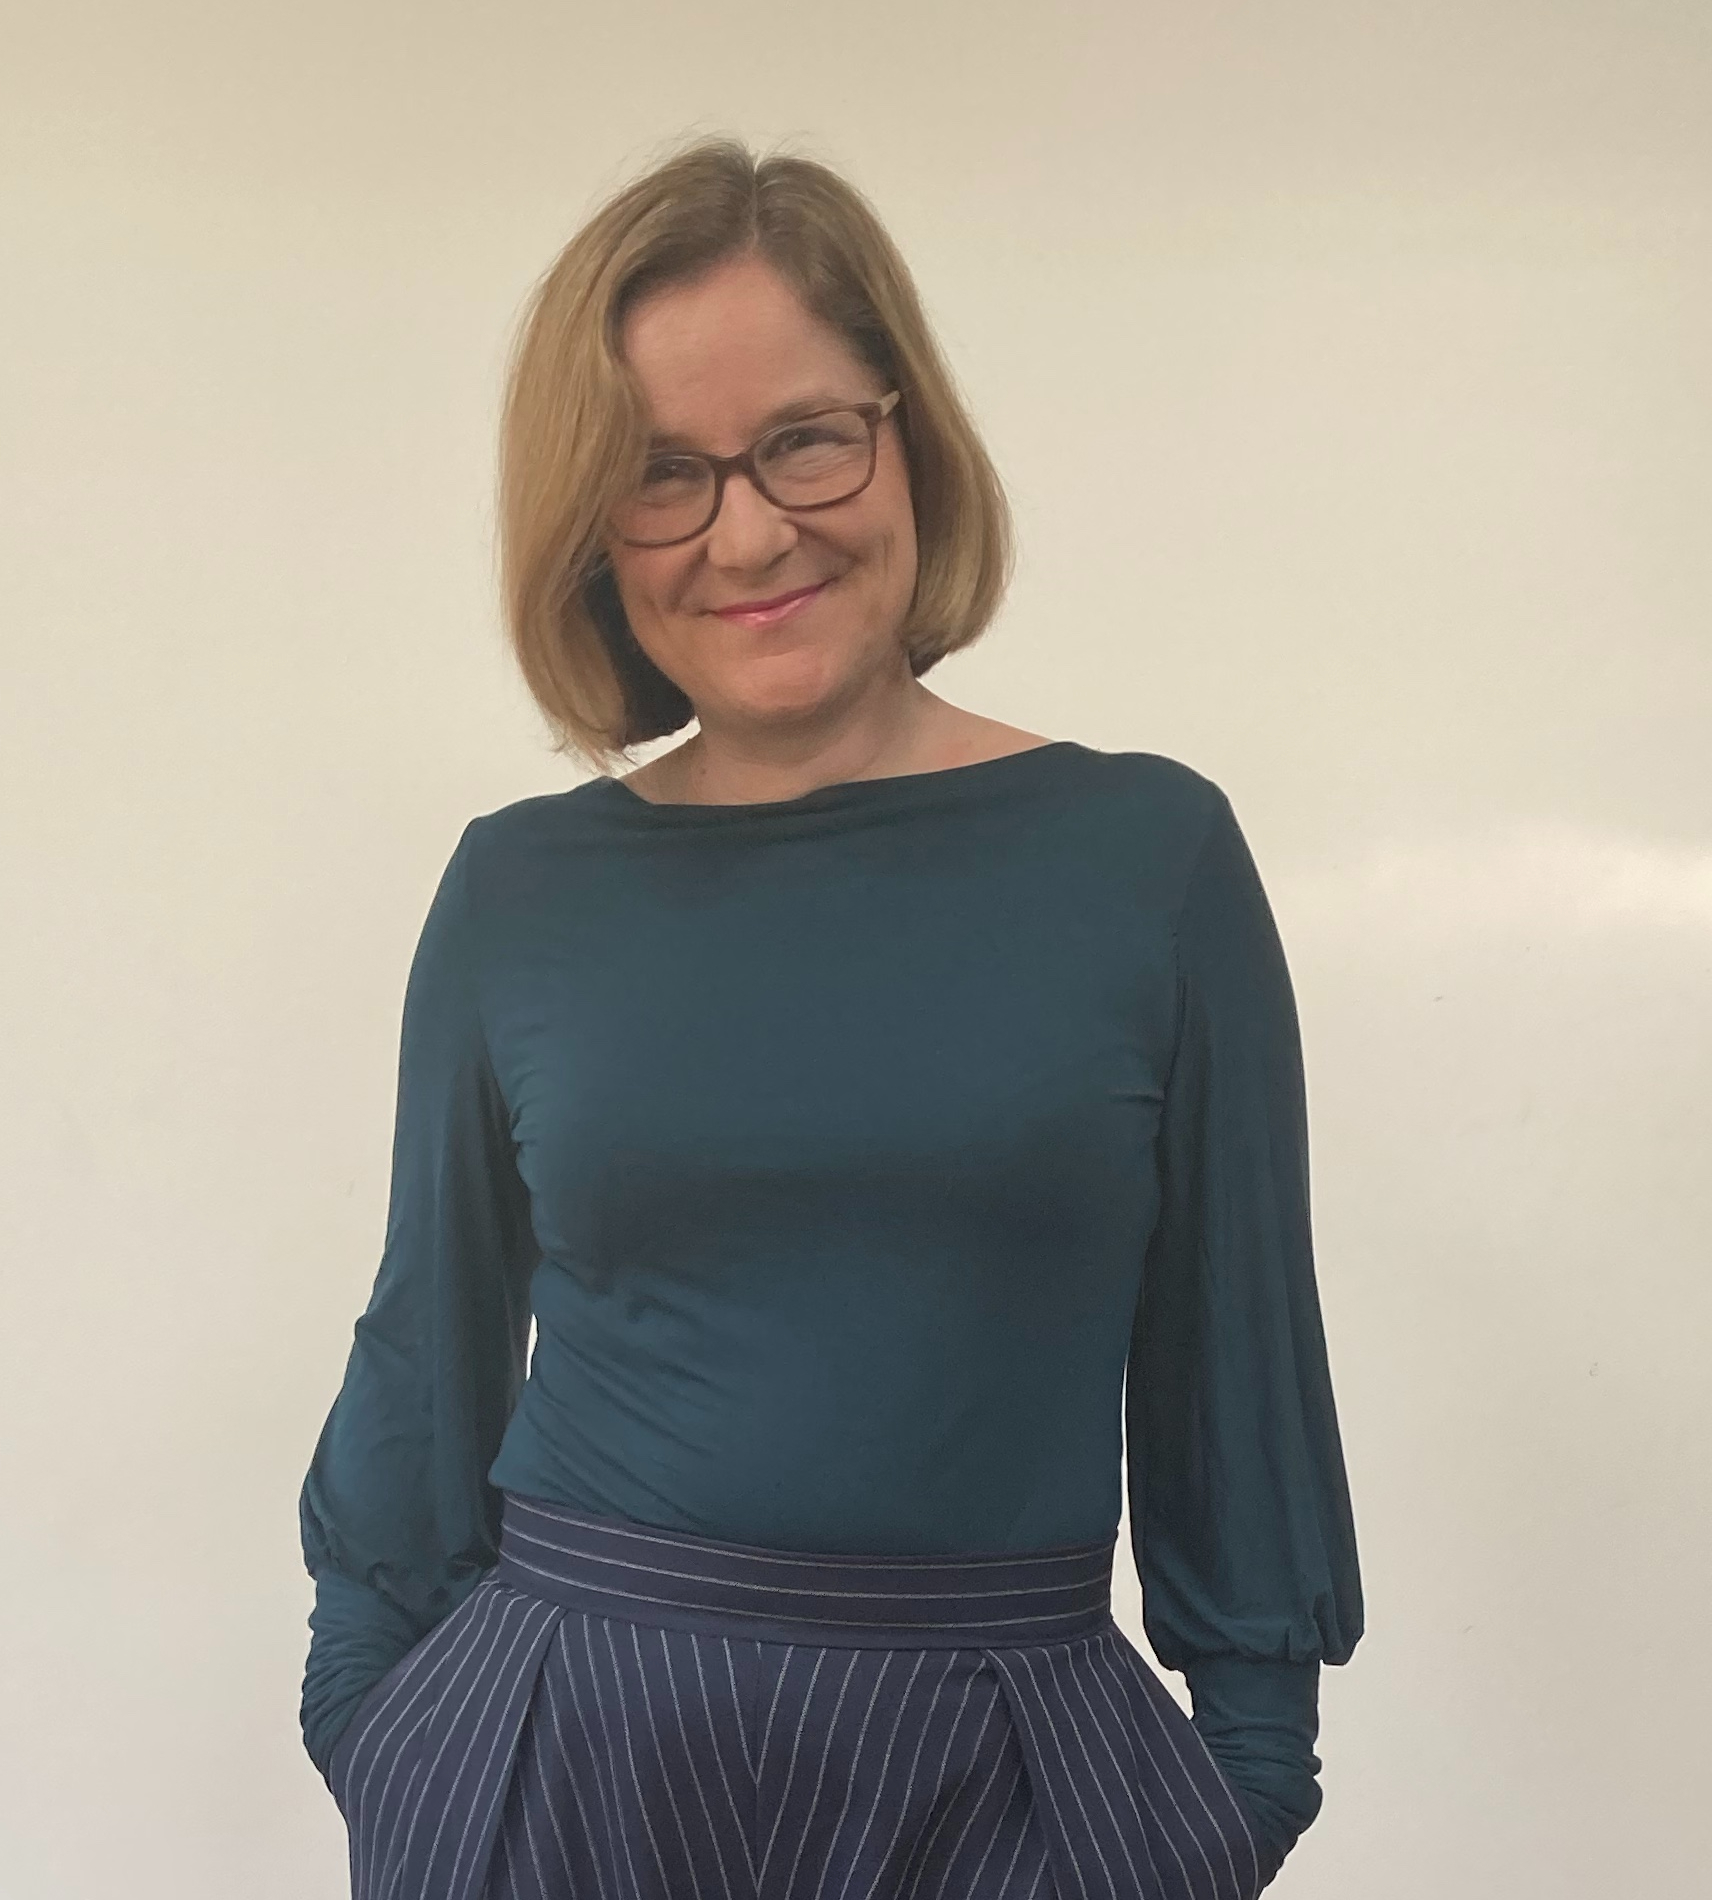
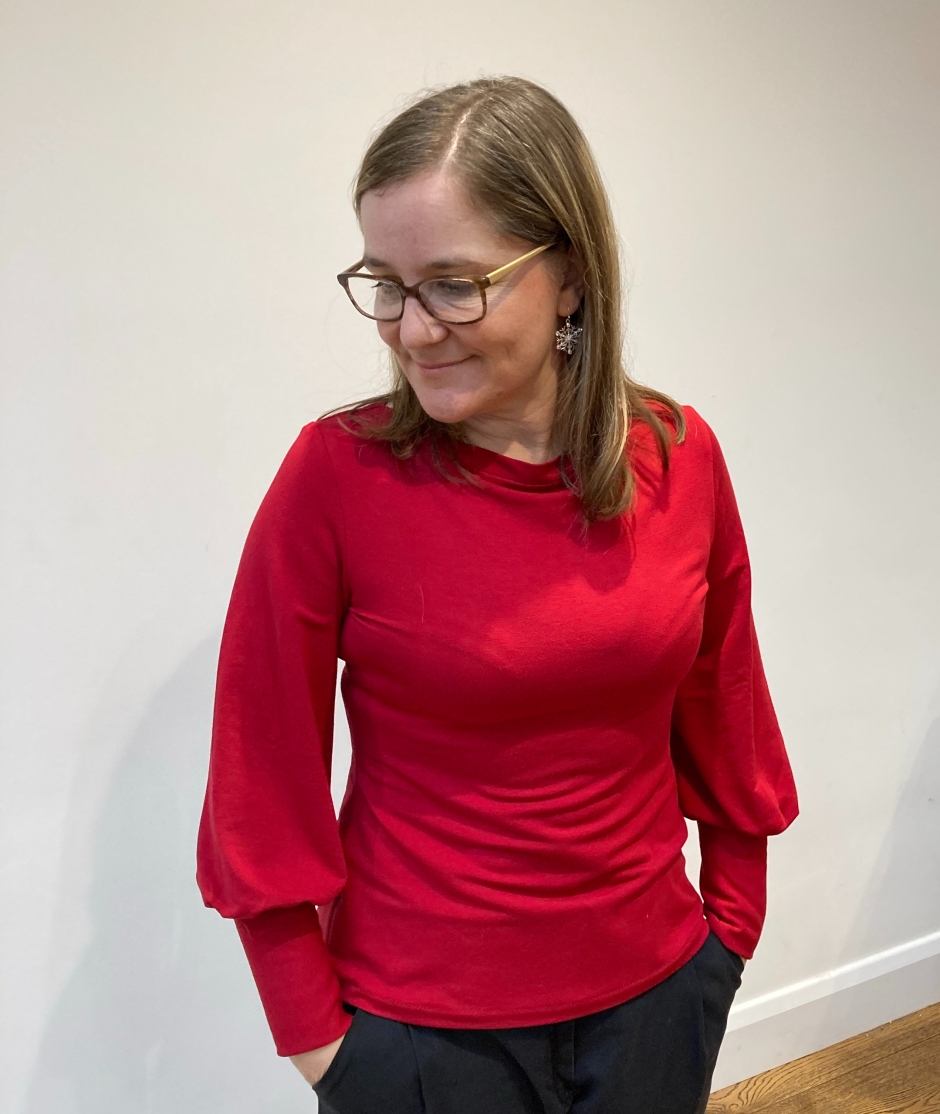
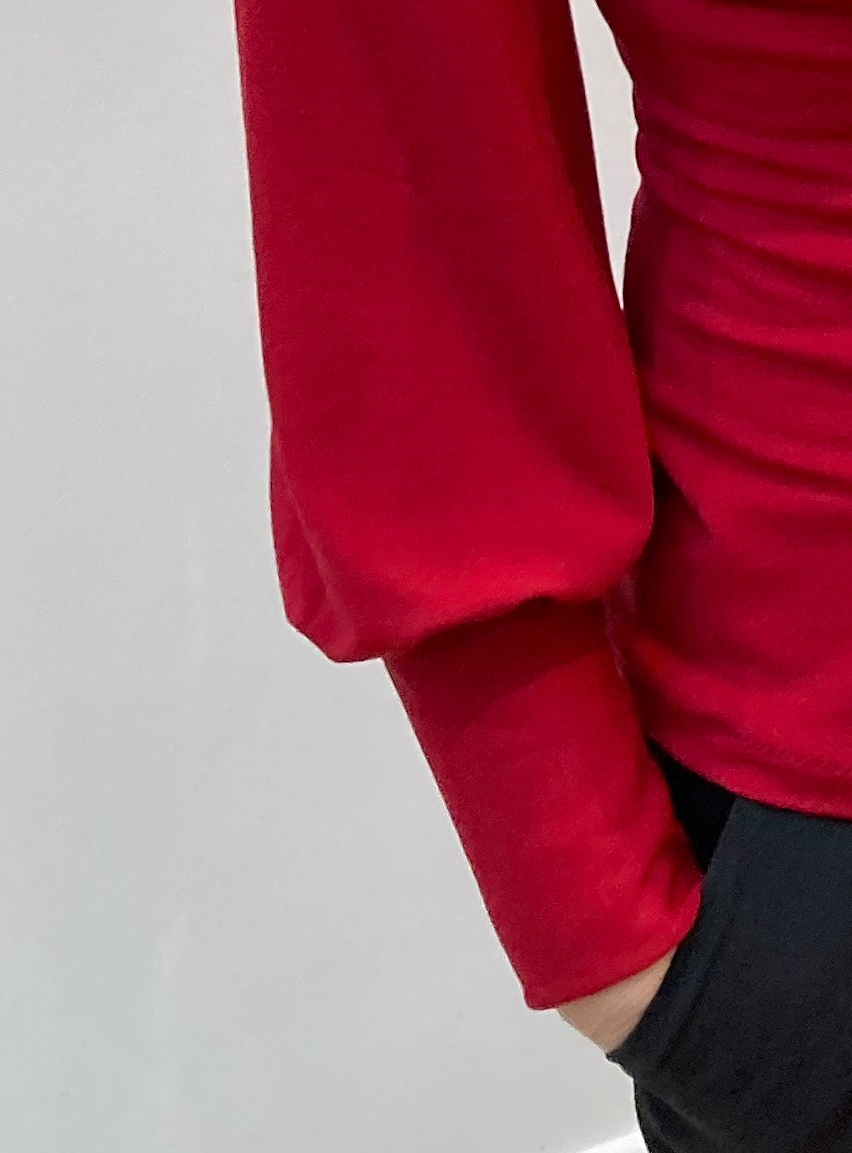
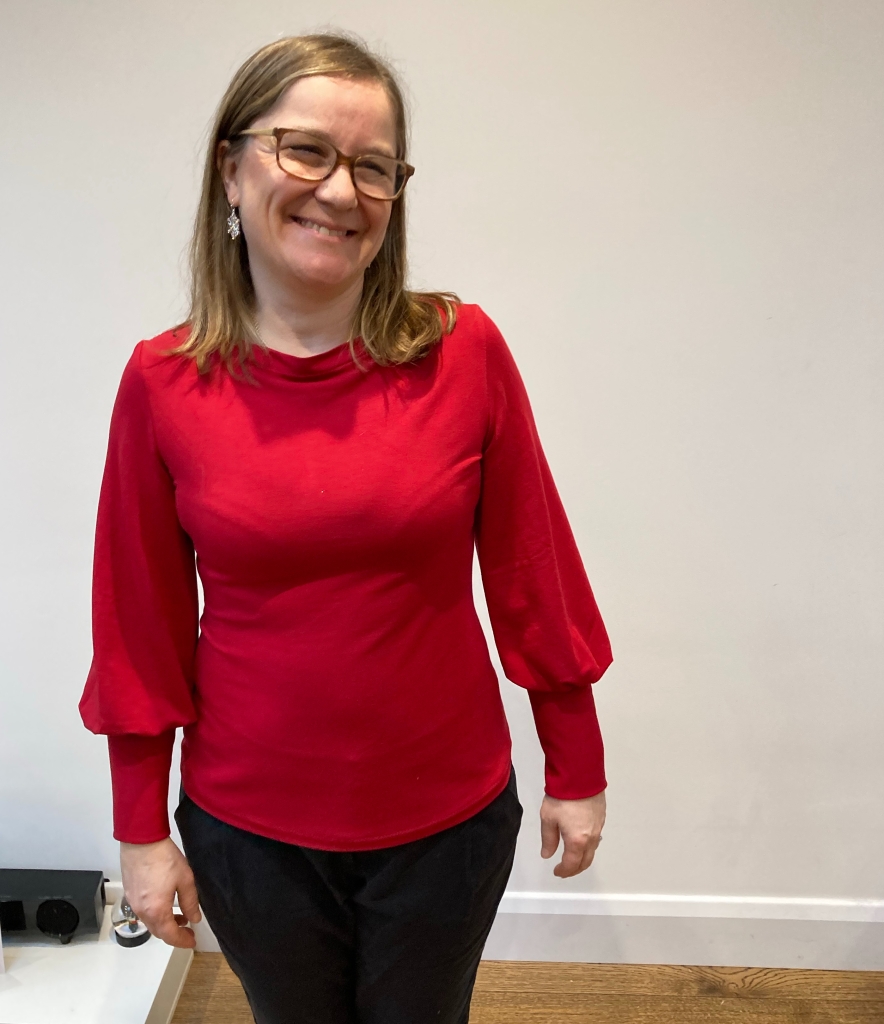
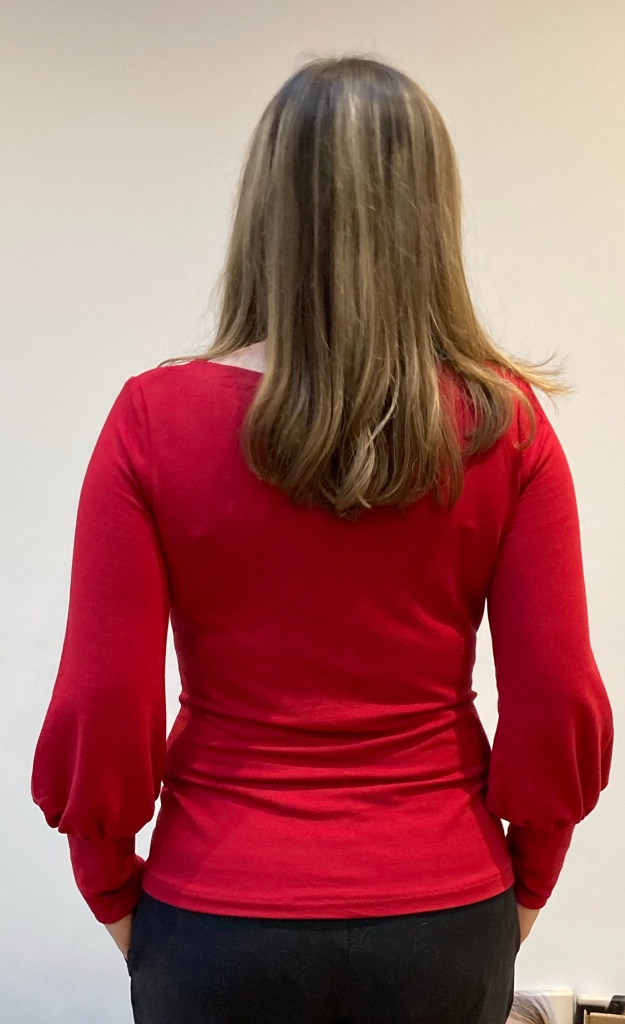
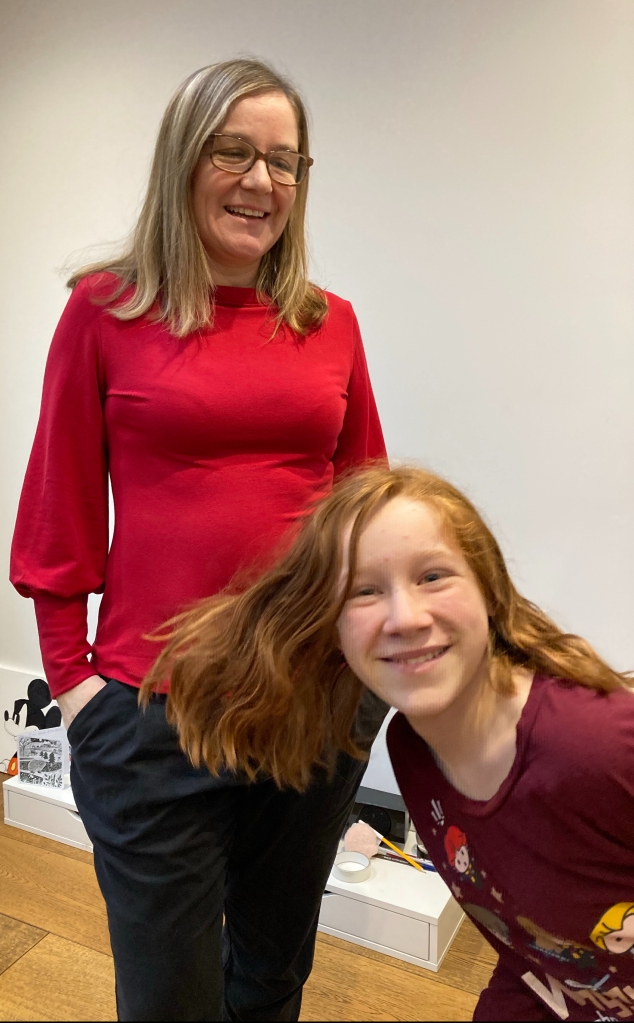
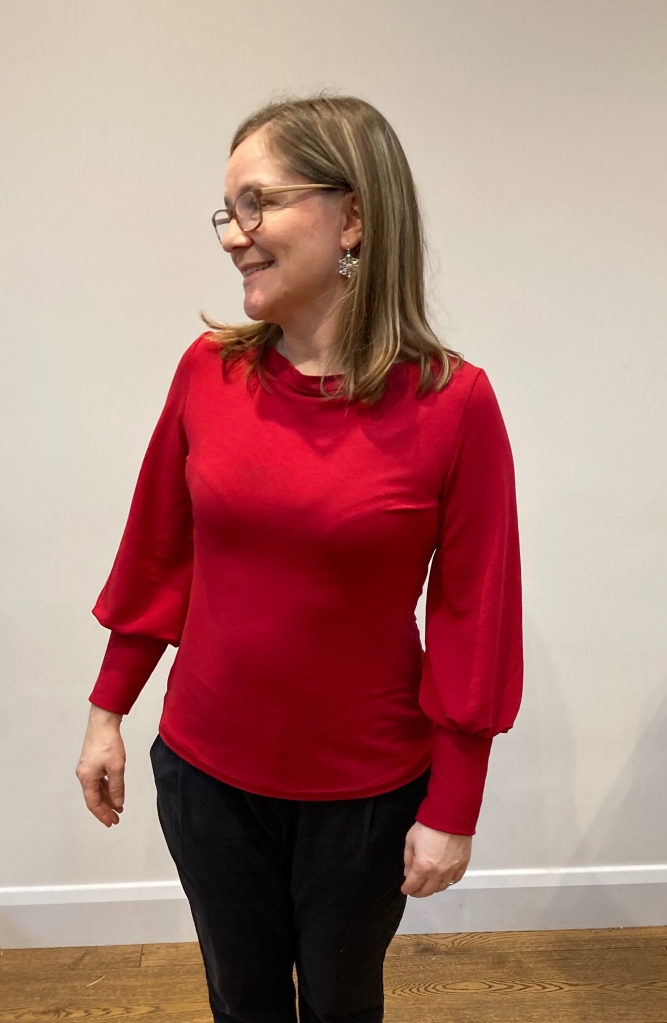
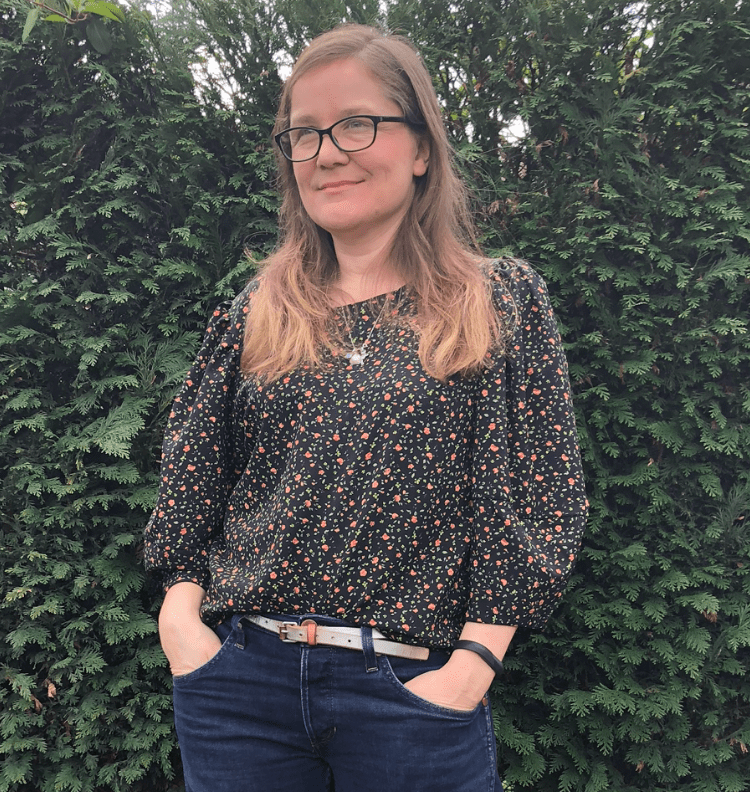
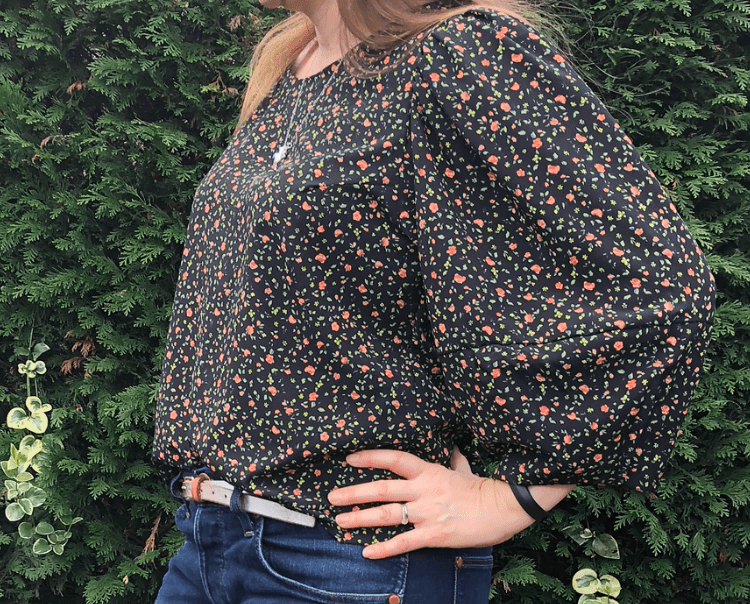
I started with the Somerset top. It’s a really nice, straightforward pattern that I’d made before. I knew the bamboo jersey would work well with the shape, as it has a lovely stretchy drape. To be fair to my needs-a-service sewing machine, even on my daughter’s brand new machine it wasn’t the easiest fabric to stitch. I was using a jersey needle obviously, but the fabric was almost ‘sticky’ – really didn’t like to move smoothly through the machine. Perhaps I need to invest in a walking foot? It came together easily, and the lovely bishop’s sleeves worked really well in this gorgeous bamboo – it feels lovely to wear.

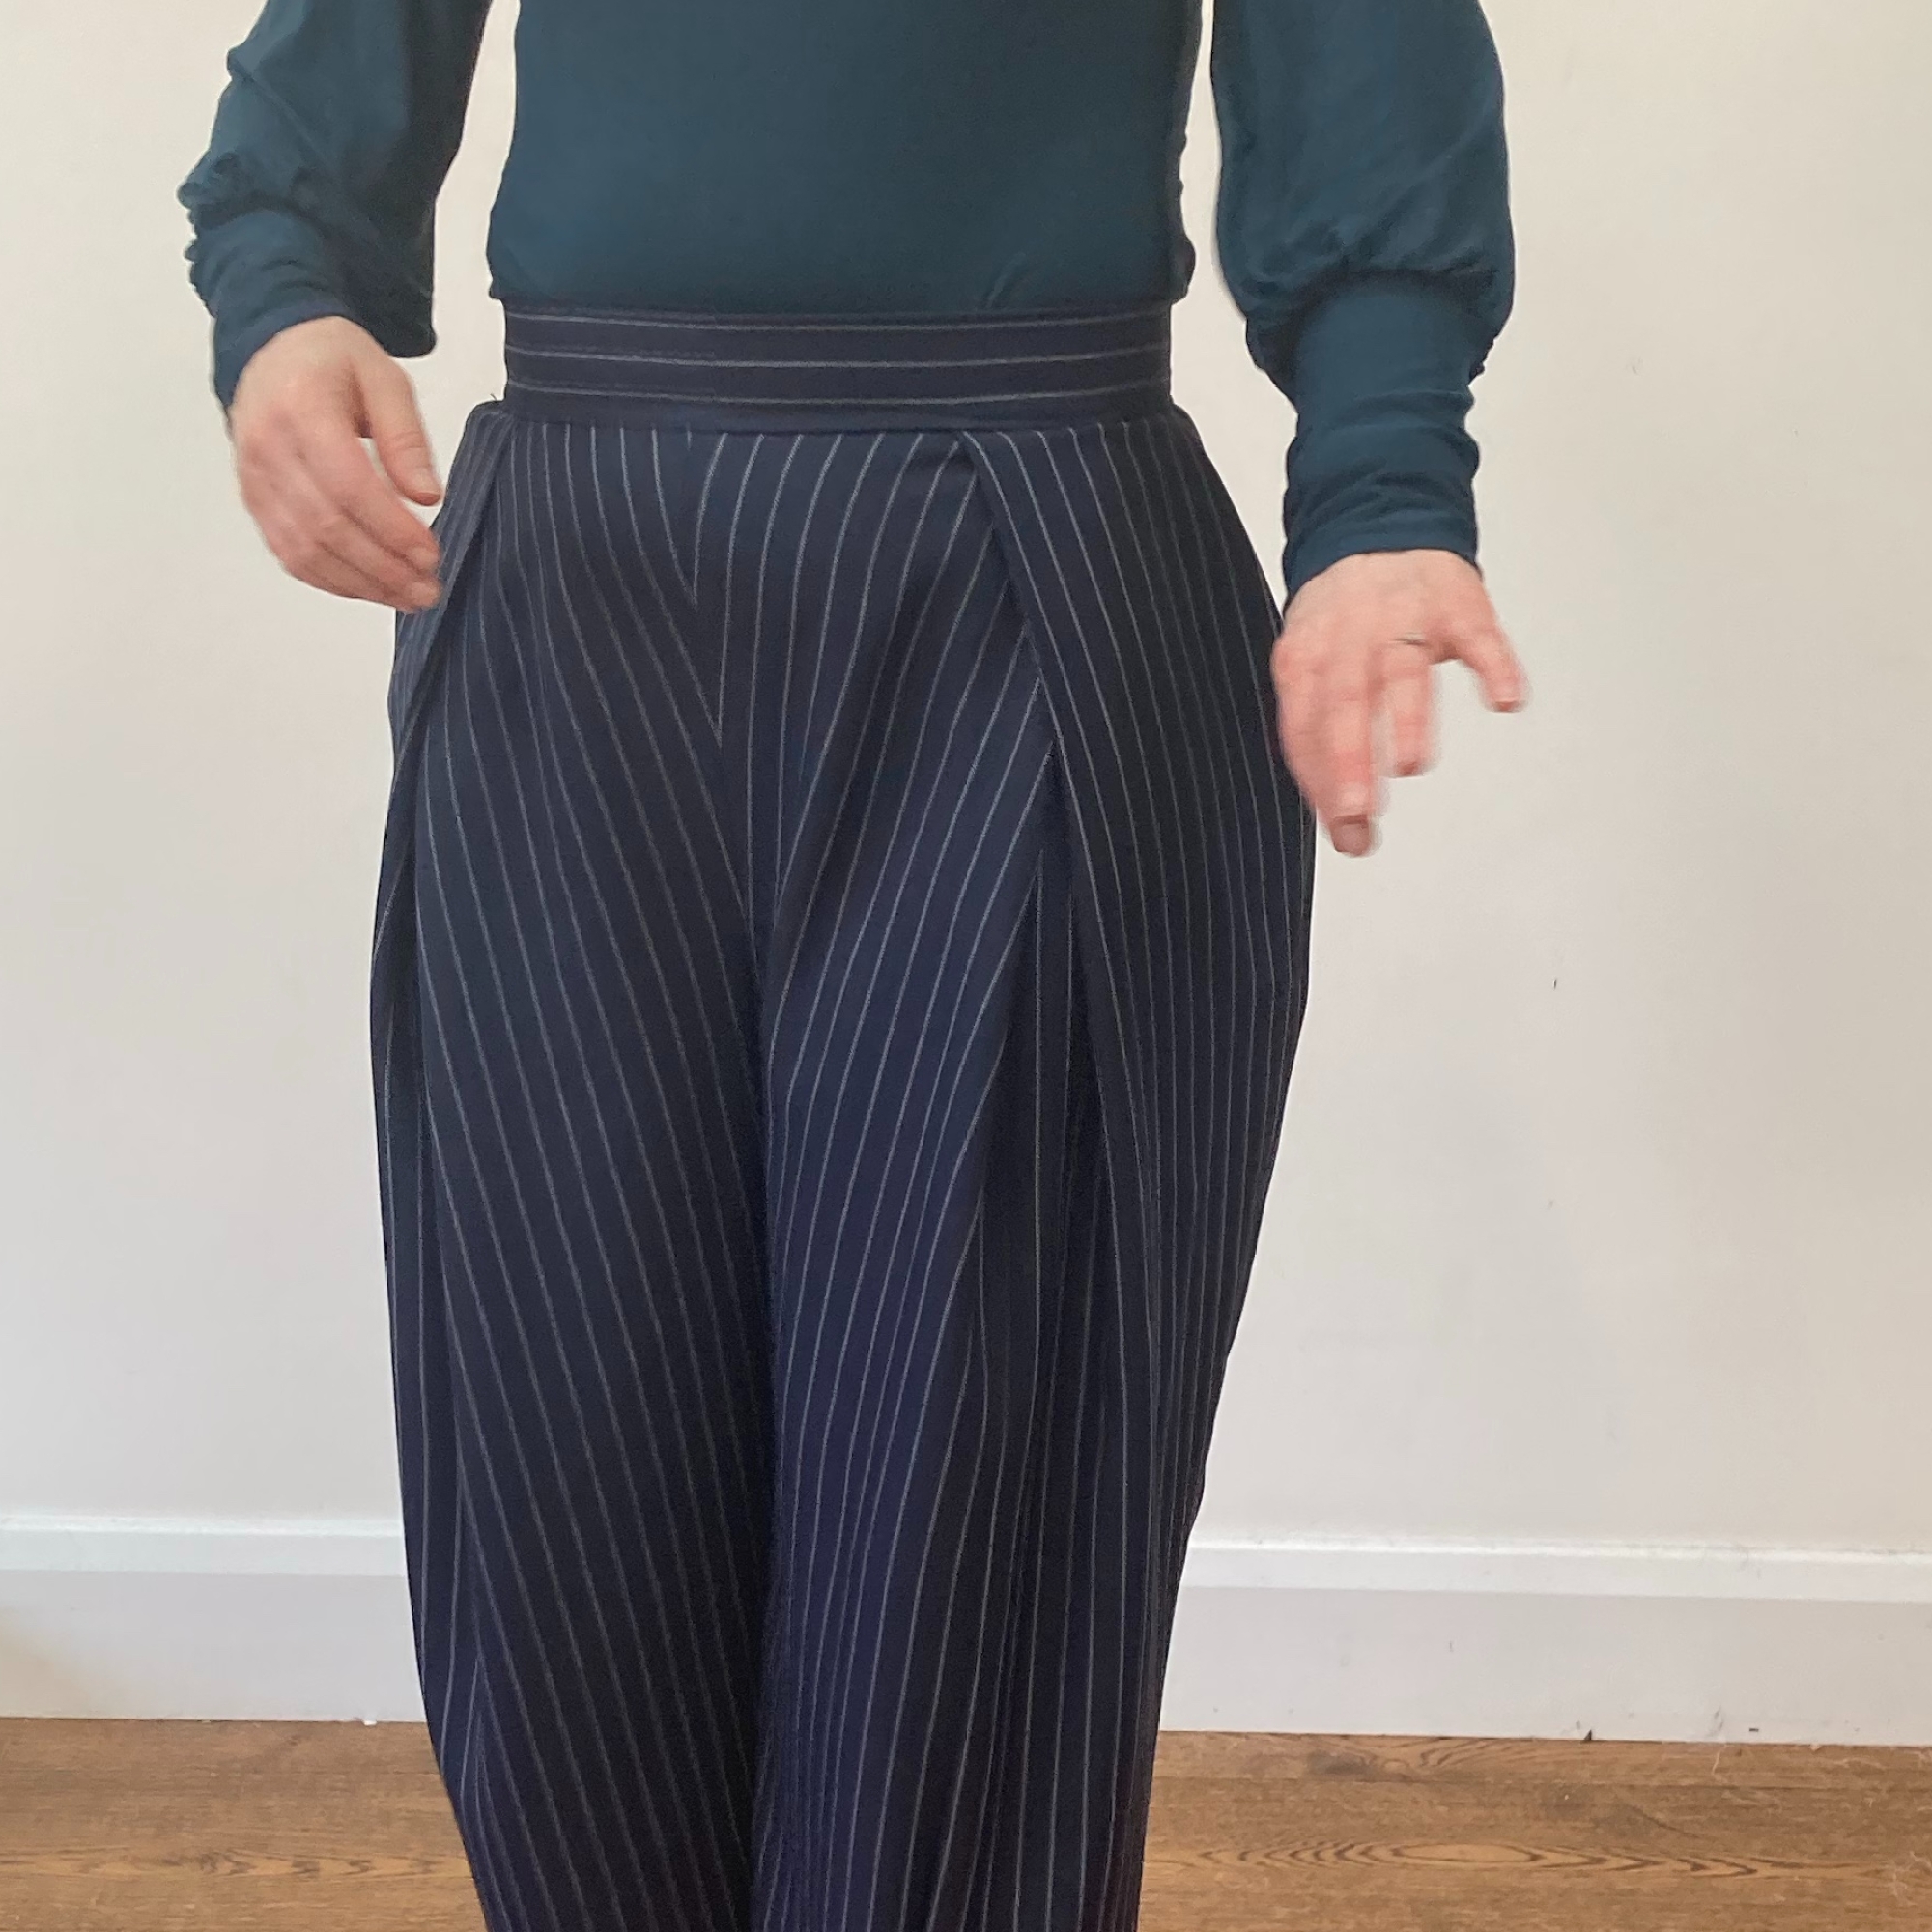
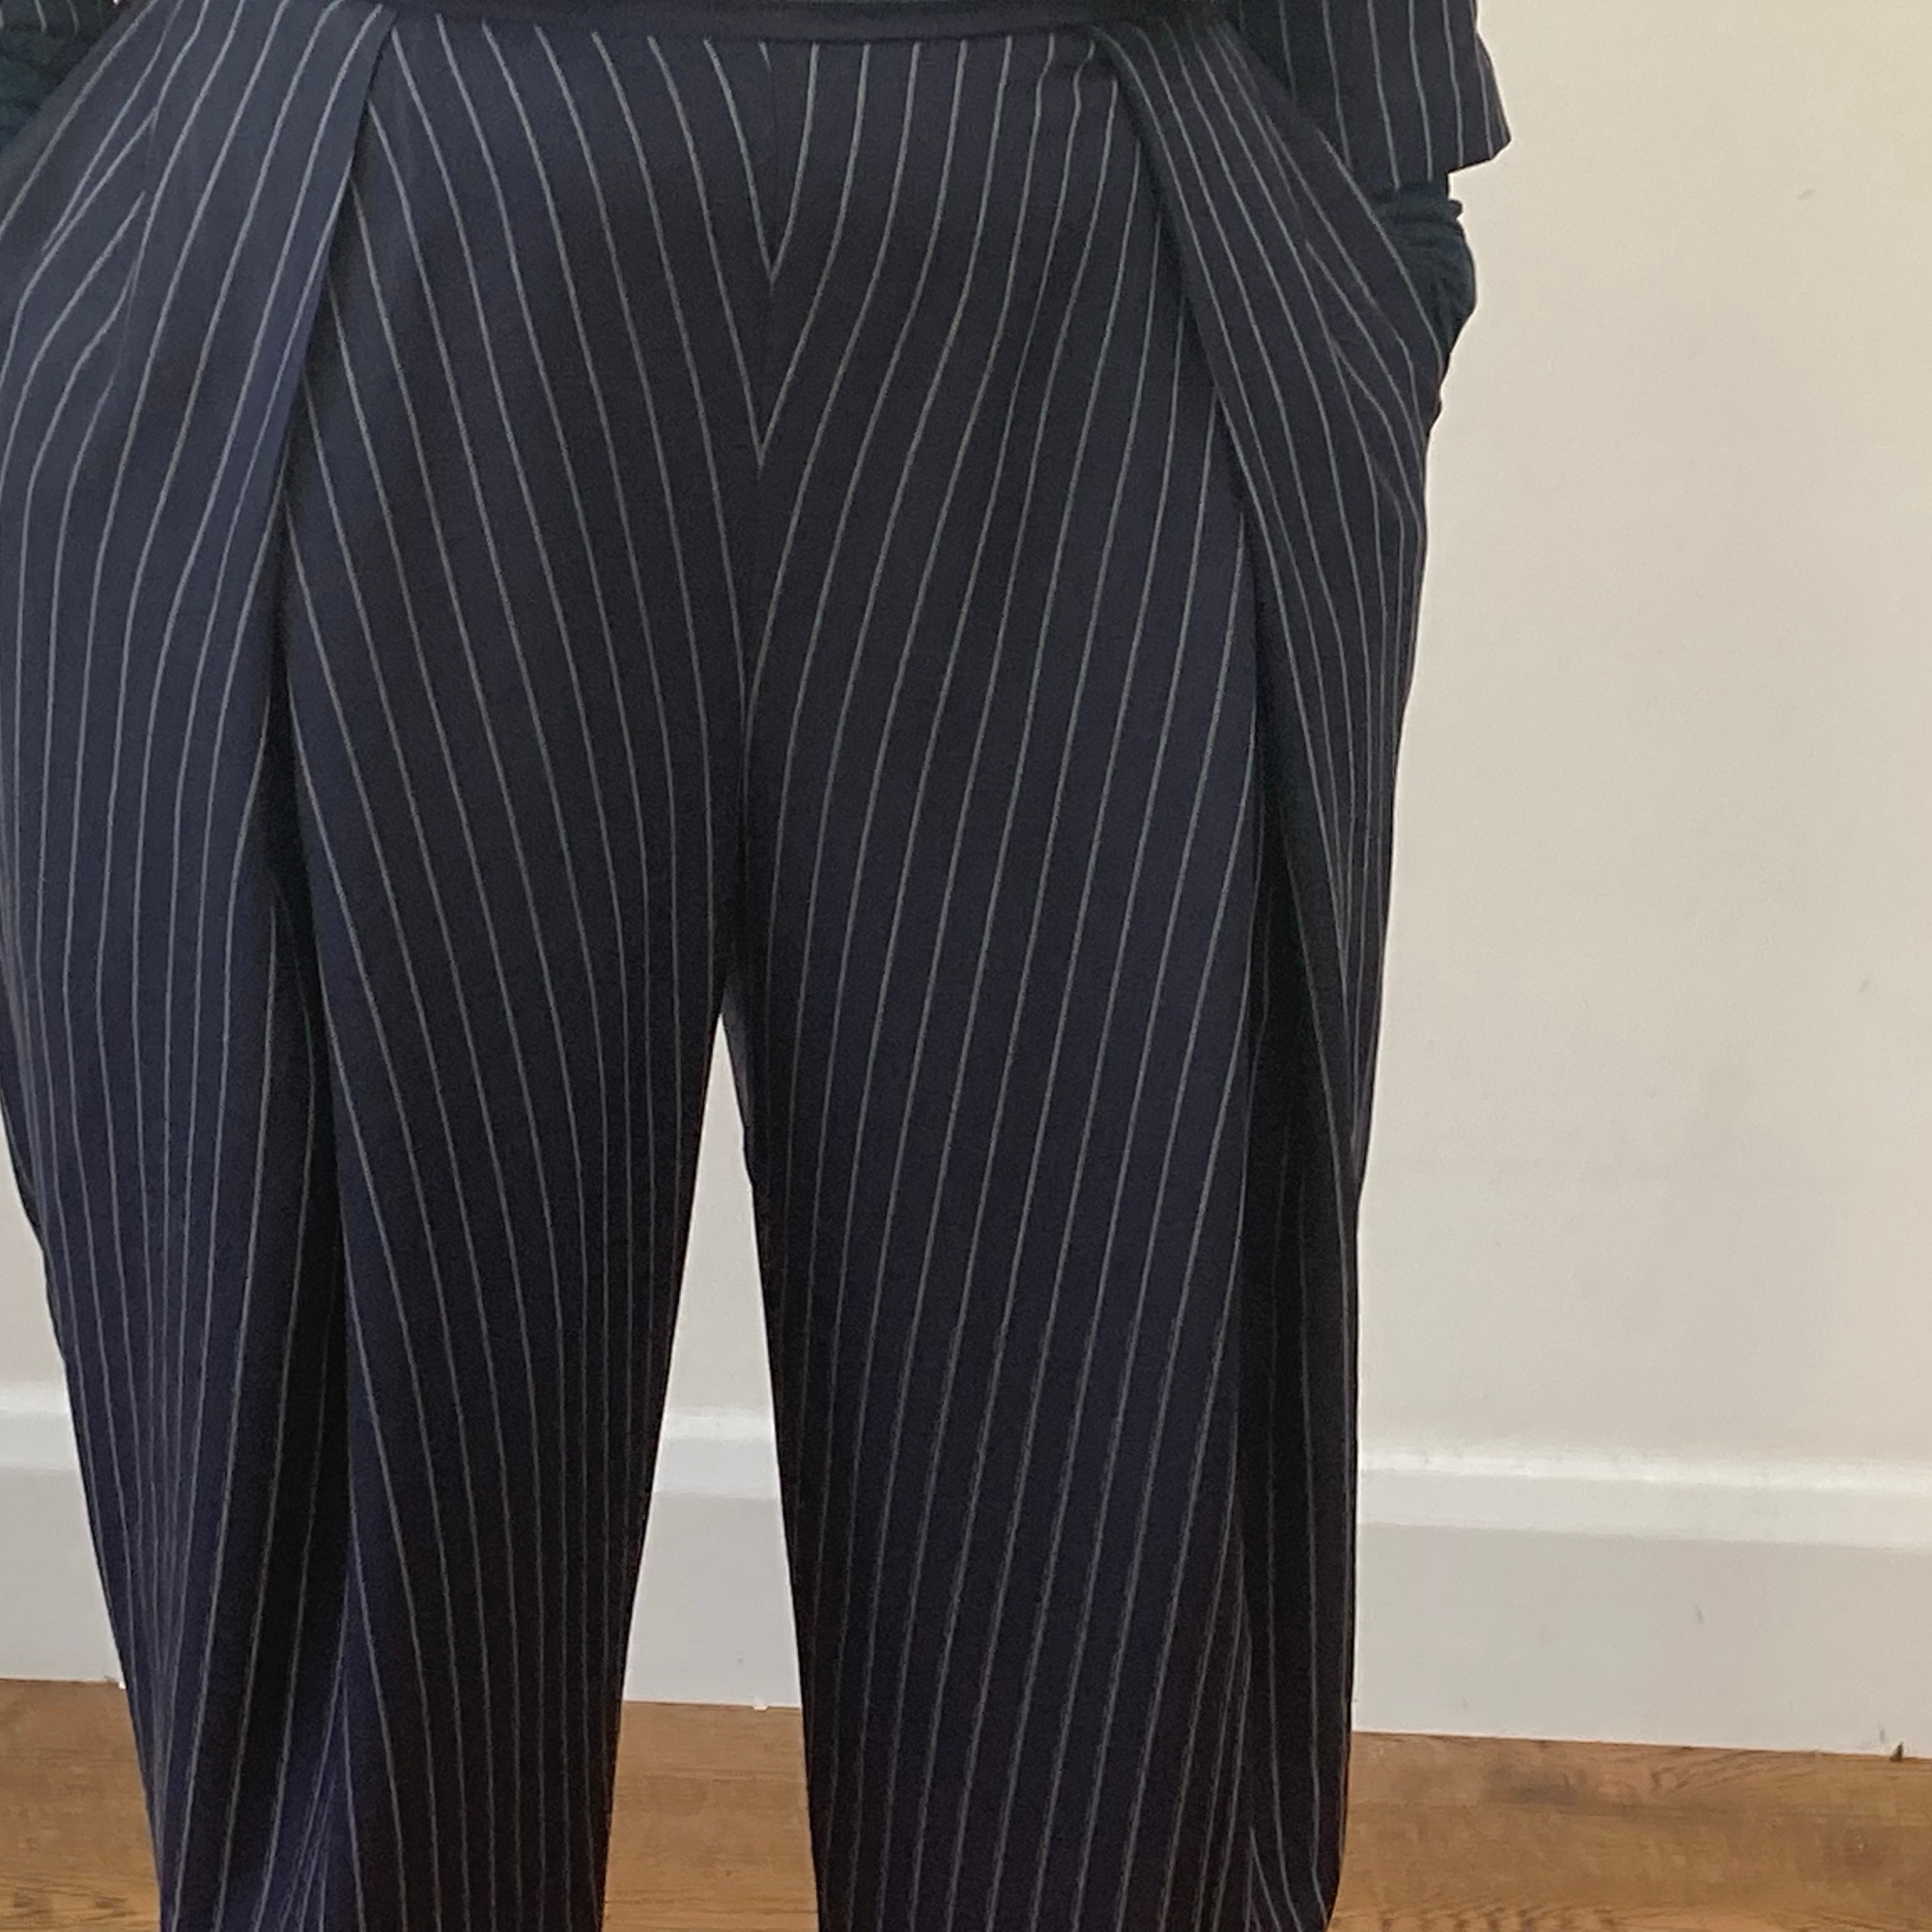
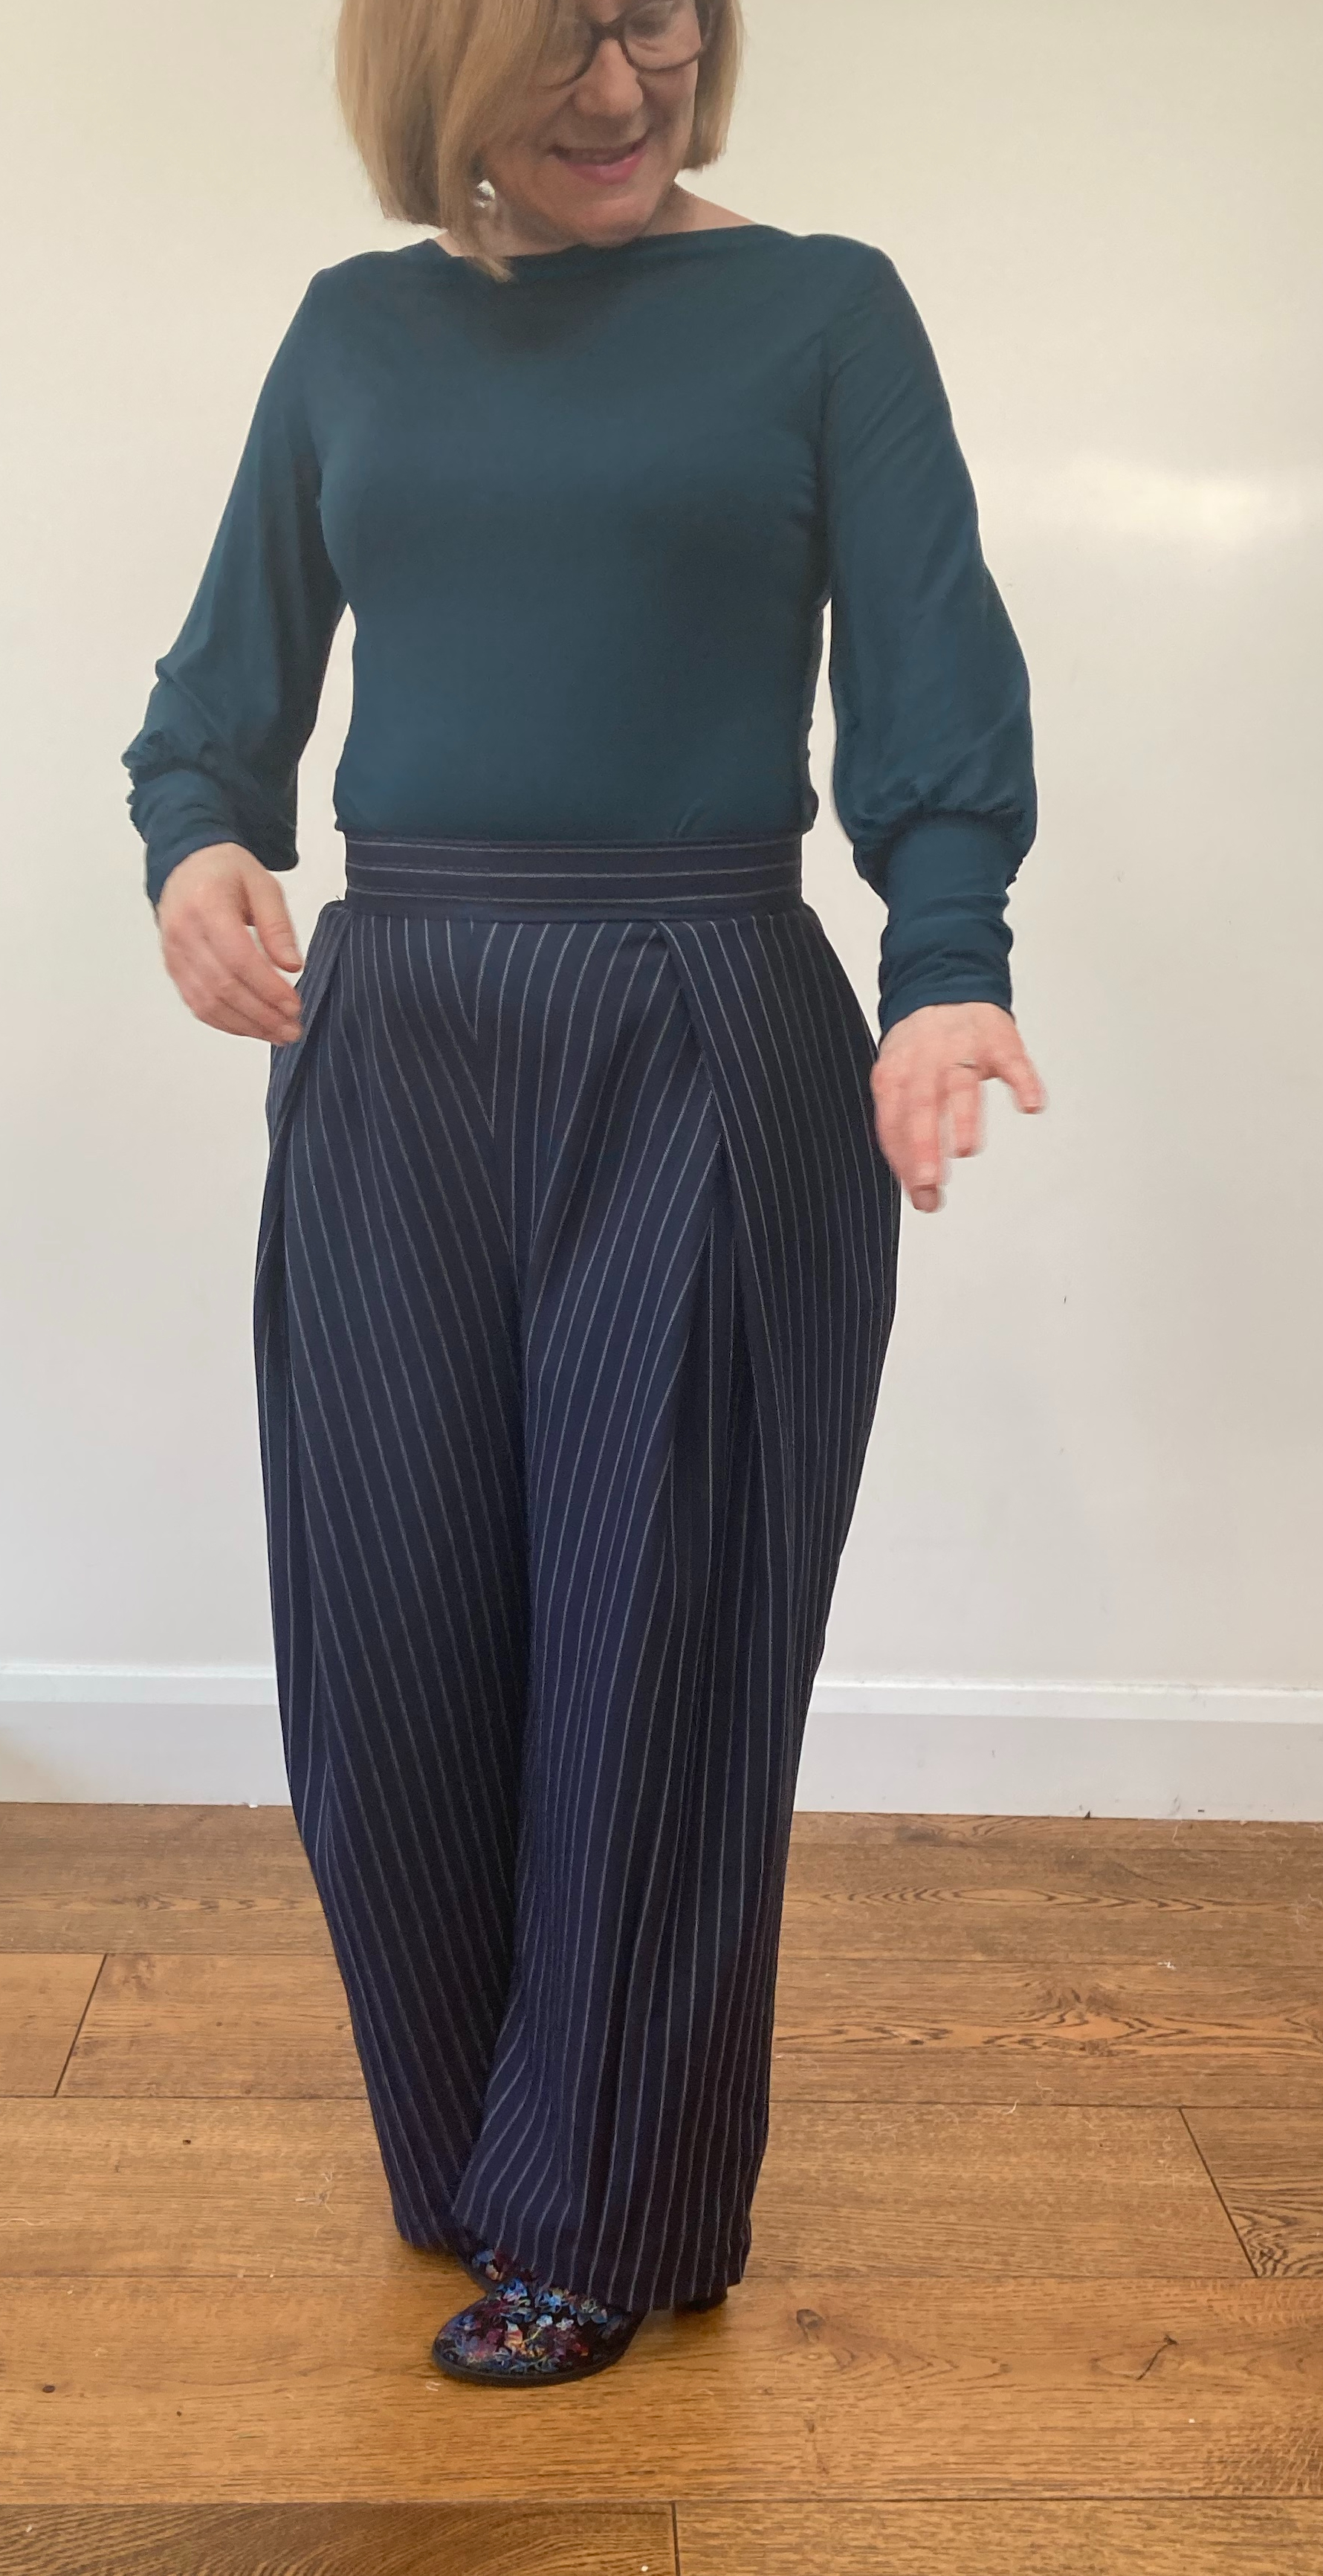
Next I moved onto the Esther trousers. Last time I’d made these in a crepe-backed satin that was much heavier than the pinstripe I bought this time. While I’ve worn those trousers on a fairly constant rotation, I remembered promising myself that if I ever made the pattern up again, I’d use a lighter fabric because the pleating means there’s a whole lot of it bunched at the front – and they’re heavy!

I’m pleased I remembered that. I’m less pleased that I made the cardinal sin of thinking “oh I cut a size X last time, I’ll just cut that again without measuring or anything”. Four years had gone by – that’s a lot of cinnamon rolls. What a numpty.

With the pattern pieces cut out and in front of me, it occurred to me that I had indeed been stupid, so I pinned the pleats, measured the waist line pieces, did some maths to factor out the seams, measured me, did some more maths and scowled. It was quite clear that this wasn’t going to work.

I had plenty of fabric and no rush, so I decided to try adjusting the pieces I’d already cut first. Fortunately with such deep pleats at the front, a small amount of evenly-balanced re-pinning gave me enough space to fit me and my cinnamon rolls in. I had to re-cut the waistband, but that was a much smaller amount of wasted fabric.

After that, the pattern came together really well. The bit I find challenging (aside from the basics of measuring obviously) is the number of layers of fabric that you end up with in the waistband area – with two pleats overlapping, plus the band encasing the lot, it’s about six layers in some places. It helps that it’s a thinner, lighter fabric this time – but it’s still odd and lumpy to handle and you need to sew slowly and carefully over that kind of bulk.

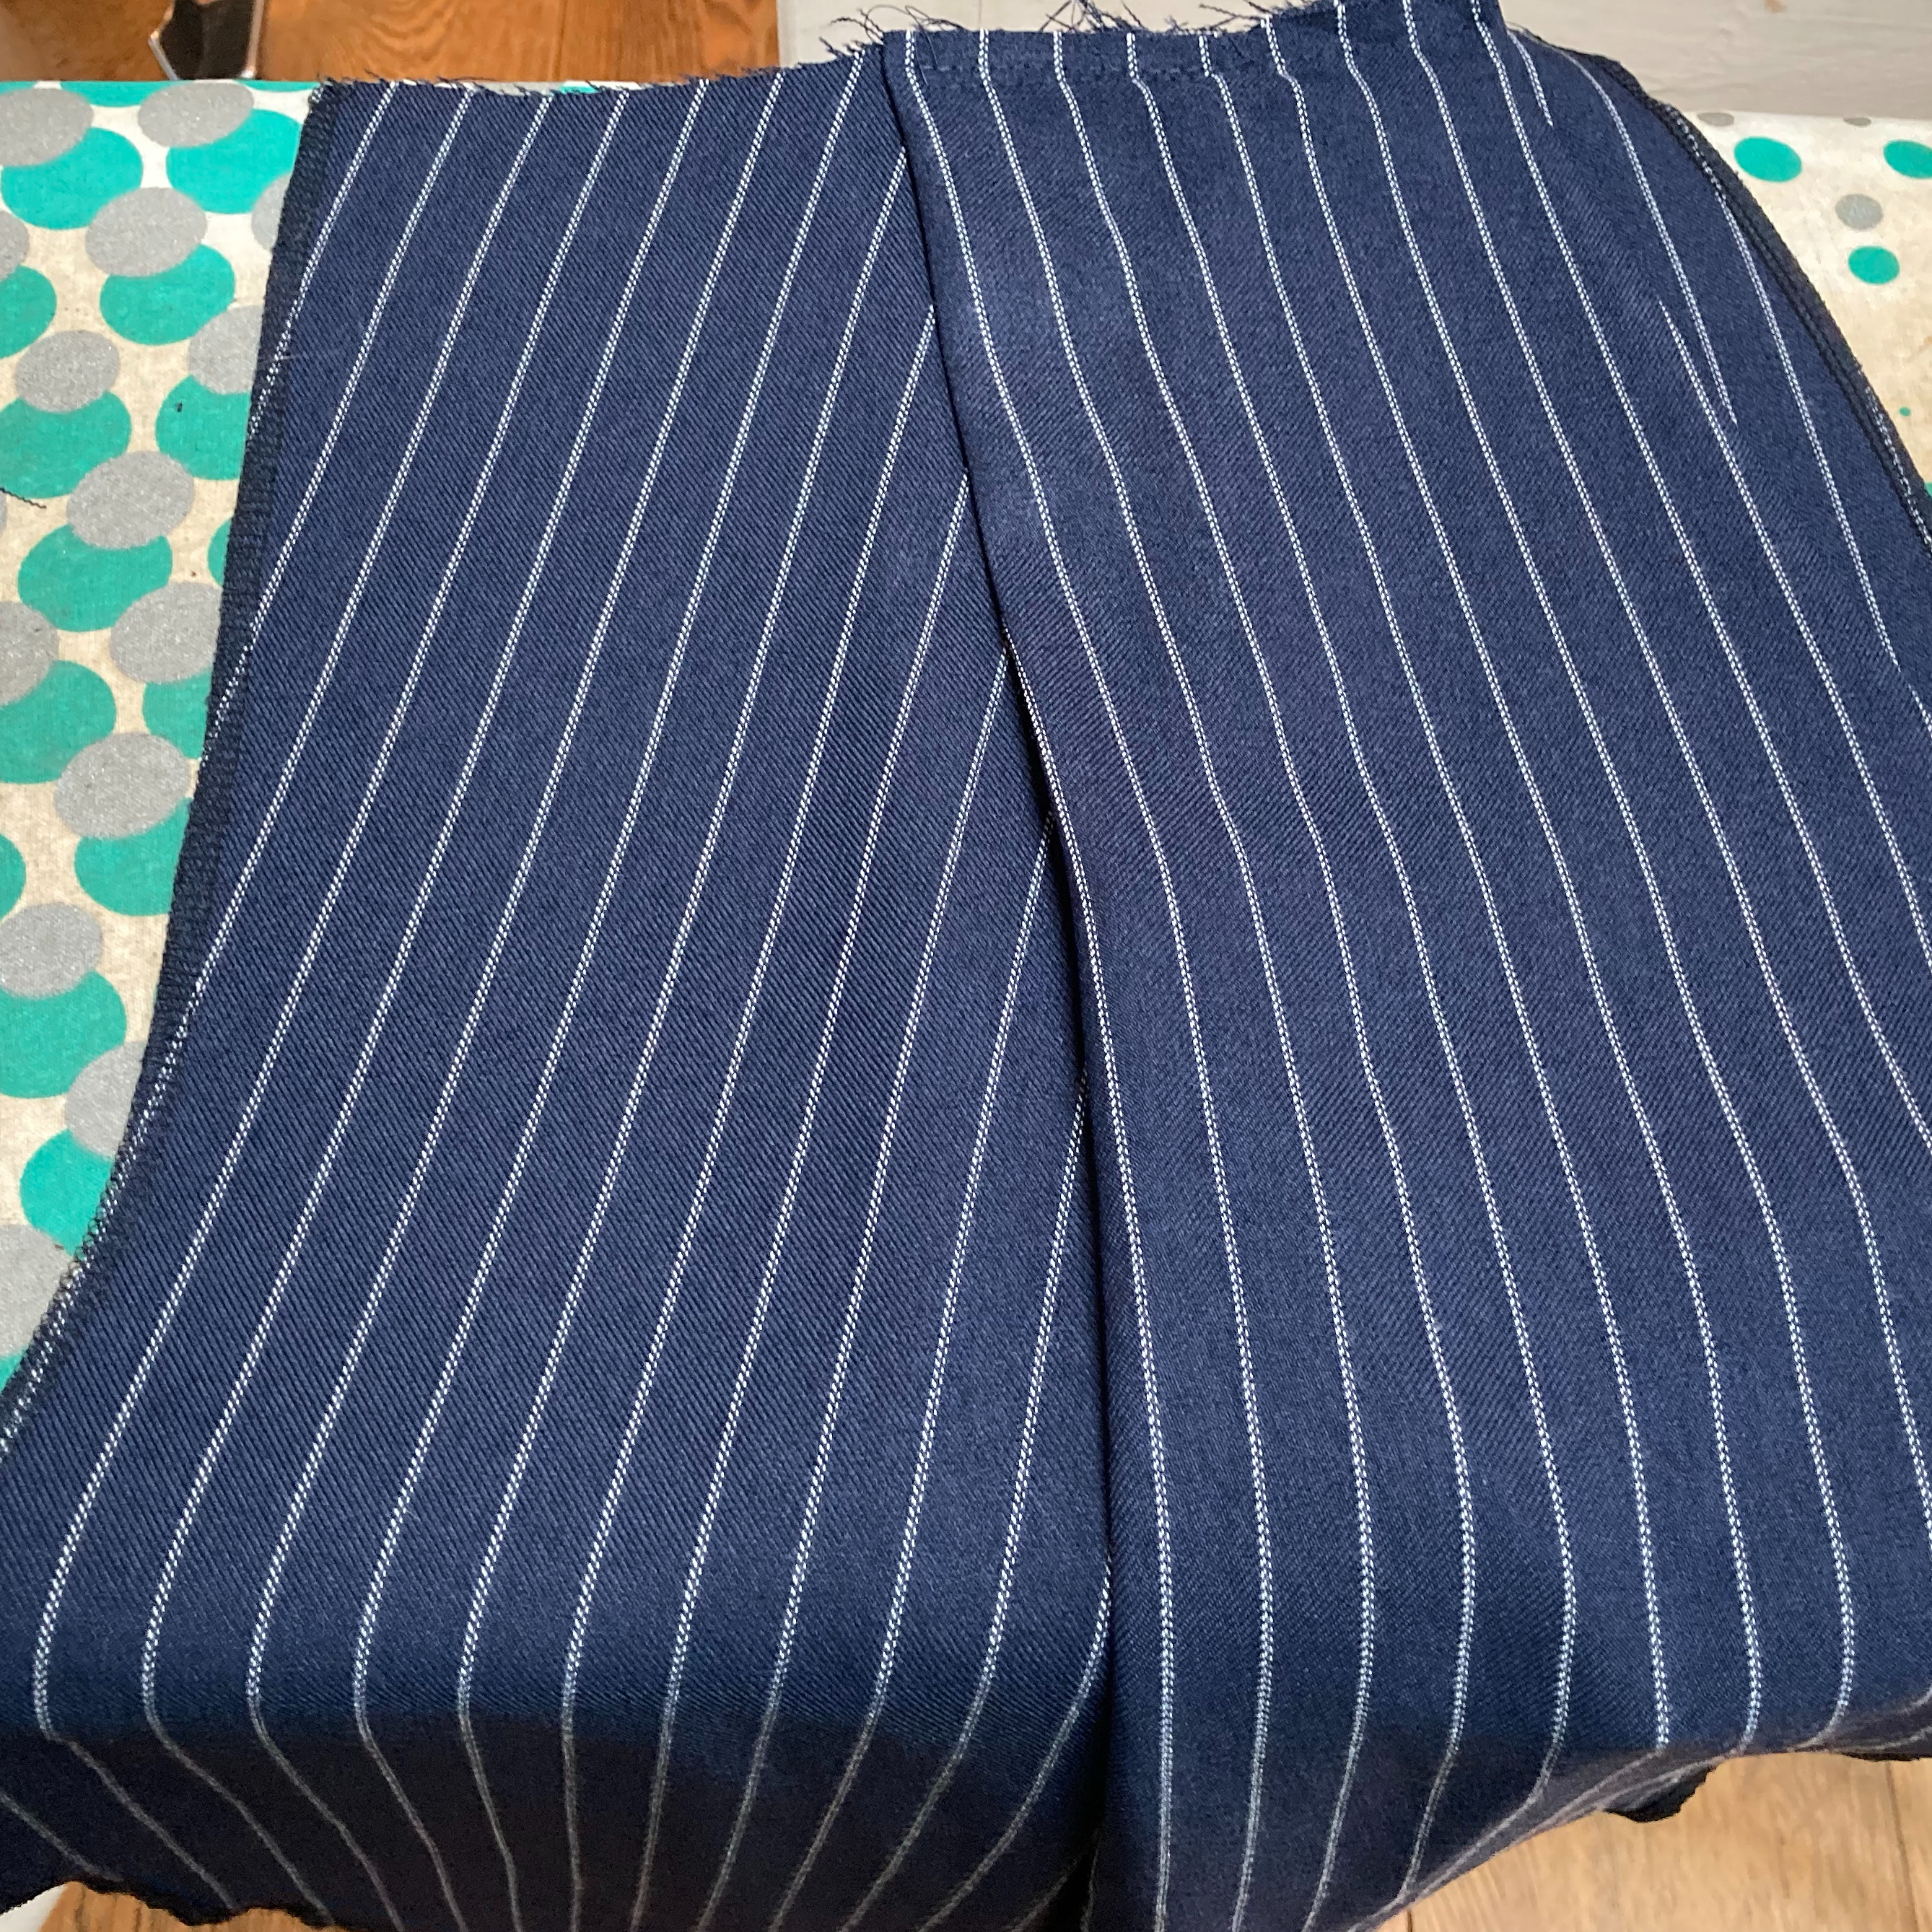
Can I just say how much I love the pinstripe with the pleats? I do love this pattern anyway (because who doesn’t love that kind of swooshy pleat?) but I haven’t sewn much with stripes in the past, and this gives me so much pleasure that I’m going to be doing it a lot more in the future. I also enjoyed cutting the new waistband on the crossgrain, so that the contrasting stripe direction would be horizontal. Oh and they’re really comfy to wear, and they have enormous pockets. A proper win.

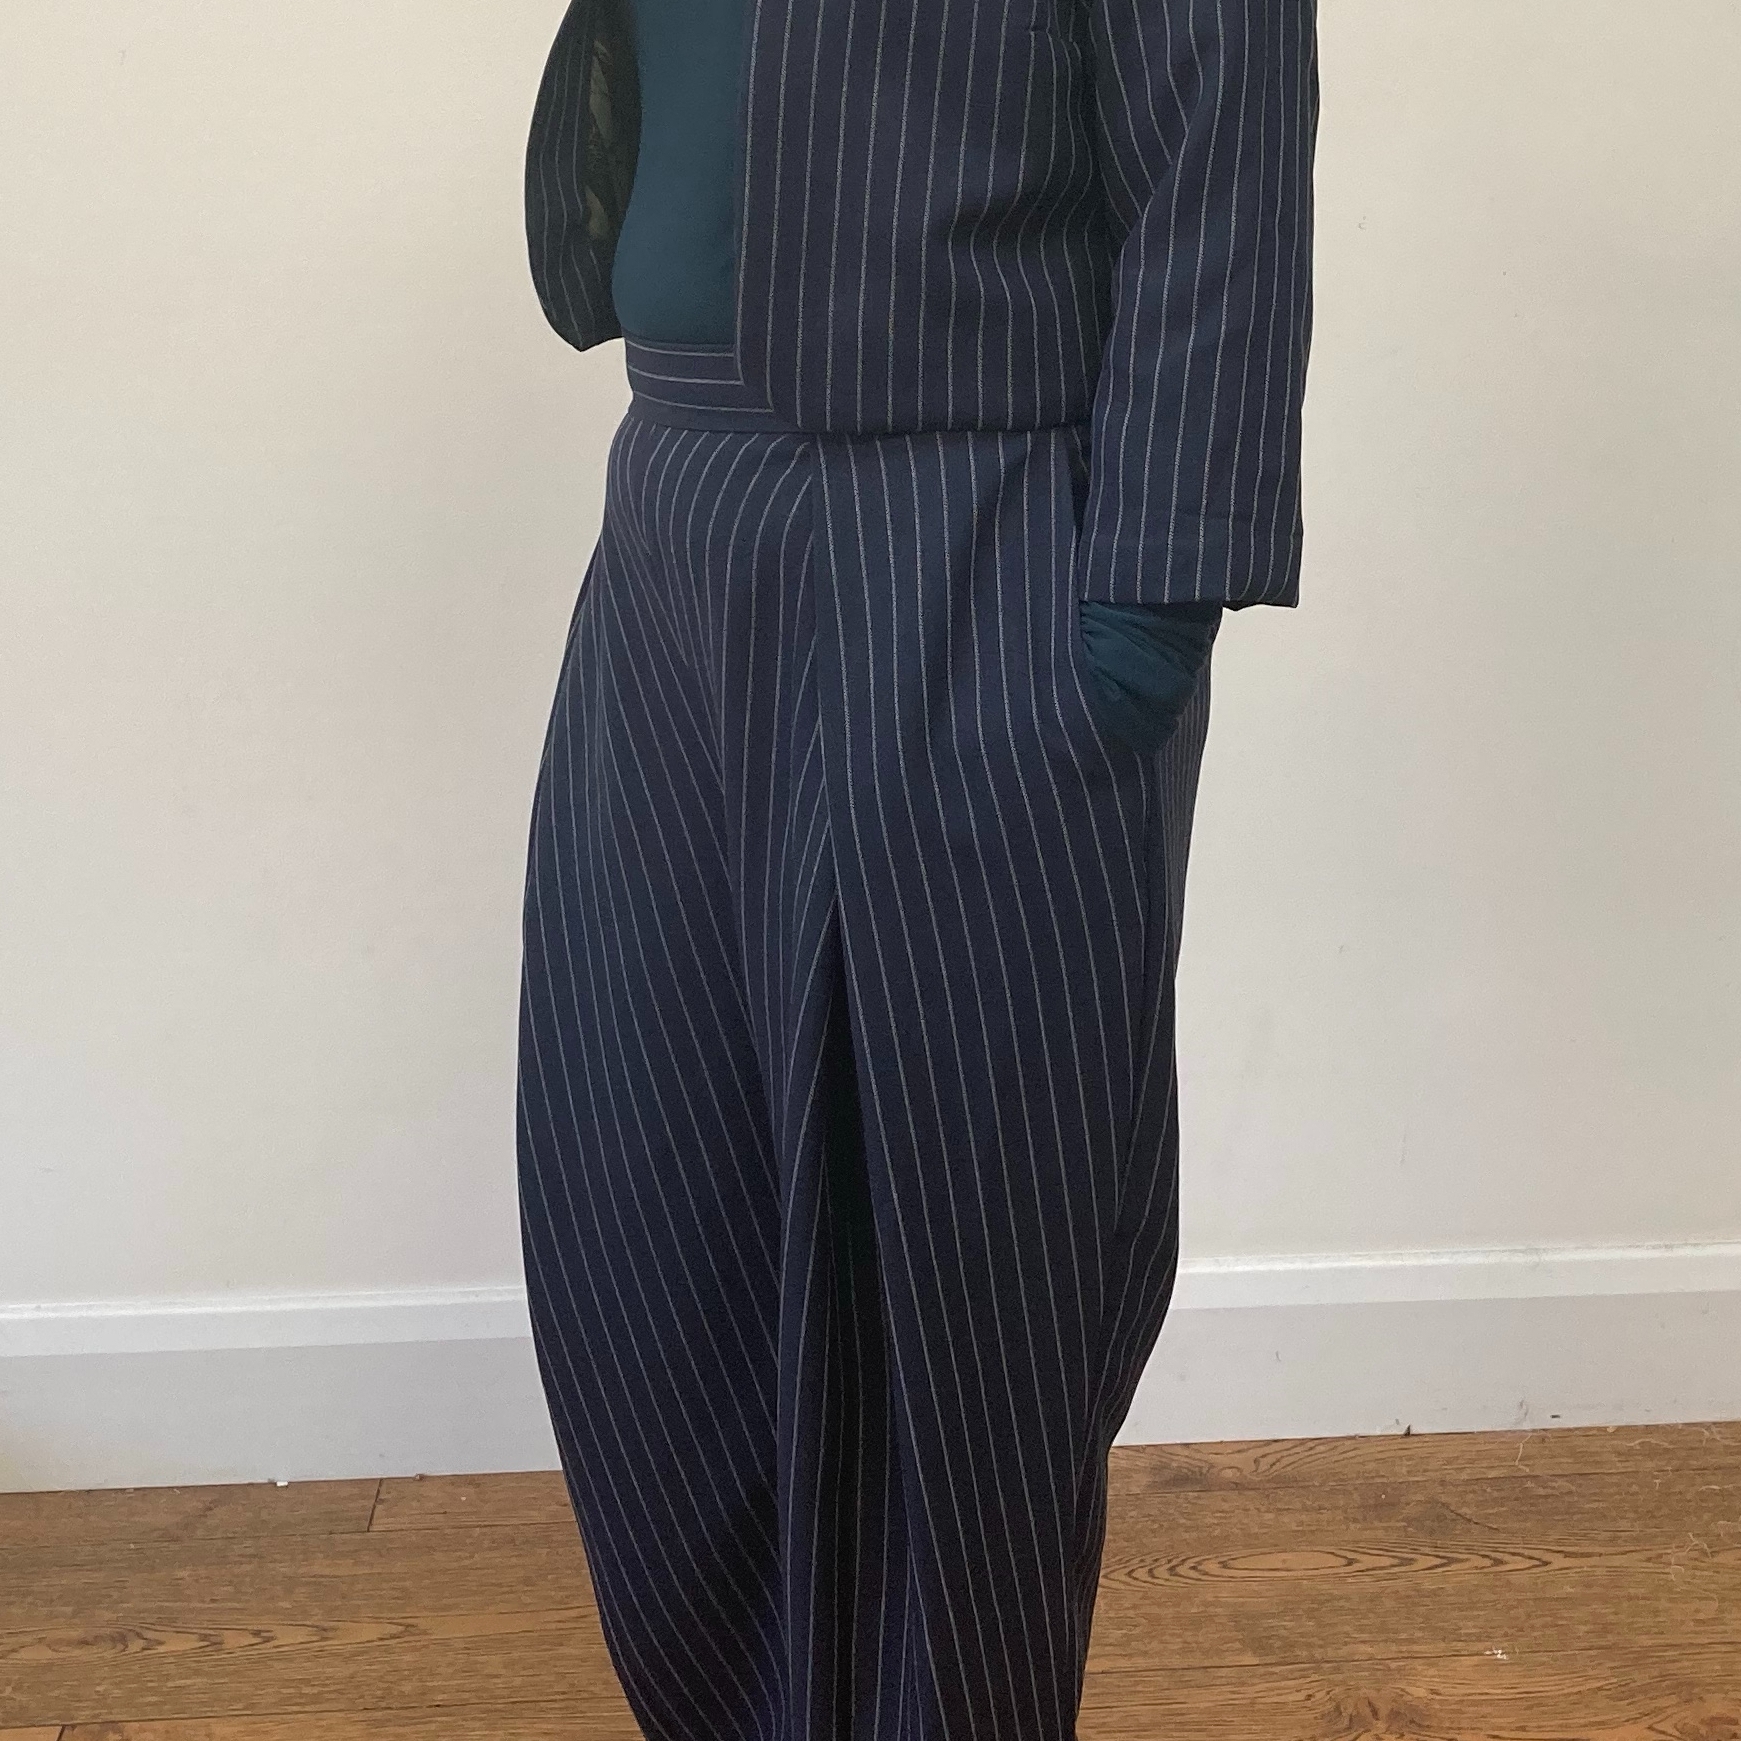
So my final piece was the Jackie O jacket. I’d chosen it to balance out the curvy, swooshy trousers with a short, cropped jacket. I felt that the light suiting fabric would need something to help give it a bit more substance, so I decided to underline the whole thing.

Underlining is not the same as lining. It’s adding a layer of fabric to give structure – rather than to hide the mess of the innards and give an easy slide to getting the garment on and off.

So only a fool would underline using a lining fabric rather than one to give structure, right?

Except I’ve always wondered about it. For an unlined jacket style, by underlining the fabrics (essentially basting the two pieces together and then treating as one), surely you’re effectively creating a satin backed crepe effect? I thought it was worth the try. I had some gorgeous lining fabrics in my stash that I picked up from Fabworks, and chose the parrots (or ‘avian amazement’ apparently looking back at my receipt) to work with my navy pinstripe.

OK, so firstly the pattern – the Jackie O is very straightforward – a no fuss jacket that comes together very easily. There are no tailoring techniques, or shaping beyond a couple of pleats around the bust, and that keeps things very simple. All the pieces were accurate (except the pockets which were a completely different shape – but I chose not to use them in the end) and true. I’d say it comes up quite small – I cut a size larger than I measured to at the bust and that’s only just OK. I won’t be wearing it over any jumpers.

I’m glad I experimented with the underlining, because the suiting fabric on its own would have been just too thin. I cut out the main pieces (back, two fronts, two sleeves) in the lining fabric and spent a couple hours in front of old episodes of the Great British Sewing Bee (happily all available on iPlayer at the moment, and brain-like-a-goldfish me can barely remember what happened, so love rewatching them) tacking them together in the seam area. I tried hard to keep them flat throughout this time, and not to distort either fabric through combining them.

The instructions on a Simple Sew pattern are brief and to the point. This is not the pattern you’d want if you were making your first garment, but it was such a contrast to the detailed steps of the Esther trousers that it felt somehow freeing. If you need to be told to understitch a seam to a facing, or how to press or hem, then you probably want a pattern that will take you through it in more detail.

So underlining with the parrots – firstly, can we give some love for those avian beauties? Aren’t they just lovely? I probably wouldn’t do it again though, or at least not in the same way. It definitely made things sit not quite as flat in the shoulder area, which is annoying. It was nice to be able to handstitch the facings and the sleeve hem to the underlining, so that nothing shows on the outside of the jacket – and I love the glimpse you get of the lining from time to time. But next time I’d probably just add a proper lining to a pattern that it suited. However, good to try and good to know how it works/doesn’t.

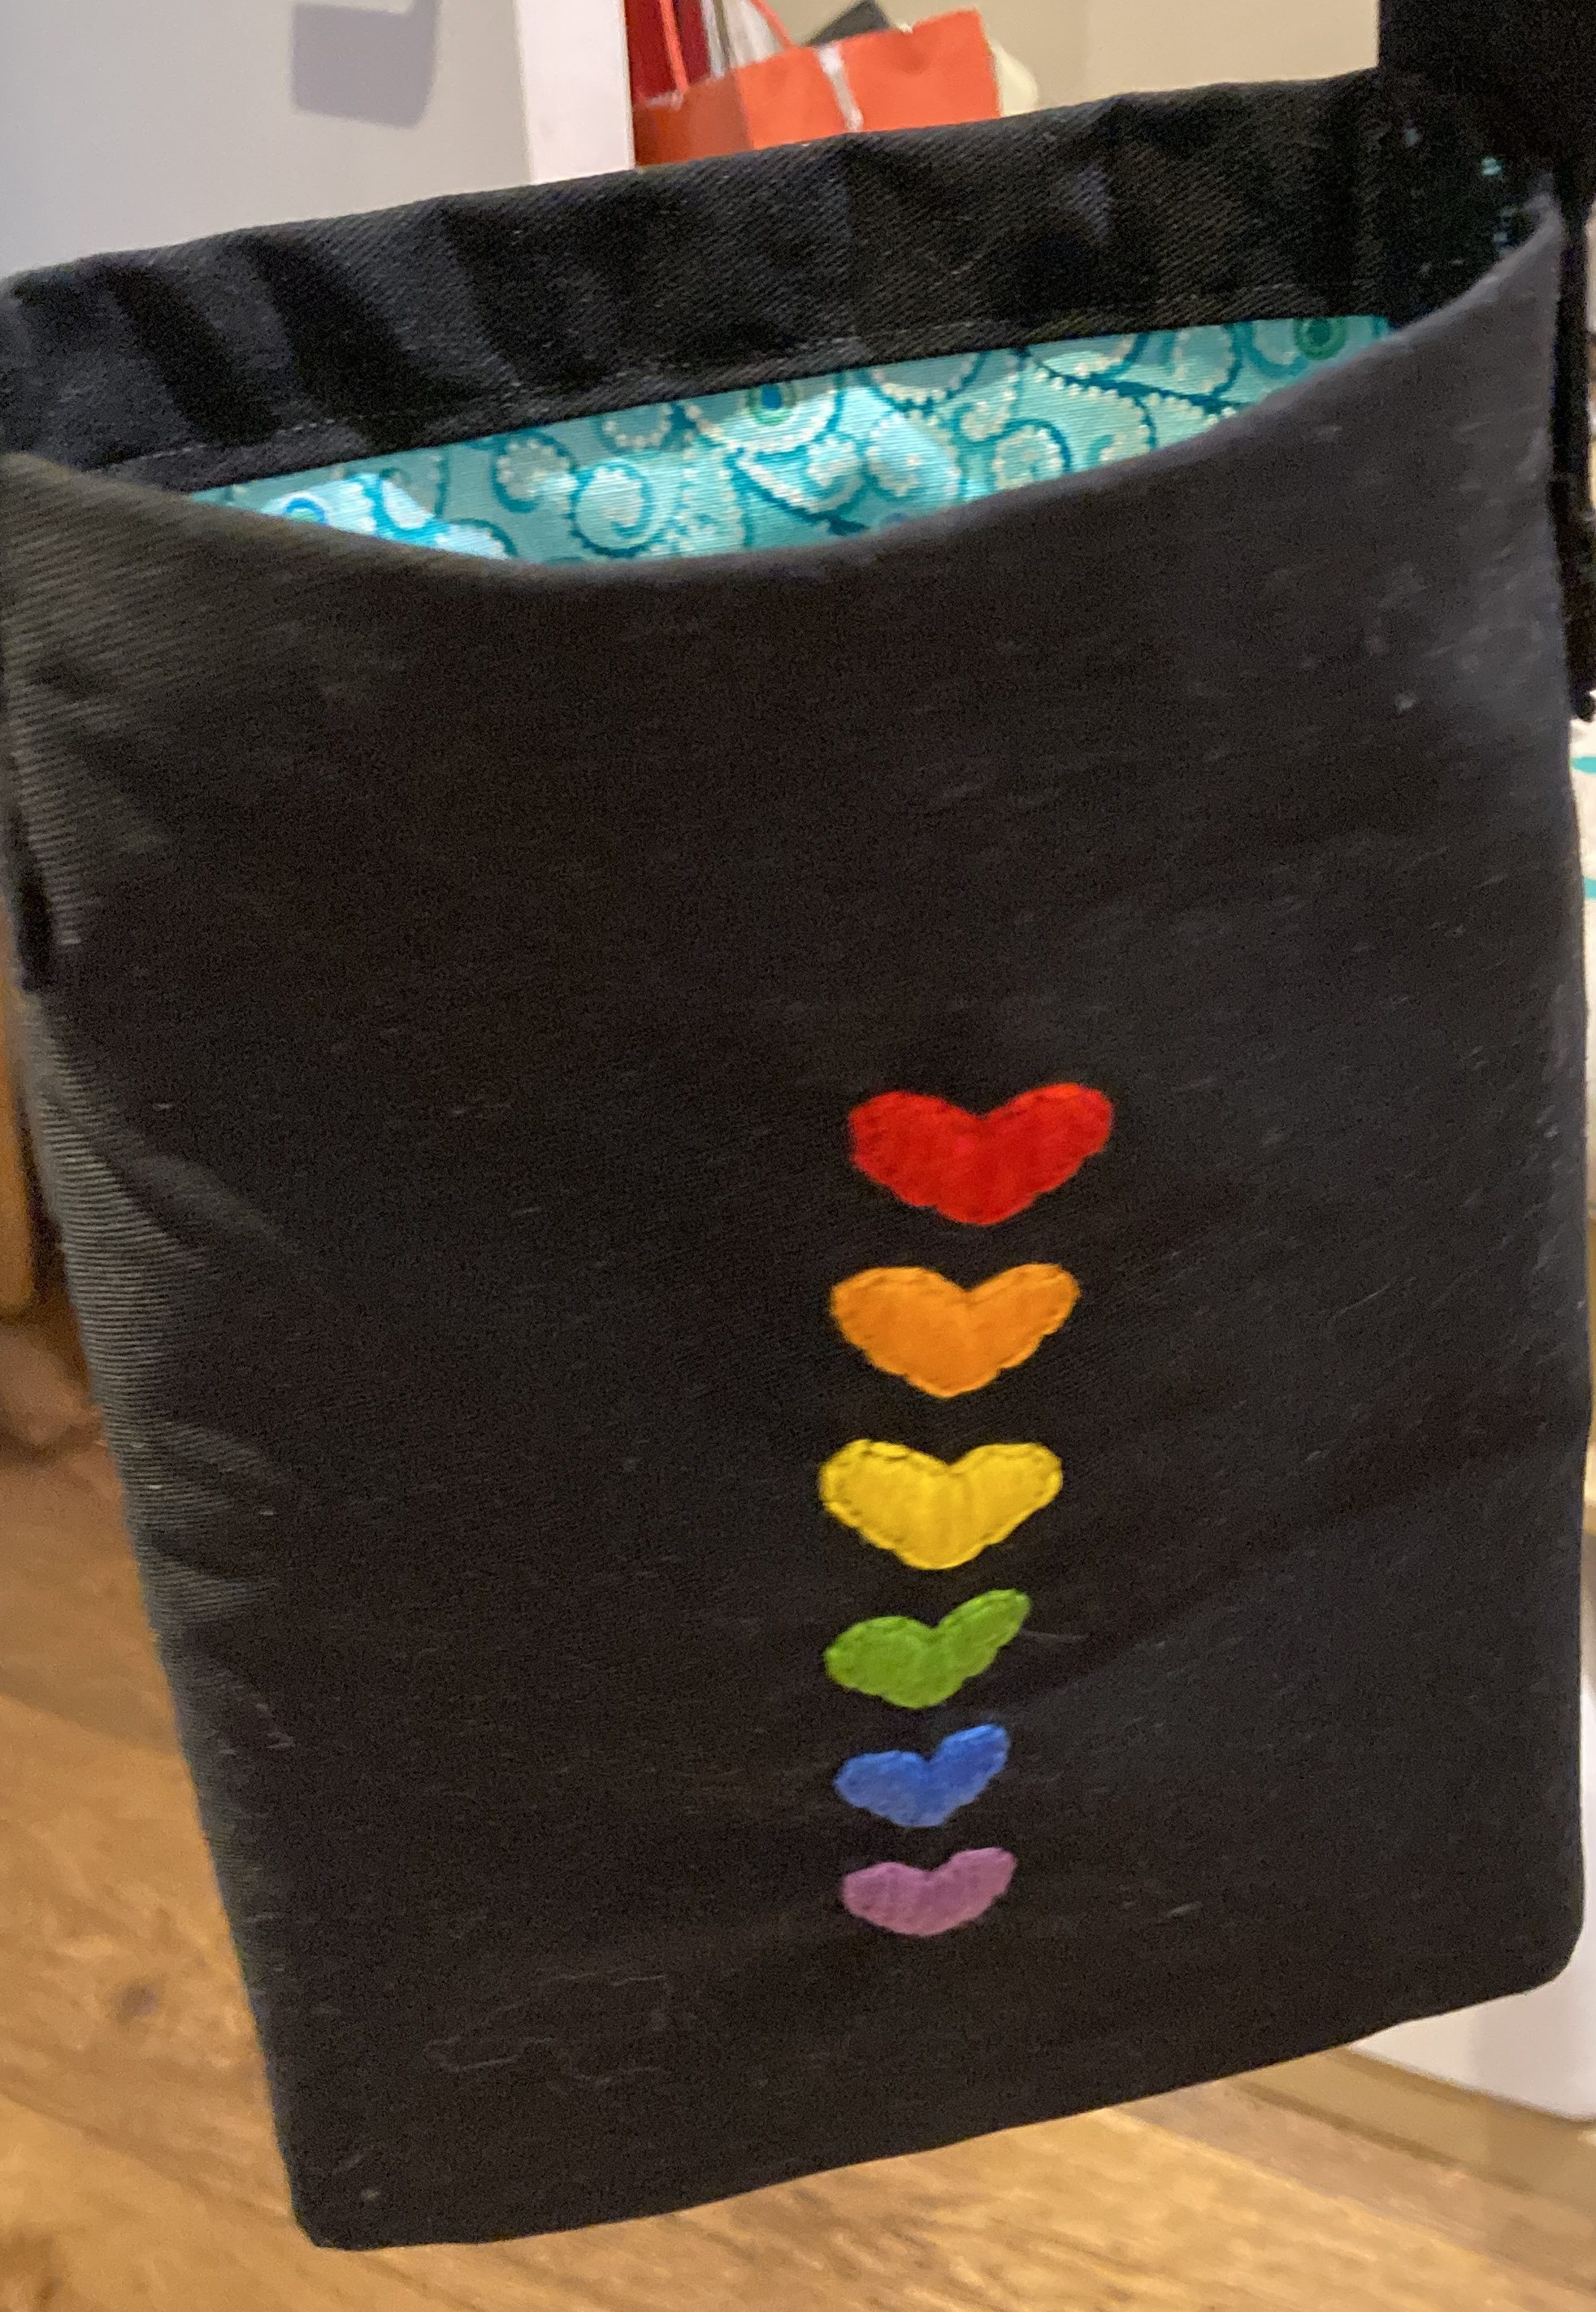
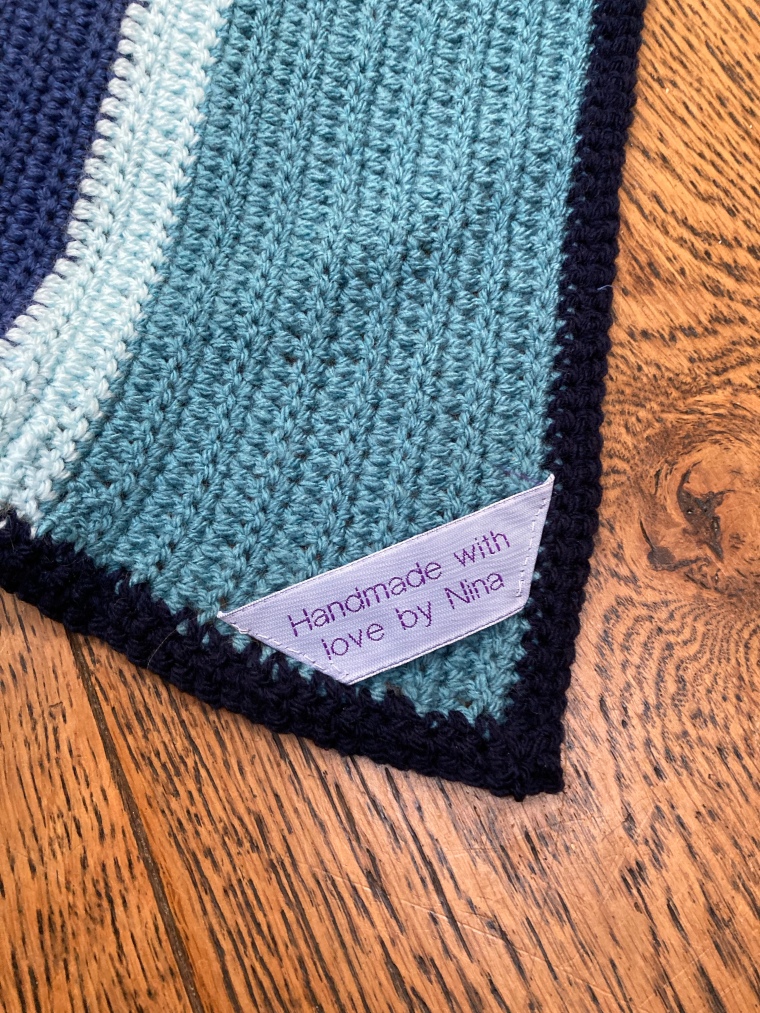
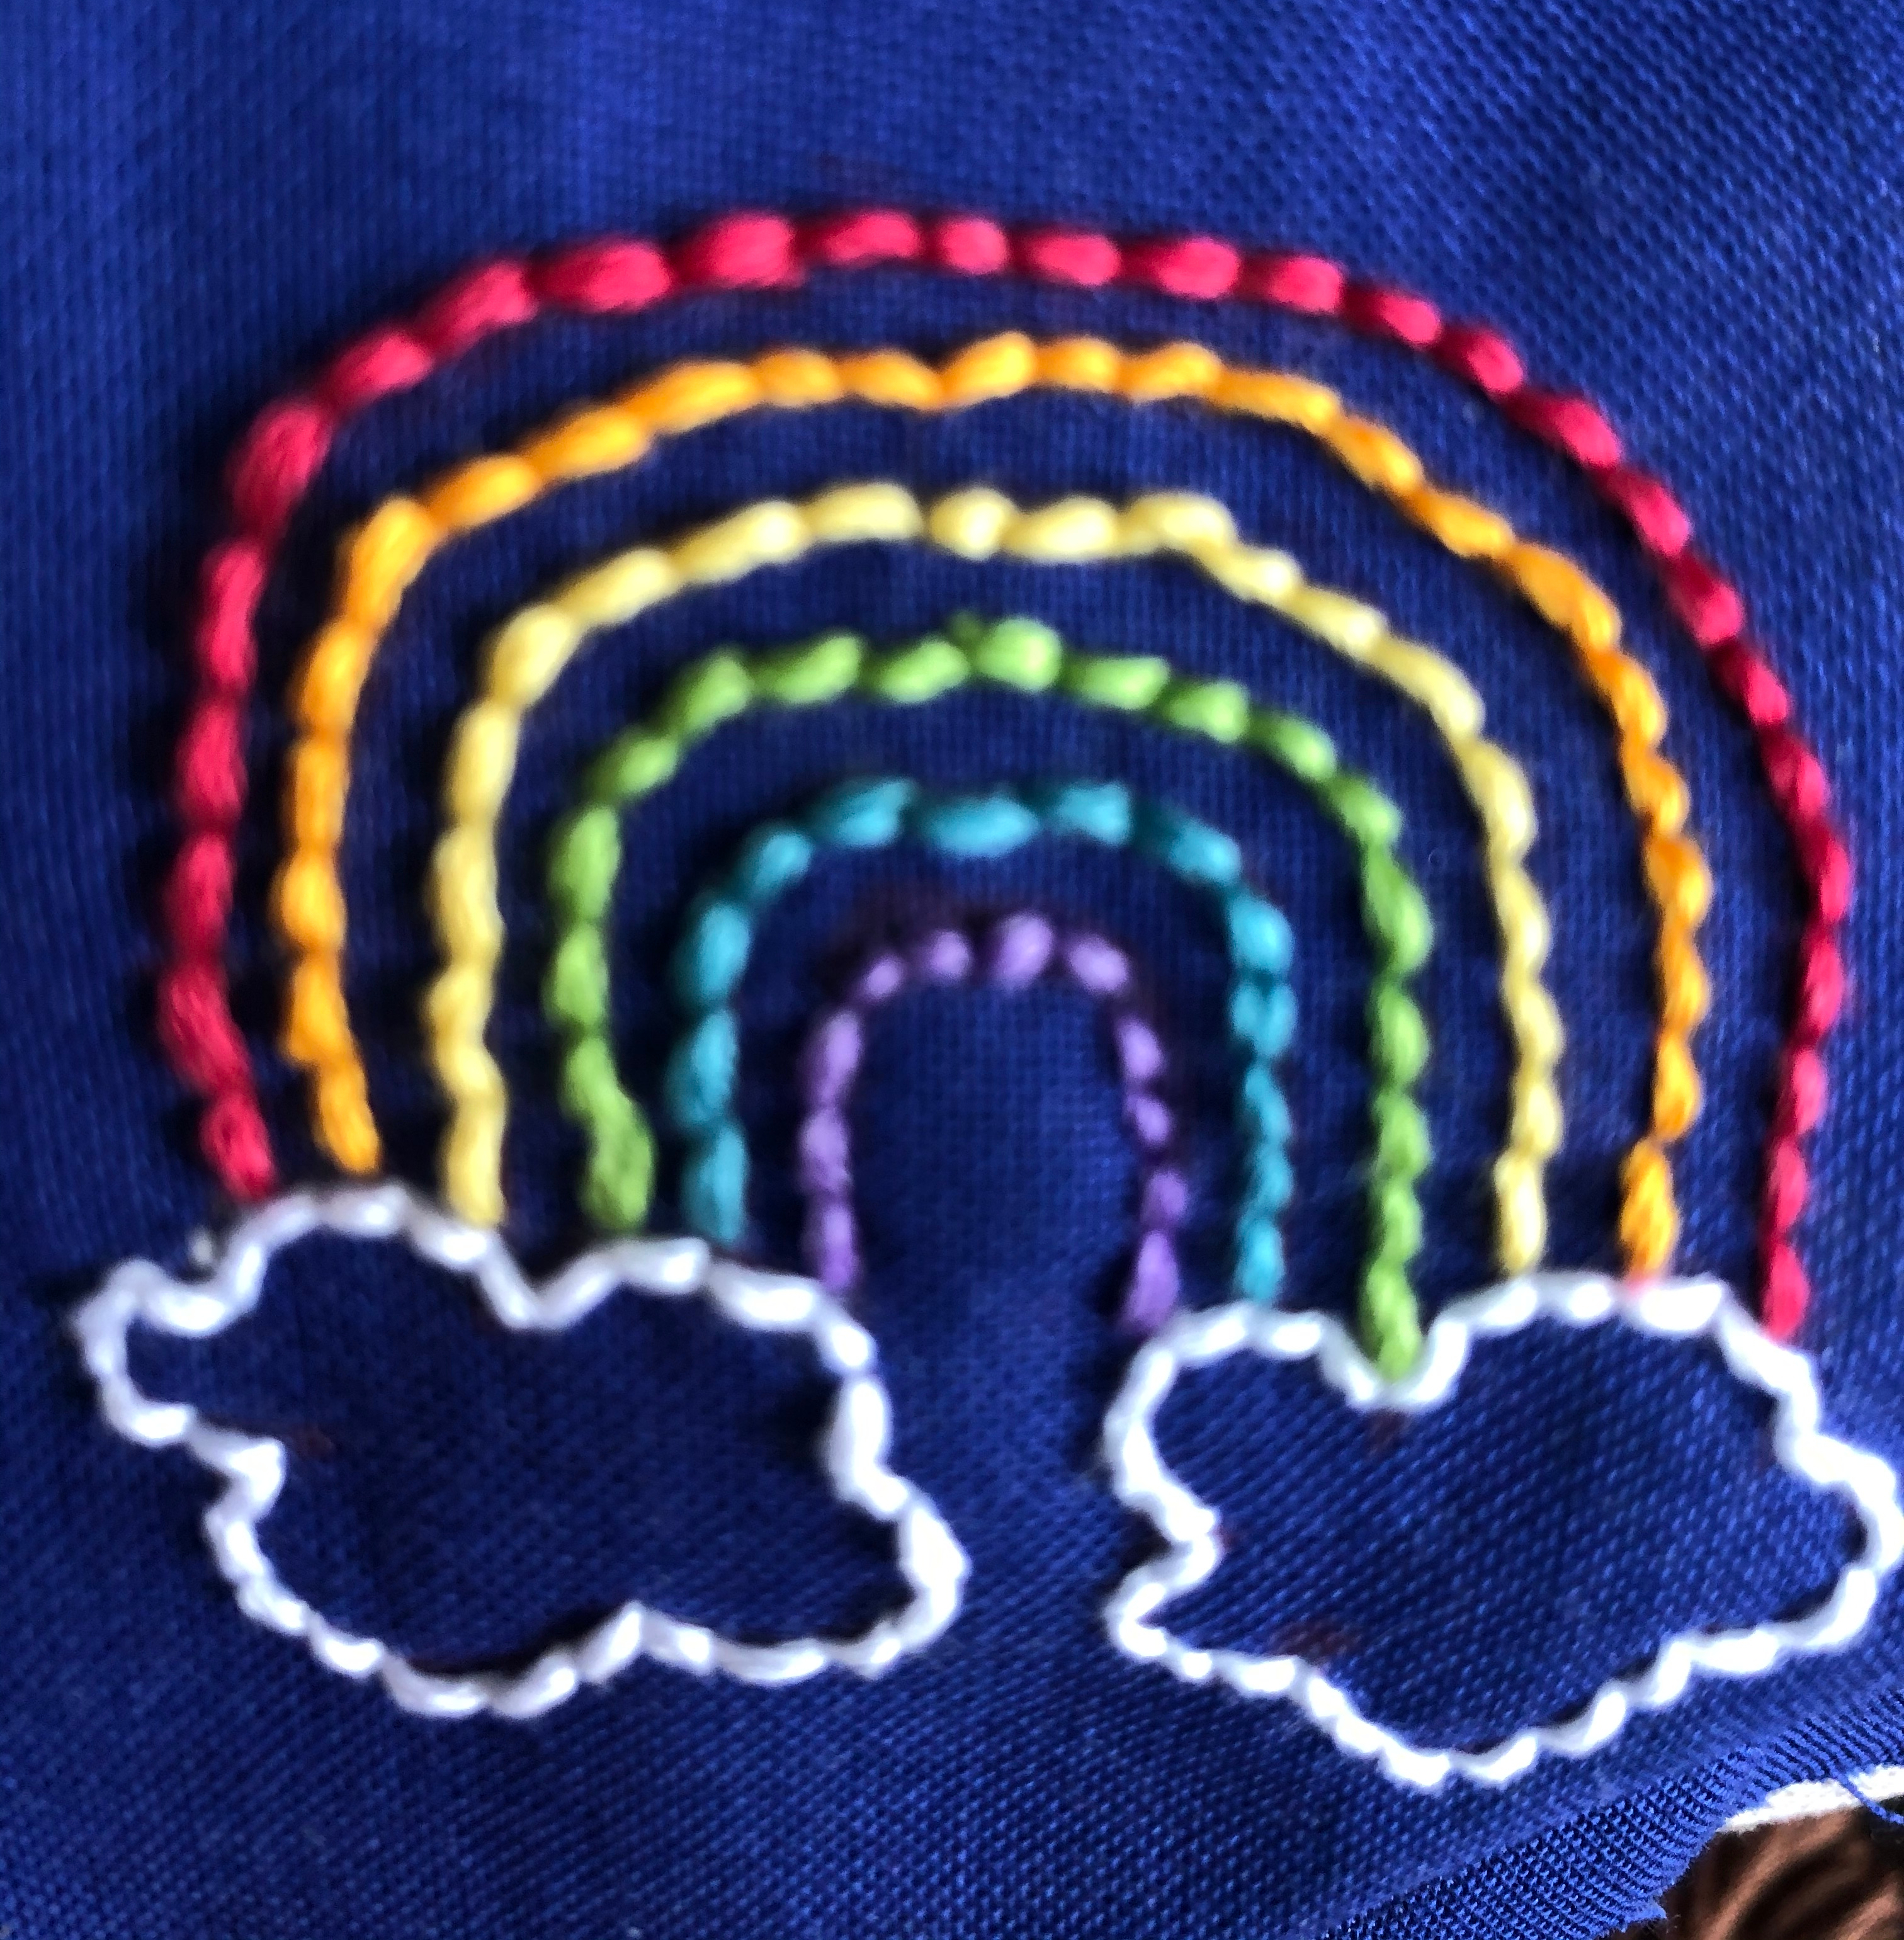
So, that was most of my lockdown sewing. In addition I’ve made a bag for my mum’s syringe driver (embroidered by Daughter 2 and showing here) using this pattern by Warkworth WI. I used fabrics from my stash, including the piece for the lining – a fat quarter from Creative Quilting designed by Blank Quilting Corp and dedicated to those touched by ovarian cancer. A proportion of the proceeds from this beautiful collection are dedicated to an ovarian cancer charity. I’d never even heard of syringe drivers until a couple of weeks ago, let alone the fact that a person with one needs to carry them around all the time – so lightweight bags of the right size are what’s needed. If you have a local hospice and some time, you could do a lot worse than helping out by making a stack of syringe driver bags and sending them there.

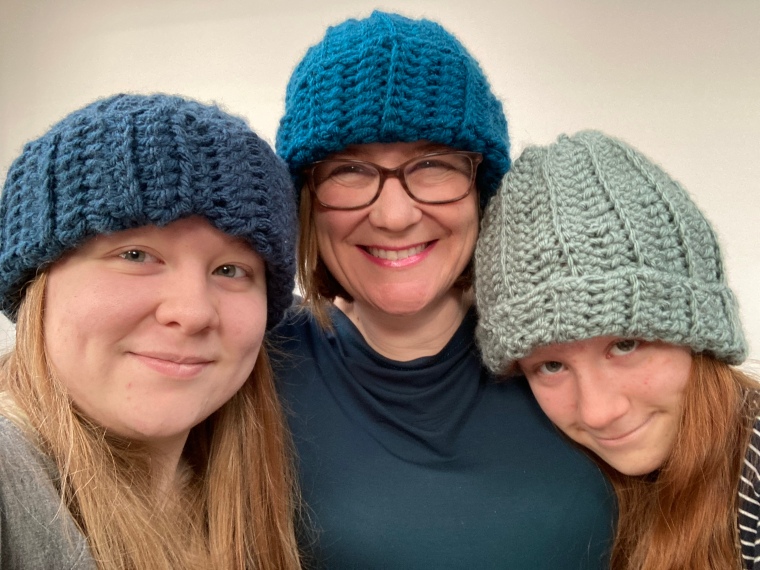
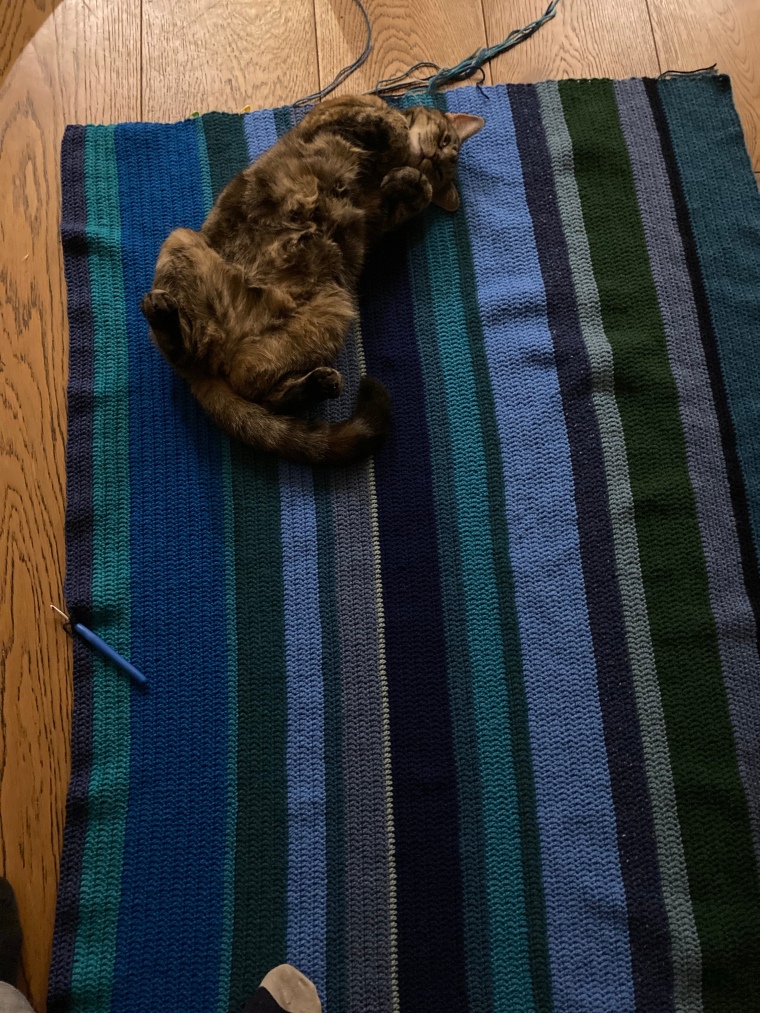
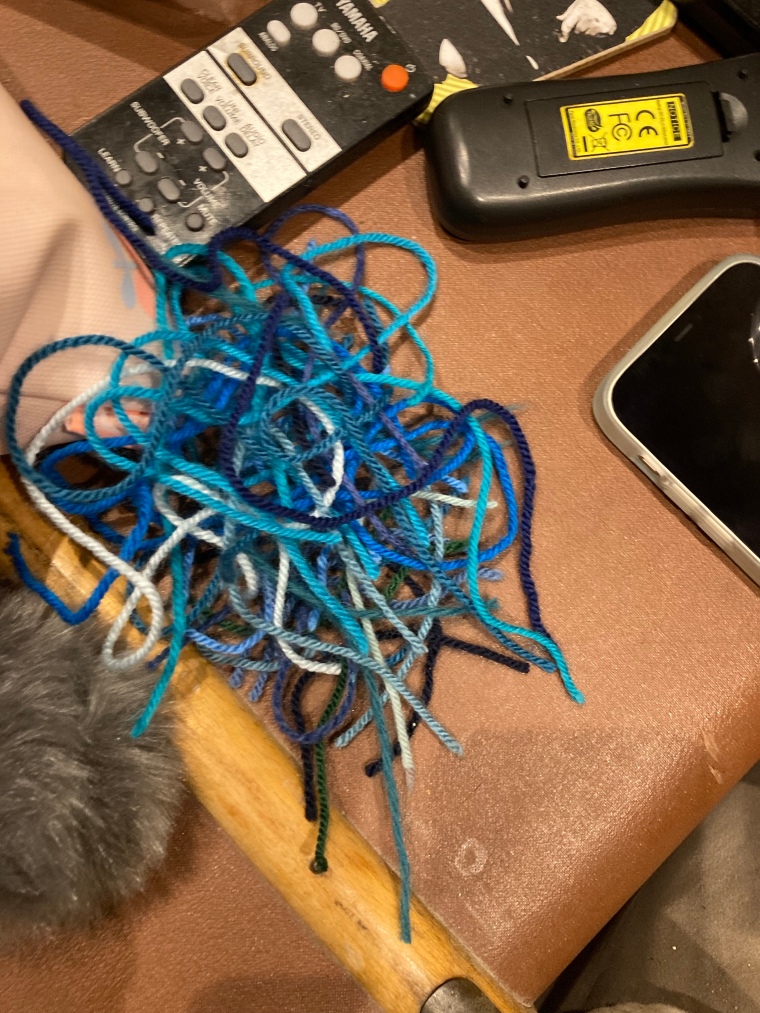
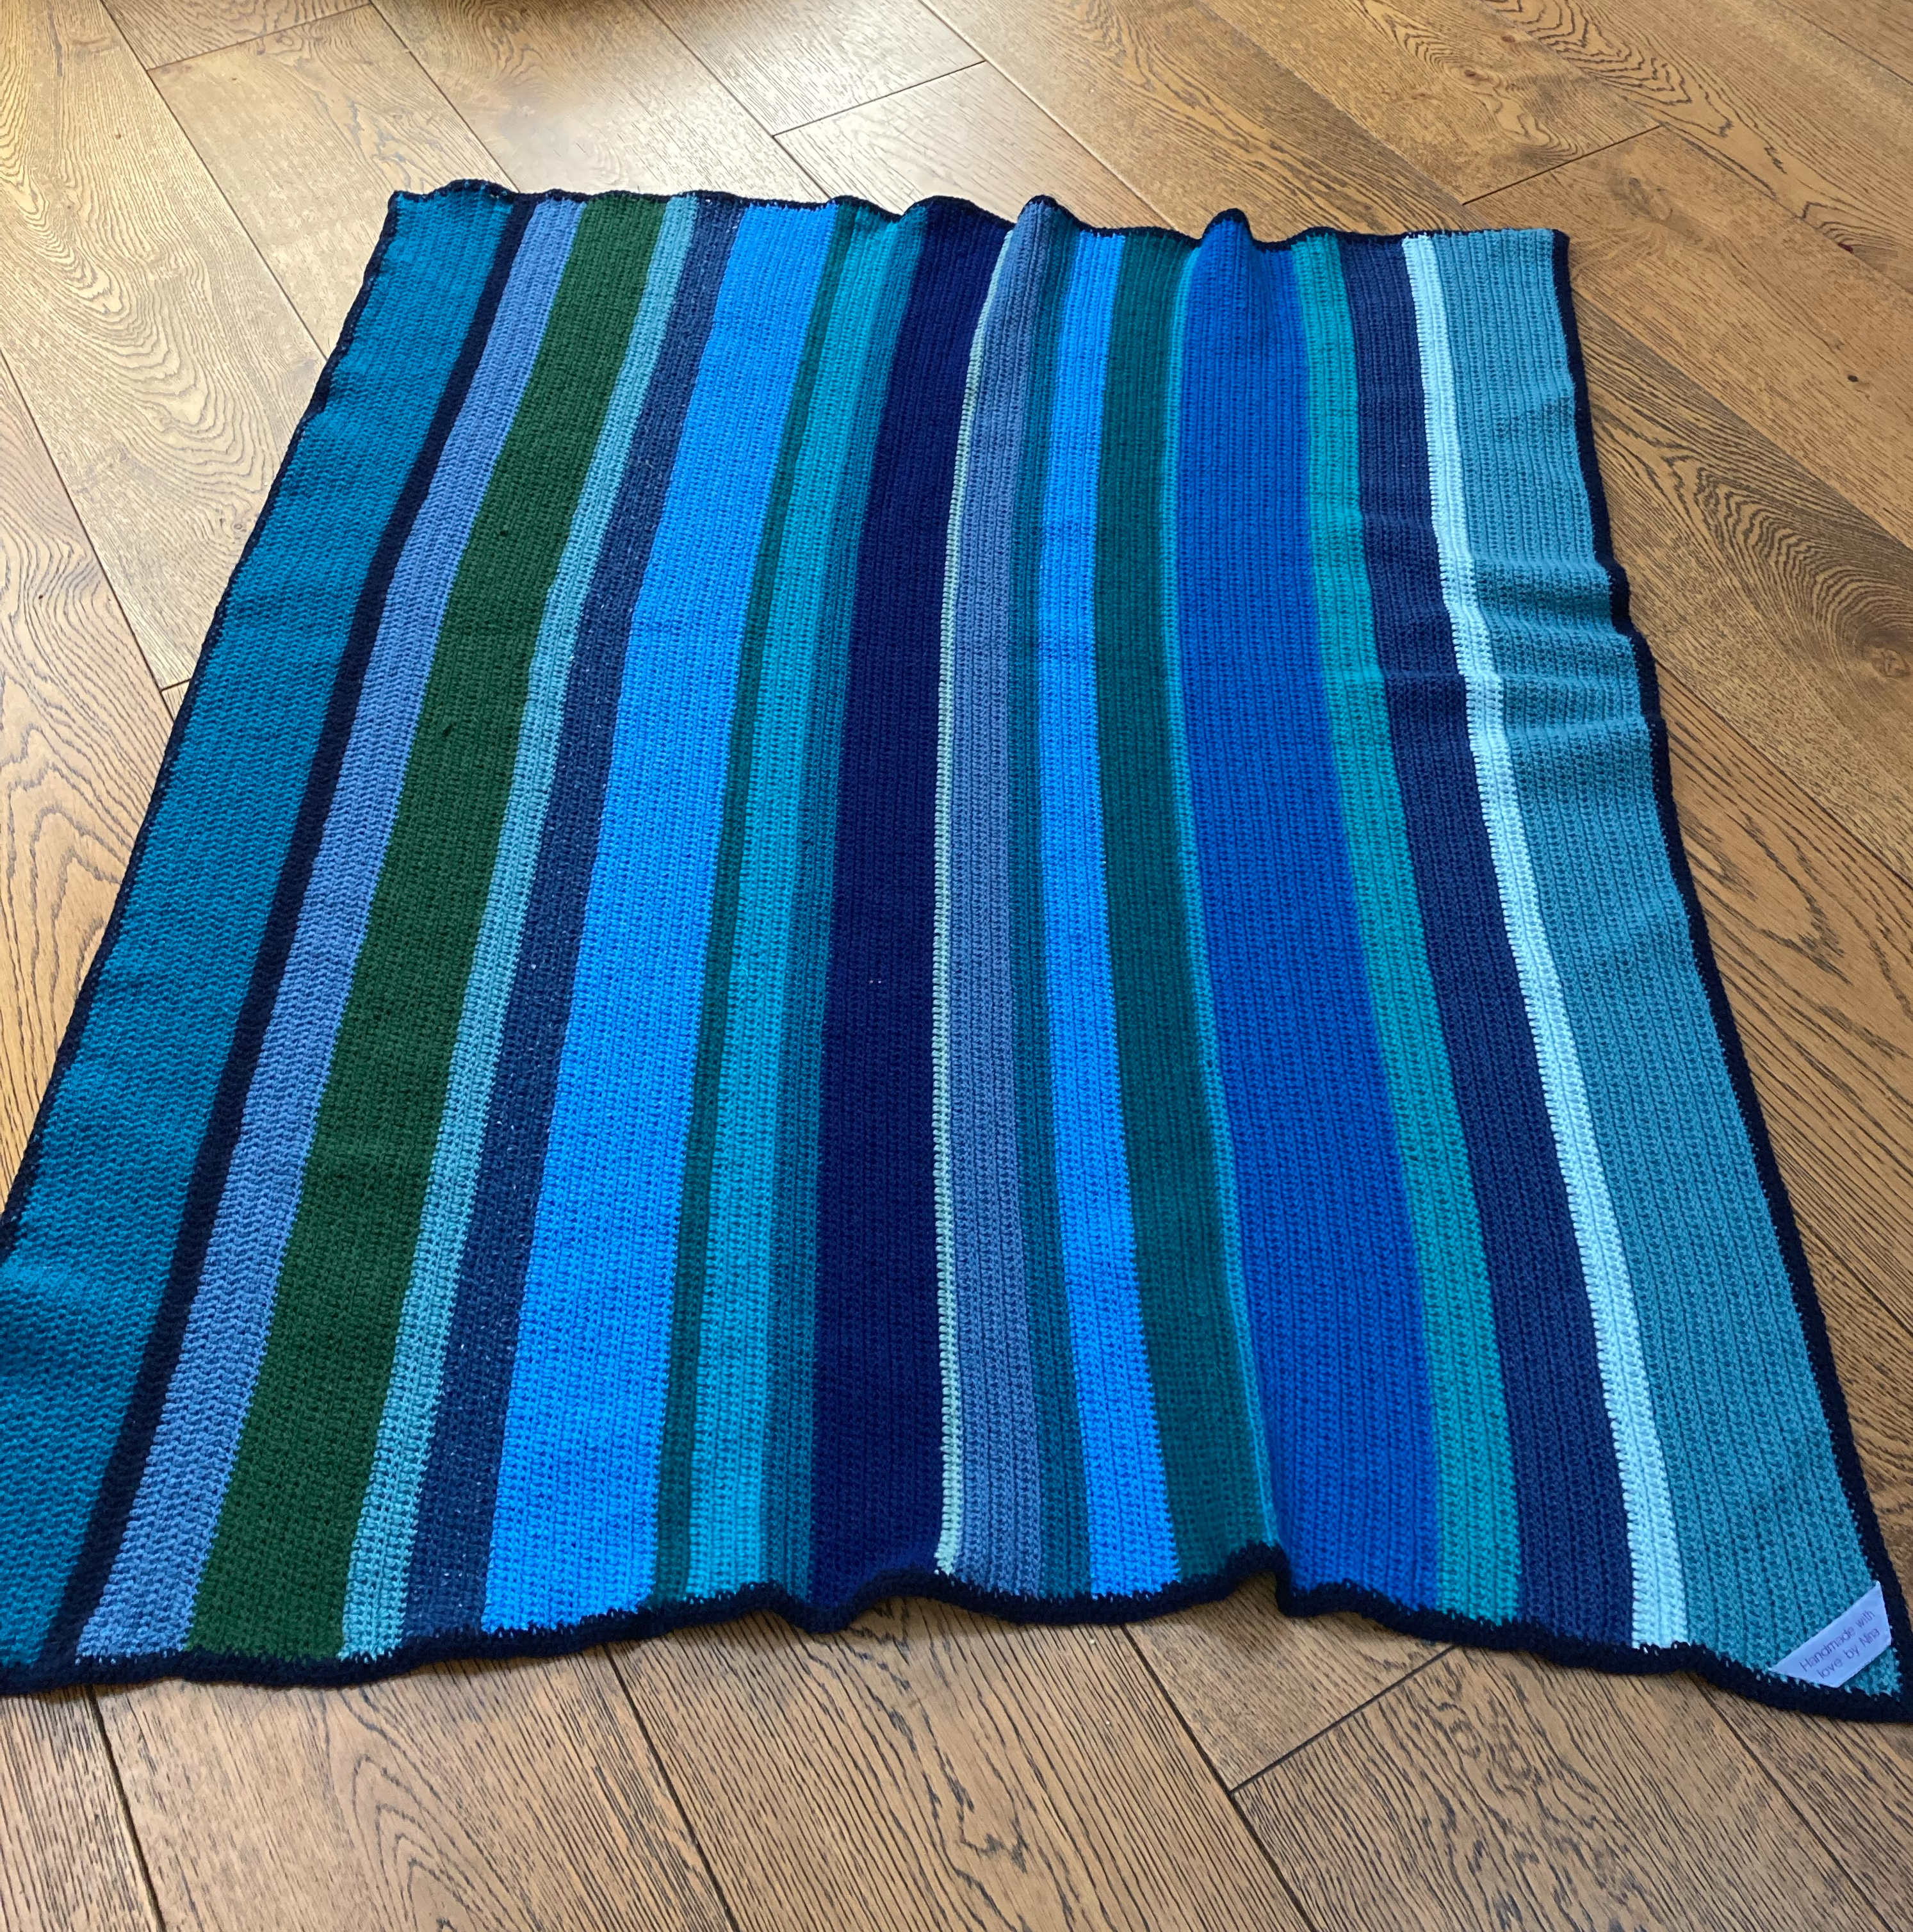
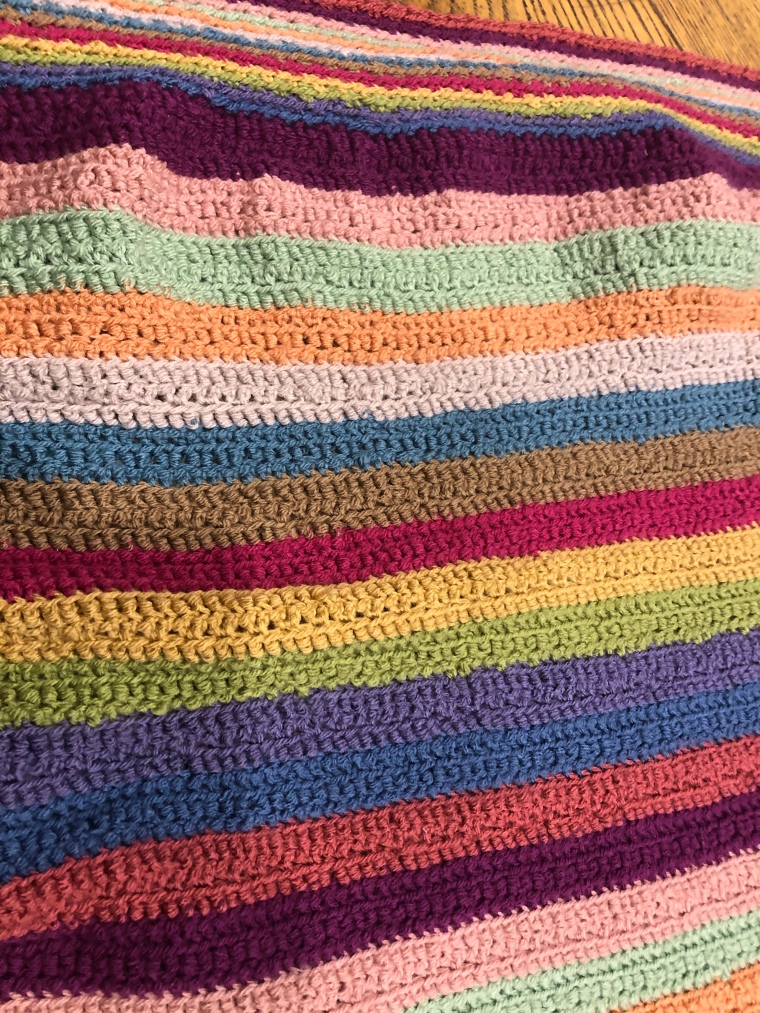
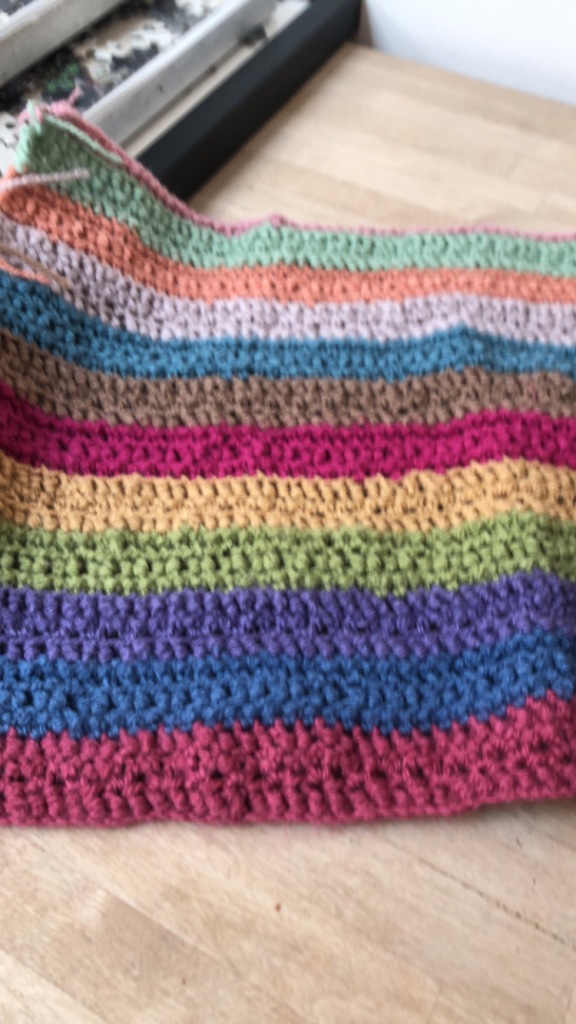
I have also now crocheted five woolly hats for my family, using King Cole chunky yarn. I bought some in John Lewis initially, but found a much wider range of colours online via LoveCrafts and for only £2.39 per ball. The pattern is from the reasonably-accurately-titled ‘You will be able to crochet by the end of this book’ book, bought as a birthday present last year by my lovely friend Vanessa. It takes about a ball and a half to crotchet a toasty warm woolly hat, and even for someone as slow as me, it only takes a day or so of sporadic crocheting. I’m crocheting a scarf with the leftover bits that we’ll have to share.

So there we are. Today is day 9, still a firm positive on this morning’s test, so I have the final two days, today and tomorrow before I can once again taste freedom. I cannot wait to get back to spending important time with my wonderful mum, but I’m glad I’ve had sewing and crochet to stop myself going completely bonkers during this time. Stay well out there.

Love and blankets

So, this one is about love.

Also, crochet, if you bear with me.

First shout is to this guy, who was foolish enough to ask me to marry him 23.5 years ago. I know how lucky I am that we’ve grown in parallel and not apart across those years, and that he’s still the person I want to talk to before I go to sleep at night. I don’t take it for granted, and I’m so happy that he’s always got my back.

The second shout is for Lisa – my best friend, bridesmaid and (incredibly) the fabulous sewist who agreed to make my wedding dress for me back in the late nineties. In my defence, I had no clue then what kind of favour I was asking – in my mind, she had a superpower and it would therefore be easy for her. Now I have a better understanding of quite how stressful, time consuming and outrageous this request was – and have expressed my abject apologies. Once again, I’m just lucky to have a friend who when I said “would you?” was the kind of person who immediately said “hell yes”.

What I wanted for my wedding dress was something absolutely not traditional. We were marrying in church because that was important to my husband, but as a confirmed atheist and feminist, I wasn’t interested in a big white frock and everything that represents. I wanted something that was me – and that drew on my Indian heritage. I’d had an idea about a wrap in the shape of a sari, and Lisa and I worked on the design – for a piece that we called a Chamumdar (a combination of our surnames). We “researched” fabric samples in fabulous shops in Southall, sustained by regular thali lunches. Very happy times.

The Chamumdar is made with layers of beautiful blue and green silks, that went over the top of my green wedding dress. As I said, not traditional but for me, it was perfect and just beautifully made. For the record, Lisa is a fabulously generous and talented artist, and I’m very lucky to have her as my friend.

The Chamumdar then – made for me by the love of a friend, to celebrate my wedding – is the back story to the main event of this post.

In August this year, I had the idea of creating a blanket inspired by my Chamumdar, and I knew that I was going to make it for the person from whom every other good thing in my life flows: my mum.

Mum is hard to describe, but everyone who knows her, knows how brilliant she is. She has taught me everything important – about love, about parenting, about kindness, about the arts, about laughter, about music and about living life to the full. She’s adored by her children, husband, grandchildren, friends, extended family and even casual acquaintances. My children laugh at her potty mouth, ask her advice on cocktails and prefer her above any other shopping companion. Her suppers are always delicious, generous and entertaining.

For the last 18 months, mum has been living with ovarian cancer – a crappy illness by any reckoning, and less fun still during a global pandemic. She has handled the indignities, pain and fatigue with her normal smiling determination. Her consultant clearly loves telling his (many) anecdotes to someone with her brain and wit.

And today – today is her birthday and I have spent three months, and over a hundred hours crocheting my blanket of love – in stripes of blue and green, just like my Chamumdar. My family have been cheerleaders, my friend Vanessa my crochet consultant, and my husband in charge of patiently massaging my elbow when it got to overload (crocheter’s elbow – I swear it must be a thing). It’s truly been a team effort, but the stitches were all by me.

This is the second blanket I’ve crocheted – and in truth this one is probably still more homemade than handmade. It’s not quite as wonky as my first effort, but you’d struggle to find a right angle. The wools are all quite different- some softer and some actually quite rough. Stitches have been added and dropped with a lack of precision that should make me embarrassed.

Still – and it feels a bit braggy to say it but – I love it. I love the colours, I love the imperfections, I love the effort – and most of all I love the love that it represents. Because that is truly the only important thing.

So, here’s to you. Happy birthday to my brilliant mum. I hope that you love it too.

And so to bed

I’m sure I’m not the only person to think that pyjamas are the right kind of things to be sewing during a lockdown. It’s hard to get very excited about beautiful dresses, trousers or shirts for work, when no one else is there. If a tree falls in a forest, and no one hears it fall – did it happen? If I wear heels to work, and no one sees any part of me below the shoulder – did I wear them?

So the first element is that pyjamas are an obvious choice right now.

Lisa wearing some snazzy PJ's for the cover of the Luna Pyjamas Sewing Pattern

Second element – the release of the Sew Over It Luna Pyjama pattern. OK, the pattern was released at the end of November, so it’s taken me a little while to get to it – but it equally seemed hard to justify another pattern for PJ trousers – my go to would usually be the TATB Love at First Stitch – Margot trousers which are a good fit for me, and should I really buy a whole new pattern for the lines of the top?

I resisted.

Then Liz (@thebakerwhosews) put up an instagram photo of her Luna pyjamas, just before I had a day off work for sewing – so it really wasn’t my fault at all.

Third element was that I already had the perfect fabric for this – just as well, as I had no opportunity to shop clearly – we’re in lockdown. I got the pattern, I printed the PDF version, I guillotined the edges and I got busy with the pritt stick. I was all set for a good sewing day.

When I said just now that I had the ‘perfect fabric’ for this project – what I meant of course was that about three years ago I had bought several metres of this flowery navy printed jersey, with the intention of it becoming pyjamas. The alarm bells might have gone off in my head had I thought that, despite having the fabric all that time – and despite pyjamas being an easy and lovely thing to make – I’d left it at the back of the stash pile. Why was that?

Another alarm bell might have sounded – really should have sounded – had I actually read the pattern properly. The Luna pyjamas are designed for a woven fabric, not a jersey. What was I going to do when I realised? Not make the pyjamas? Order some suitable woven fabric and make something else this time? Have we even met?

Clearly not. I had a project in my mind, determination in my soul and sense never had much to do with it anyway.

The alarm bell that did sound, loud and clear, was the one that screamed “this fabric is an absolute bastard to sew”. Unfortunately, that bell rang out when I had everything cut out and I’d started sewing – and pretty much everyone would agree that by that time, it was a bit late.

So the pattern – the Luna pyjama pattern is a straightforward and relatively easy sew. I can see that it would be anyway. It takes quite a lot of fabric all told (about 3.5-4m depending on size), but the instructions are clear, the sizing true, and the pieces fitted together beautifully. It calls for bias seam tape interfacing, a thing I neither owned nor had heard of – but seemed to be designed to stop the bias edge of the wrap top from stretching out. I got creative with some standard seam tape – not the most elegant solution, but it pretty much does the job and it’s all hidden from view.

Working with a stretch fabric, I clearly put a fresh stretch needle in my machine, and worked through the very last of my navy thread. However, my sewing machine just didn’t like sewing this fabric. It seemed to be both slippery and sticky at the same time – the kind of quality of a slip/petticoat, that sticks to your tights whilst allowing your dress to slide unimpeded. My machine kept missing stitches, and breaking the needle thread. Whether it was the fabric or the desperate remnants of thread I was working with by the end (those multi packs of thin threads that you get in the Aldi special offer), it was not a winning combination.

I always think that I have tons of navy and black thread, and then I’m always surprised when that’s not true. Either that or I make a mental note that I need more navy thread, and then on separate outings buy three different reels. All at 500m+. You’re right – the problem is me.

By the end of sewing day one, I’d pretty much finished the top. I put it on Rosie, and then I scowled at it and gave it a time out. I liked the look of it, but the process meant that we were not friends.

It took me nearly a fortnight to take a few hours to sew up the trousers to match. Such was the cooling off period required, and it’s fair to say that I am still cross with the fabric.

I’ve been wearing them all evening though, and I do really like the pattern. I can see that in the right (woven with a lovely drape) fabric, they would work beautifully. I ‘may’ have ordered some more appropriate fabric for a second set today. And some of that bias tape interfacing stuff. I’ll keep you posted.

So the pyjamas are complete, and it’s time for bed. In this time of real challenge in the world, it’s good to have some simple things that add a little to your day – and I think this pattern might be one of those things.

Support for sewing from Mary, Bert and Tilly x

Statement sleeves

My sewing output in 2020 really reflects my mood. I think this year has taken so much of me (of all of us), that there hasn’t been much left over for sewing. I’ve started things but not finished many of them.

This Christmas has been no different – such a strange end to the year, going against all instincts and keeping loved ones at (many) arm’s length. However, I’ve had a little time to sew, and after a stern chat with myself, I decided to finish a top that was in my WIP pile.

The fabric was from an order back at the start of the first lockdown – a loopback jersey fabric (shade = berry) from Guthrie and Ghani. It’s simply the softest jersey I’ve worked with – about the weight of a ponte, but somehow softer, and with a lovely drape. The colour is a brighter red shade than I’d thought looking at it online, but actually I like it a lot. I’m excited to think that I have some of the same fabric in a navy shade that’s still waiting for me.

The pattern is the Maven Patterns Somerset top. I’d seen several makers posting their Somersets on Facebook and Instagram, and fell in love with the bishop sleeves and the slash neckline. I finally gave in and ordered it in October. It was just before the second national lockdown – but in our family we were locked down for the last two weeks of October as my eldest daughter got Covid. Stuck at home with no printer, I ordered the pattern via the Foldline service – where they will send you the PDF version as well as printing it out on lovely big A0 sheets. It’s not the cheapest way to buy a pattern for sure, but the luxury of having the pattern printed without having to glue together dozens of sheets is wonderful. It’s also great to have the PDF version – in case I want to print again in future, but also because the instructions are only virtual – not wasting paper, or indeed space in my overflowing sewing area. The printed pattern arrived really quickly, along with one of their lovely envelopes to keep the cut pieces in (query – any one know if I can order more of those? My PDF patterns are hard to organise in a way that doesn’t look messy, and that could be the answer…).

So I cut out the pieces. Only four of them.

And then I somehow got stuck. Really? Why? It’s a really simple, straightforward pattern. A lovely sew – what on earth was I waiting for?

Christmas, as it turned out.

So on the Monday after Christmas, I spent the afternoon pottering around, gradually assembling this top. It really is an easy sew, so again what on earth was taking me so long? Well I needed to put red thread in my overlocker – and I only had two cones. Obviously threading my overlocker is always a stress as it hates me, so we had some fun with that. Then the neckline, the first step, is simply to turn it down, press in place and topstitch. I was pleased with my topstitching, but realised too late that I had managed to not catch the hem in a couple of places. No problem I thought, I’ll add a second line of stitches and make it look like I’d used a twin needle (which I hadn’t chosen to do in the first place). That second line really couldn’t have been more cack-handed. The nice topstitching now looked like a hot mess. So I spent quite a lot of time with my stitch-ripper, trying to carefully remove the second line without damaging the fabric or stretching it out.

By the time I’d unpicked the lot, I decided to carefully/invisibly hand-stitch the hem gaps closed and stick with the first line. That took no time at all, and I reflected that the second line of stitching plus all the stitch ripping had probably added a good hour to the make.

I then had a bit of an issue with the shirring elastic needed to gather the bishop sleeves – I think it was just too thick for my machine, or maybe I’d not got the tension right and it kept creating additional loops rather than gathering right. I tried several times on a scrap, and then gave up and simply used a double line of thread to gather the sleeve ends. It worked fine, but probably didn’t make them quite as full as they would have been with the shirring.

Other than those moments, the top was an easy make and lovely to sew. The instructions by Maven Patterns really couldn’t be clearer, and they take you through every step of the process in a lot of detail. The fit (I made a size 12) is spot on – and it makes a really wearable top.

I love the sleeves – they feel elegant but the long cuff keeps them well out of your soup (or whatever else you’re trying to consume/work on). I think I’ll make more Somersets – I really hope I do anyway. I always say this and then get distracted by the next shiny thing – but this is the kind of basic pattern that is quick and easy to whip together. And I could definitely use one in navy…

A stitch in (lots of) time

Turns out that when I thought I was slow at sewing, I had no idea at all how slow I might be at crochet.

Back in lockdown #1 (remember that?) I started the first proper crochet project I’d ever undertaken. I’d bought the kit when I went to the Stitch Festival in March, before the world went topsy-turvy, encouraged by my sewing-friend and work mate Vanessa. It’s the Kasbah Blanket by Black Sheep Wools – and I was attracted by the beautiful sample on show, the colours and the encouragement from Vanessa that it was all pretty straightforward and that I could definitely do it.

My previous experience at crochet was extremely limited. I learned to crochet a bowl with Elisalex at the Village Haberdashery in a class many years ago now – with my mum and step-sister. We had an enjoyable evening, and I felt a huge sense of achievement making my t-shirt material jersey bowl. I came home and made another. And another. And then I realised that I had no practical use for crocheted jersey bowls and I stopped. That dear reader, was the total sum of my skills – so when I was reassured that I could definitely do this, it’s fair to say that I was doubtful that this project would ever be completed.

There was another good reason for doubt here – it takes a sodding long time to do a crochet blanket. For motivation, I committed to making the blanket for my eldest daughter Ellie, who was heading off to university and leaving home in October. I wanted her to have something to take with her that she knew had taken a lot of effort, and which might make her think of home (well me basicallly) when she was off having a fabulous time at college. Privately I wasn’t convinced she would receive it before her graduation, but we started.

The enormously patient Vanessa showed me how to chain stitches to start (because even the basics had left me at this point), and gave me Zoom lessons to learn the treble crochet stitch that this blanket is pretty much made up of. The thing was started. What I realised quite quickly is that each row of the blanket was 175 stitches. Each stripe of the blanket was made up of 3 rows, so each stripe needed 525 stitches. There were 39 stripes, and then a border going round the whole thing with another 13 stripes. The grand total was – a whole lot of stitches. And a lot of time.

Slowly – very slowly – the thing grew. While work was bananas, working from home and the Easter long weekend meant time spent in the garden, getting very gradually faster and absorbing some vitamin D, listening to an audio book (actually many of them) and in a reasonable amount of time it was looking like the photo on the left.

Anyone who knows me well, will know what happened next. Clearly I thought I had it taped, that I had ages to finish it before Ellie went to uni, and that something newer and shinier was the priority. It was there in the background and I knew I needed to pick it up again if it was ever going to get completed – but it lurked and I did nothing.

August and A level results day was a happy one in this family (appreciate that this was not everyone’s experience because it was an utter fiasco) – but as well as having to get my head around my firstborn child leaving for university, I had the sinking realisation that I had left things far too long and that even if I spent all of the time between results day and her planned departure day doing nothing but crochet, it still probably wouldn’t be finished. [This may be something of an exaggeration, but you understand my point.]

She left early October, and it wasn’t finished. I felt guilt, I worked at it. And now ….. (drum roll) …. about a month late and as the UK enters Lockdown #2 ……. I’m very happy to have completed and gifted the wonkiest crochet blanket known to mankind.

What you don’t see in those close up photos that I used before in this blog is that I clearly fudged a bunch of stitches and narrowed the rows quite significantly as I went through. Look carefully (or even casually really) at this photo, and you can see that there is a big difference between the width at one end and the other.

It very clearly doesn’t sit flat, and for some reason the border is way too tight at the wider end as well – and while that narrows it back down a bit, it hardly looks professional. No question, it’s got holes where there shouldn’t be some, the stitches are inconsistent, and I’m not sure that the double crochet I used for the border was in any way right – I looked it up on You Tube and was quite proud of teaching myself – but it doesn’t really look a lot like the photo that came with the kit, so was probably wrong.

You know what? I’m still prouder of this thing than most things I have made. I still love the colours, I love the fact that Ellie has a blanket for her uni room that was made by me, and I’ve learned to quite love the repetitive action of crochet. I’ve got plenty of leftover wool (probably due to that narrowing of my rows that missed out a bunch of stitches) so maybe I’ll make a scarf? Try something new?

In terms of the kits from Black Sheep Wools – I think they’re excellent value, as you get everything you need except a crochet hook – and they probably sell those too. For a complete novice like me, the instructions would have been impossible to follow, but they make a bit of sense to me now. For anyone who knows what they’re doing, I’m sure they’d be perfect – if a bit basic. I’ve seen some of their other crochet designs that are lacy and beautiful, and I think that they’re well beyond my abilities.

I mean, I think that’s obvious to everyone at this point.

I can sew a rainbow

img_2684It’s the eighth week since lockdown began and, true to the “slow sewing” bit of my blog’s strapline, I’ve finally finished four sets of scrubs which I’ll deliver this morning to the Royal Hospital for Neurodisability in Wandsworth. The hospital sent a message to my place of work just as we were all shutting down, asking if anyone would be able to make some scrubs for them – and while it’s taken a lot longer than it should have, I’m very pleased to have now got a batch ready to deliver.

img_2782
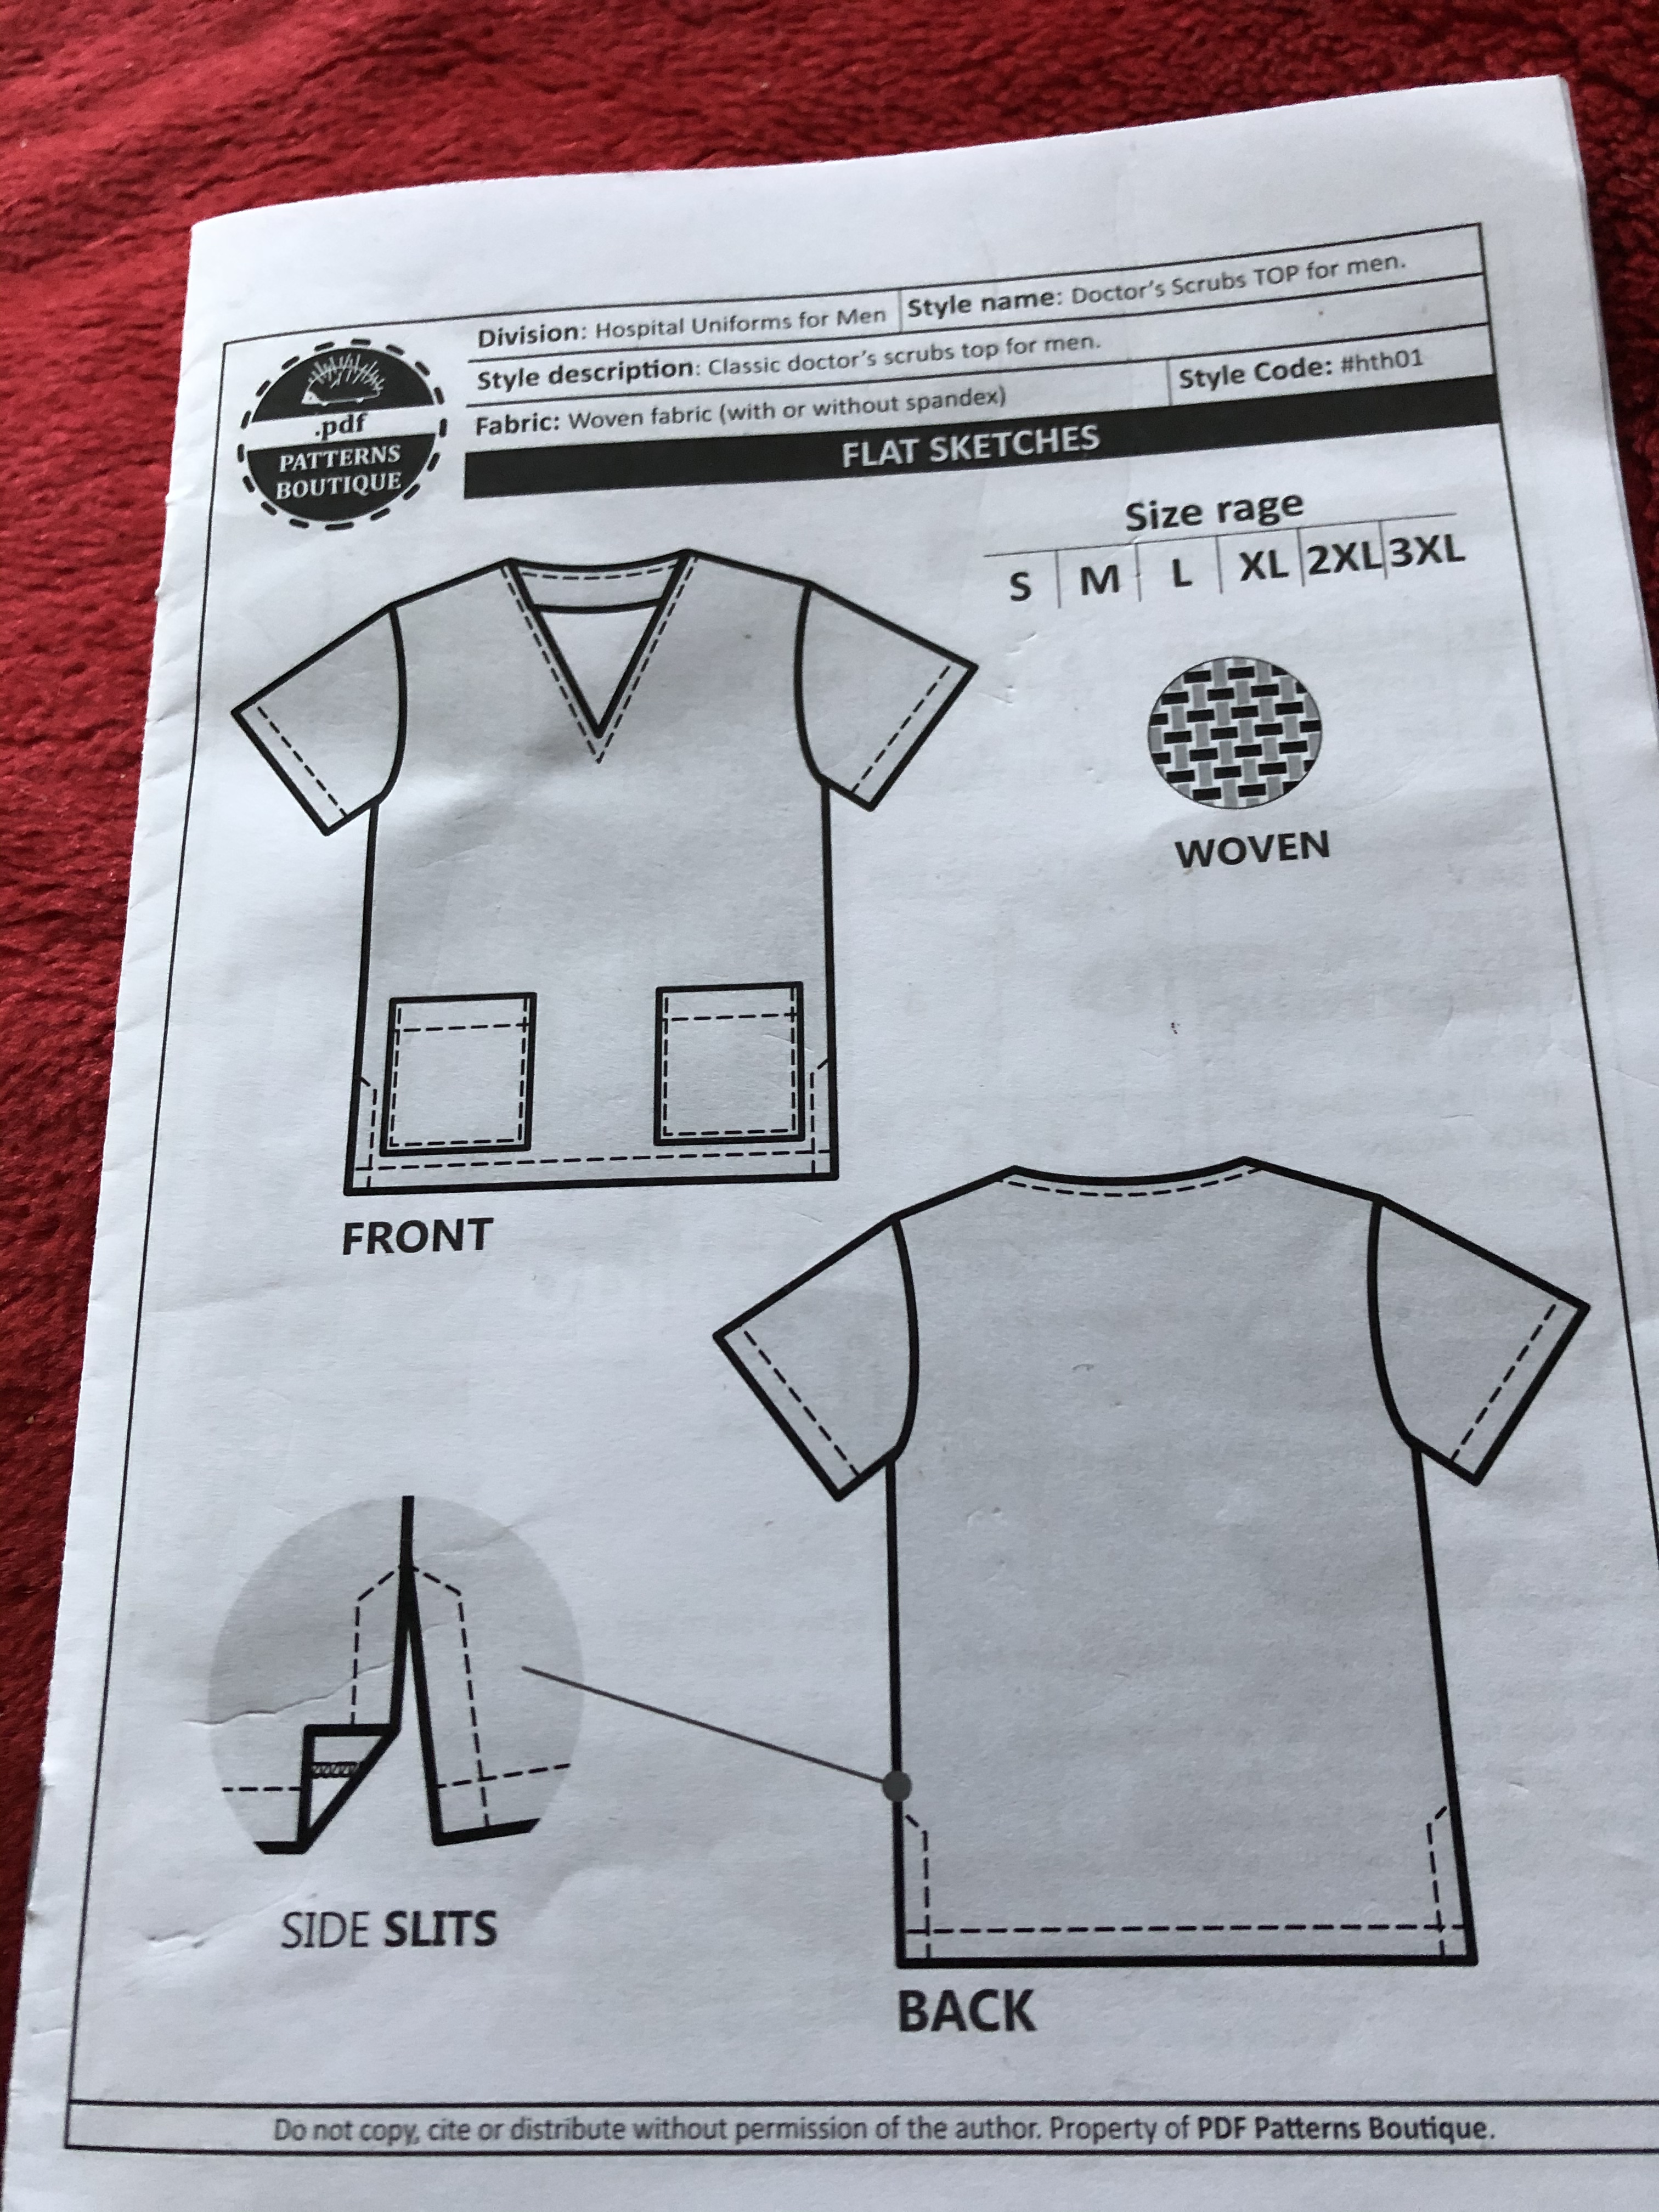
The hospital’s email had suggested a pattern – one produced by PDF patterns boutique and imaginatively entitled ‘Classic doctor’s scrubs for men’. The important bit was that they are/were being printed by Blue Sky Printing at cost – so for only a few pounds and in only a few days the printed pattern and instructions were at my door. Similarly Fabricland were prioritising orders for people supporting the NHS through sewing, and so about a week later I had 15m of blue cotton which I was washing and ironing – on a beautifully warm and sunny day over Easter (obviously). And it turns out that ironing 15m of anything takes a pretty long time.

I was so proud that the whole family pitched in with this one – husband on cutting out, eldest daughter as my co-sewist, youngest daughter on ironing the interfacing – and middle daughter on embroidery. Embroidery is her new lockdown hobby, and it’s pretty gorgeous if I do say so in a proud-mum way.

We were aiming for six sets of scrubs, but while we have six tops assembled, we’re out of fabric for the trousers for the last two sets. I’ve recently had a duvet cover donated that might work, but if not I’ll order a little more fabric and get the last two pairs of trousers done as soon as I can.

So, other than a sense of being able to do something that’s useful at this time of national stasis, there are a few sewing things that I learned from all of this.

Firstly, sewing anything four (or six) times really does build your skills up in a way that sewing lots of different things doesn’t. You can feel yourself adapting as you go and using the knowledge of only a few minutes before to improve the next seam/line/pressing etc. It’s pretty dull work though and tiring – you don’t get the same sense of progress when you sew the same things six times over and that takes a bit of adjusting to.

img_2674

Secondly, while I knew that my eldest daughter would sew along with me (she’s off to study costume design this September if the world gets itself a little more settled, and has amazing design and construction skills), I hadn’t anticipated how much more you can get done when you have a whole family of willing helpers. I wouldn’t have dreamed of adding embroidery – and if it were a requirement, frankly the hospital would have been waiting a lot longer for a far poorer result. My husband was happy chopping cotton, and even my ten year old was keen to help – not just with appropriate signage, but with specific tasks like applying interfacing. It’s been a really lovely team effort.

img_2783Thirdly, instructions for this pattern were sparse to say the least – but that’s OK. I’ve not used this type of pattern before, and  it was effectively diagrams with the odd note. Not what I’m used to (spoiled by the step-by-step hand-holding of most indie patterns these days) but actually sufficient. The garments being made were not fitted, and were basic and simple. I wouldn’t opt for this kind of instruction for anything more complicated – but it gave me taste of how sewing was in the past (vintage patterns have very little guidance) and how some of those more experienced dressmakers can ignore a pattern’s text and just read the pieces based on their own experience.

I suppose finally, it’s been good to have something that I have felt in some way obliged to sew during these bizarre and difficult times. My sew-jo up and left at the beginning of all this, and the hoodie dress I cut out in March is still unconstructed. Having this (slow) project going on has kept me sewing even when the impetus has left and I’m in awe of people who have done so much more. My friend at work ordered 30m of fabric in the first wave of this, organised her street to do construction and then between them they’ve crowd-funded for more fabric and collaborated to do loads more. Respect.

Right now, I just find it hard to be creative in the same way as usual – I’m learning to crochet and am working on a blanket that will probably take the rest of my days. It’s simple, repetitive and quite contained – and that’s working for me right now. I’m looking forward to when my excitement about sewing gets back to its usual levels – and I don’t doubt it’s out there – like everything to do with lockdown, it’s just a matter of waiting.

Tea finished and the sun is up (sleep has also been elusive of late), so I’ll finish this post now and get ready to deliver to the hospital on my way to work. Stay safe everyone.


Kimono – in praise of the V and A

With a casualness that belongs to another time (was it only a matter of weeks ago?), I went to the V&A. In general I don’t feel like I take enough advantage of the range of available culture that living just outside London offers me. The V&A is different though: it’s my favourite museum by a long mile, its exhibitions are fascinating and beautiful, and being a member means that I can saunter in and skip the long queues that build up. I just love it.

The current (is it current when the whole place is closed?) exhibition celebrates the art, construction and beauty of the kimono. The pieces we saw during our visit demonstrated the simple structure of the garments, set against the breathtaking artistry of the embroidery, intricate resist-dye techniques and weaving. The exhibition moved from the history into recent designer pieces that have been inspired by kimono – from Alexander McQueen to Star Wars.

Soon after our visit, the museum closed and then London closed – and while I’m very lucky in my home and my lovely cohabitants, it’s a very odd feeling. Part of me longs to sew and be creative, but at the same time I don’t. I don’t feel I need that quiet solace that I get from sewing when everything is so … contained.

img_2574
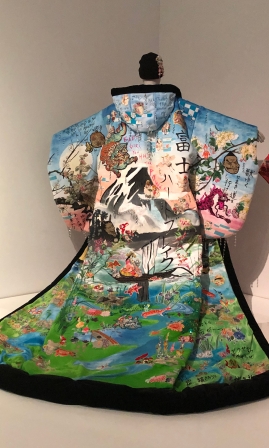
It made me think back to that exhibition and draw some probably-stretching-a-point parallels with the life we’re living right now. The simple structure of one place to be in, with no variation and no urgency (or option) to be anywhere else – well maybe that’s the simple structure of the kimono. We can make it beautiful with decoration – but the simple shape is already everything that’s needed. Maybe the need for embroidery comes later.

On that basis my isolation sewing is not going to be very adventurous. I’m planning a Stella hoodie dress from the TATB Stretch book – because I need comfy clothes to lounge around in.

I guess I really ought to say that I’m going to learn to resist dye with rice paste (seriously mind-blowing skills), focus on intricate and detailed embroidery or learn new weaving techniques – but actually I’m going to keep things simple and be calm.

I’m very pleased that I had the chance to see this beautiful exhibition when I did – and when normal 2.0 is installed, I hope I never again take for granted how lucky I am to be able to experience such amazing art.

Cielo – a heavenly project

img_2525The Italian translation of cielo is the sky or heavens. The meaning in Spanish is the same (due to the shared Latin root – caelum) but that doesn’t seem as relevant because this is a review of a pattern from the Closet Case Patterns Rome collection. Anyway the obvious pun works just fine here, because this really is a pretty heavenly pattern.img_2455

The only Closet Case pattern that I’ve made before is the Bombshell swimsuit. That was one of those projects that I made about four years ago – when I knew I didn’t have the skills to accomplish it but figured “to hell with it” and just gave it a go. My swimsuit is far from perfect, but I wear it still and I love it. It’s a brilliant pattern.

I don’t know why I’ve not made some of the rest of the CCP catalogue. It’s not that I don’t constantly drool over them. The Clare coat, the Morgan jeans, the Charlie kaftan and the rest of the Rome collection have been on my mental ‘to make’ list forever a long time. When the Rome collection was published last year I was keen – but as ever, there are just so many things to make <ooh shiny thing>.

img_2513So what finally got me there? It was the pouffy sleeves of the Cielo that took me across the line with this one. They looked fabulous in the line drawing, kept popping up in different blogs that I follow, and seemed even better in the Instagram selection that I researched. And now that I have those sleeves to waft around in for myself, it’s hard to imagine wanting to wear anything else!

img_2447
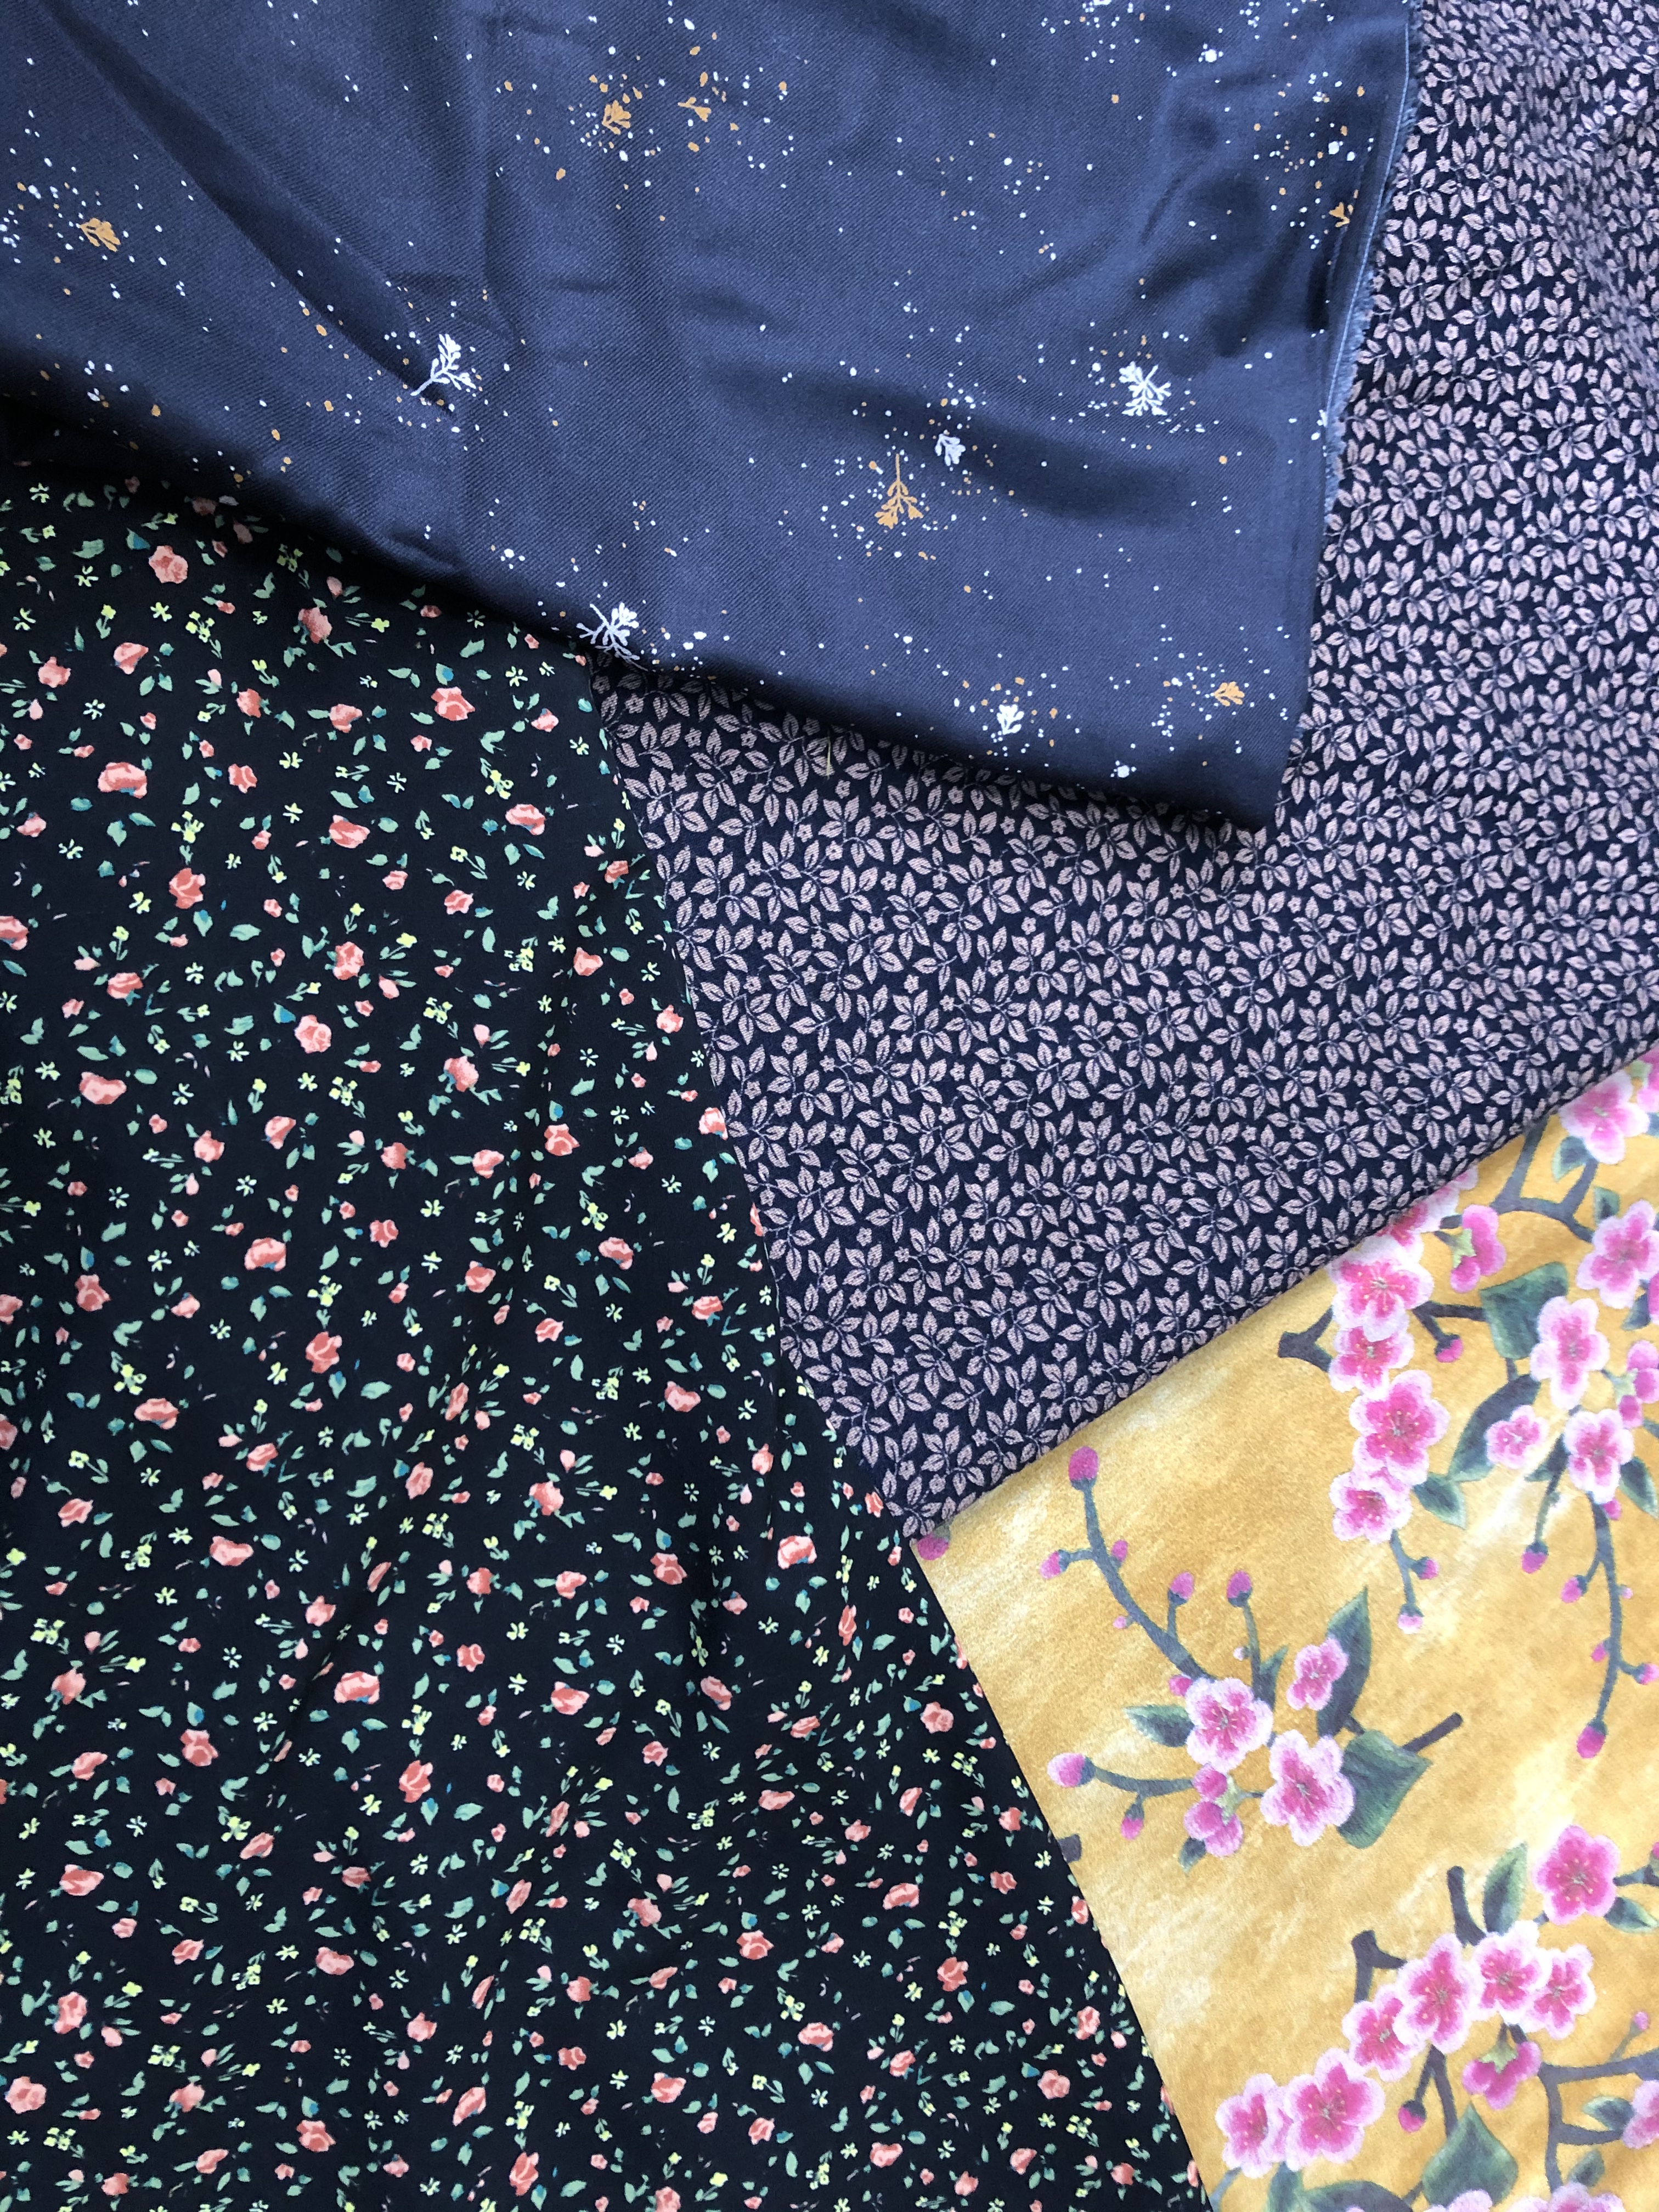
The fabric and the pattern were both purchased at the Stitch Festival last weekend. I bought the pattern from Sew Me Something – and I really have no memory of where the fabric came from. There were so many stalls – so much wonderful fabric – and I was like a child in a sweet shop. What a dangerously lovely day! I ended up buying far too much fabric, all prints despite a firm commitment going in to only buy solids, and for the most part, no clear idea of what they would become.

This piece was different though – I had my pattern already purchased, and the moment I handled it, I knew she would be my first Cielo. The fabric is a light, very drapey viscose (at a guess – I’m rubbish at identifying fabric types). It doesn’t hate or particularly welcome an iron, and feels like it will be dry a few minutes after it’s been washed (fingers crossed, with little ironing required – in which case it will definitely be my favourite thing ever).

The steps of construction were straightforward, with nothing particularly tricky. That doesn’t mean that I didn’t blunder my way through it though. I traced the pattern pieces on Friday evening, while waiting until the right time of the morning to be my eldest daughter’s taxi service back from a club. I was quite happy spending that quiet time tracing – and only realised that when pretty tired I should probably have triple checked my work when I realised that half the lower sleeve had been traced on to the worktop, not the paper.

img_2454Next I managed to cut out one of my huge sleeve heads with fabric that had a hidden cut out – you know when you fold it and you’re sure that you know where the lower fabric edge runs, but there’s one bit that’s cut out? That was me. And it was right in the middle of the sleeve head. It’s such an enormous pattern piece that I didn’t want to just recut the piece (it would have been so wasteful), so instead I recut the top of the piece about 3cm down, to lose the chunk that was missing – I knew that it would make the sleeve a bit shorter, and possibly slightly less pouffy, but as the cost was only about 2cm across the gathered section, I decided it was the best way forwards.

img_2460
Let’s reflect that this is a bleached photo with the flash …

The final mistake was in using black thread for my gathering stitches – seriously, am I a complete amateur? My eyesight (or lack of it) is hilarious to my children, but still I thought it best to put in gathering stitches that were black thread on a black background – and which I really could barely see.

And yet, despite these errors – you know I just really loved making this top. It’s not just because I could see she was a lovely thing as I was making her – but also because the pattern was really well put together, easy to follow and fun. I had to walk down to our local sewing shop (Sweet Seams) to get some more black thread mid afternoon on Saturday, and I realised I was walking along with a big grin on my face – because I was in the middle of a really lovely sewing day. And let’s just celebrate the fact that I went into the shop, bought the thread and nothing else, and left again. I know, I’m as surprised as you are.

Learning points – well the obvious ones would be to avoid all the errors above in my next Cielo with careful cutting/measuring, using a contrast colour for the running stitches and so on.

One thing I adapted in the pattern was the length – when I’d finished but not hemmed the top I tried it on, and it was really as short as I wanted it to be – perhaps too short already. I therefore cut a 2 inch band and added it to the bottom. I really like this – both the finish and the length on me – and perhaps just the fact that I had to lengthen something! At 5’2″, that doesn’t happen very often.

So one of my Stitch Festival fabrics sewn, and I’m really happy with it. What will be next??

Time trial: Tabitha Drawstring Dress

I’ve wittered on before about being a slow sewist – but in fairness that’s been an assumption on my part until now. I generally sew alone (sewing weekends notwithstanding), so my points of reference tend to be contestants on the Sewing Bee, Next in Fashion, Project Runway etc. So in reality, I had no proof that I was slower than your average dressmaker. Until now.

I was always going to buy Tilly’s new book ‘Make It Simple‘ – I’ve got her other two books, lots of her standalone patterns and I really like her style. Not everything works for me, but her size 4 measurements rarely need much adjustment for my frame, and I end up with garments that I feel fit really well. The premise of the new book being “easy, speedy sewing projects to stitch up in an afternoon” sounded too good to be true.

Back from a lovely holiday in Bruges, I curled up last weekend with the book and picked the Drawstring Dress (based on the Tabitha t-shirt pattern) as my first project. I had some lovely bluey/lilacy t-shirt fabric (no idea of its provenance) that needed a purpose, and everything else was in my stash. I had a lovely Sunday project ahead of me.

So, I decided to do a time trial. Tilly’s optimistic predictions were:

  • Cutting time (including drafting the skirt): 45 minutes
  • Sewing time: 2 hours 20 minutes

Let’s see how we got on …

9:50   Assemble tools, make coffee (an essential part of all sewing) and clear down breakfasty remains adhering to all kitchen surfaces.

img_235010:01 Start tracing pattern pieces in size 4.

10:55 Tracing complete and paper pattern pieces cut out. Skirt piece drafted (some head scratching as ‘place on fold’ instruction in diagram appears to be on wrong side).

10:55 Break to sort laundry and dishwasher. Make second pot of coffee.

11:10 Iron fabric and try to get the piece folded on grain.

11:20 Start cutting out pattern pieces in the fabric.

11:57 All cut out; break for more coffee and crumpet.

img_2351
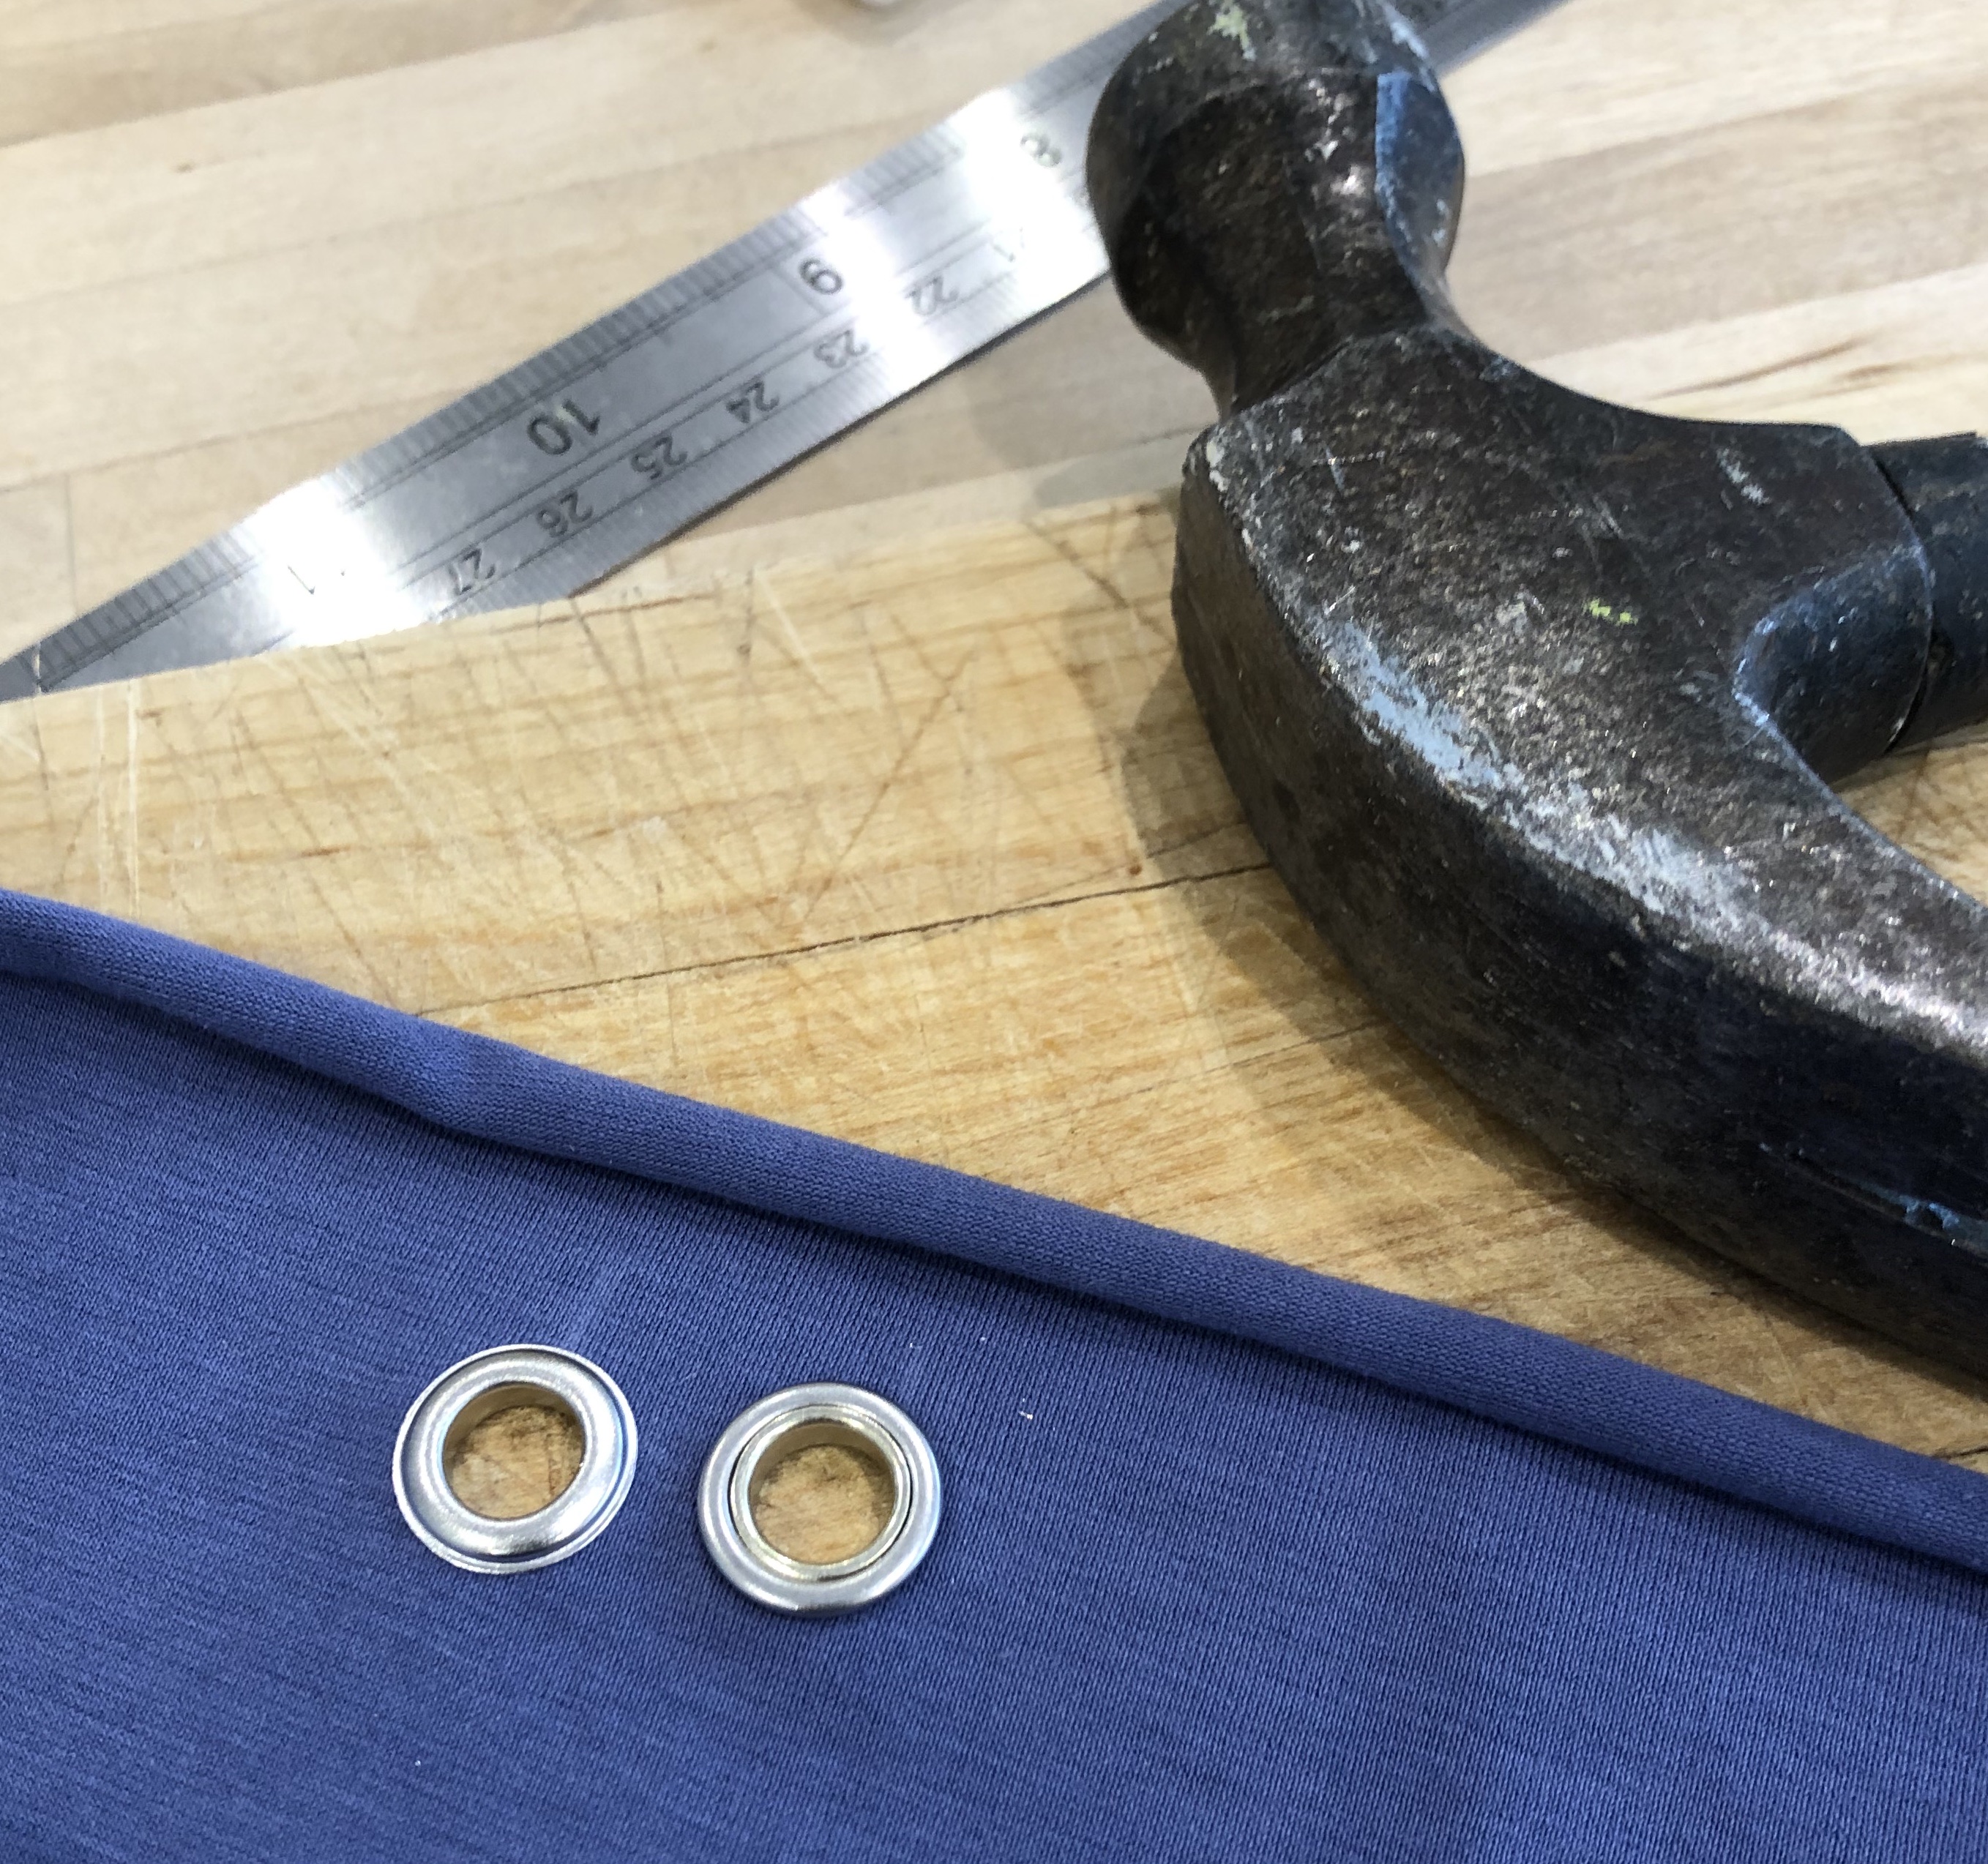
12:04 Find eyelet kit and a scrap piece of fabric to test it on – not inserted an eyelet before.

12:08 Finally manage to open the pack (staring at you Hemline packaging).

12:26 Eyelets fitted. Kitchen island slightly dented. Feel I have a (slightly wonky) new superpower involving a crazed woman with a hammer. Another laundry break.

12:32 Cut drawstring from a dark navy piece of ponte di roma jersey that will contrast well with the lilac jersey.

12:40 Break for family stuff – homework, snacks and conversations.

1:05 Stabilize shoulders and stitch together. Take a gamble on neckband – I haven’t got any ribbing in a suitable colour, and I have no patience to wait until I can source some. I cut the piece in the main fabric, on the basis that it’s pretty stretchy.

1:35 Neckband attached – ok, not perfect but quite near – certainly not redoing it. Now for the sleeves.

img_2358
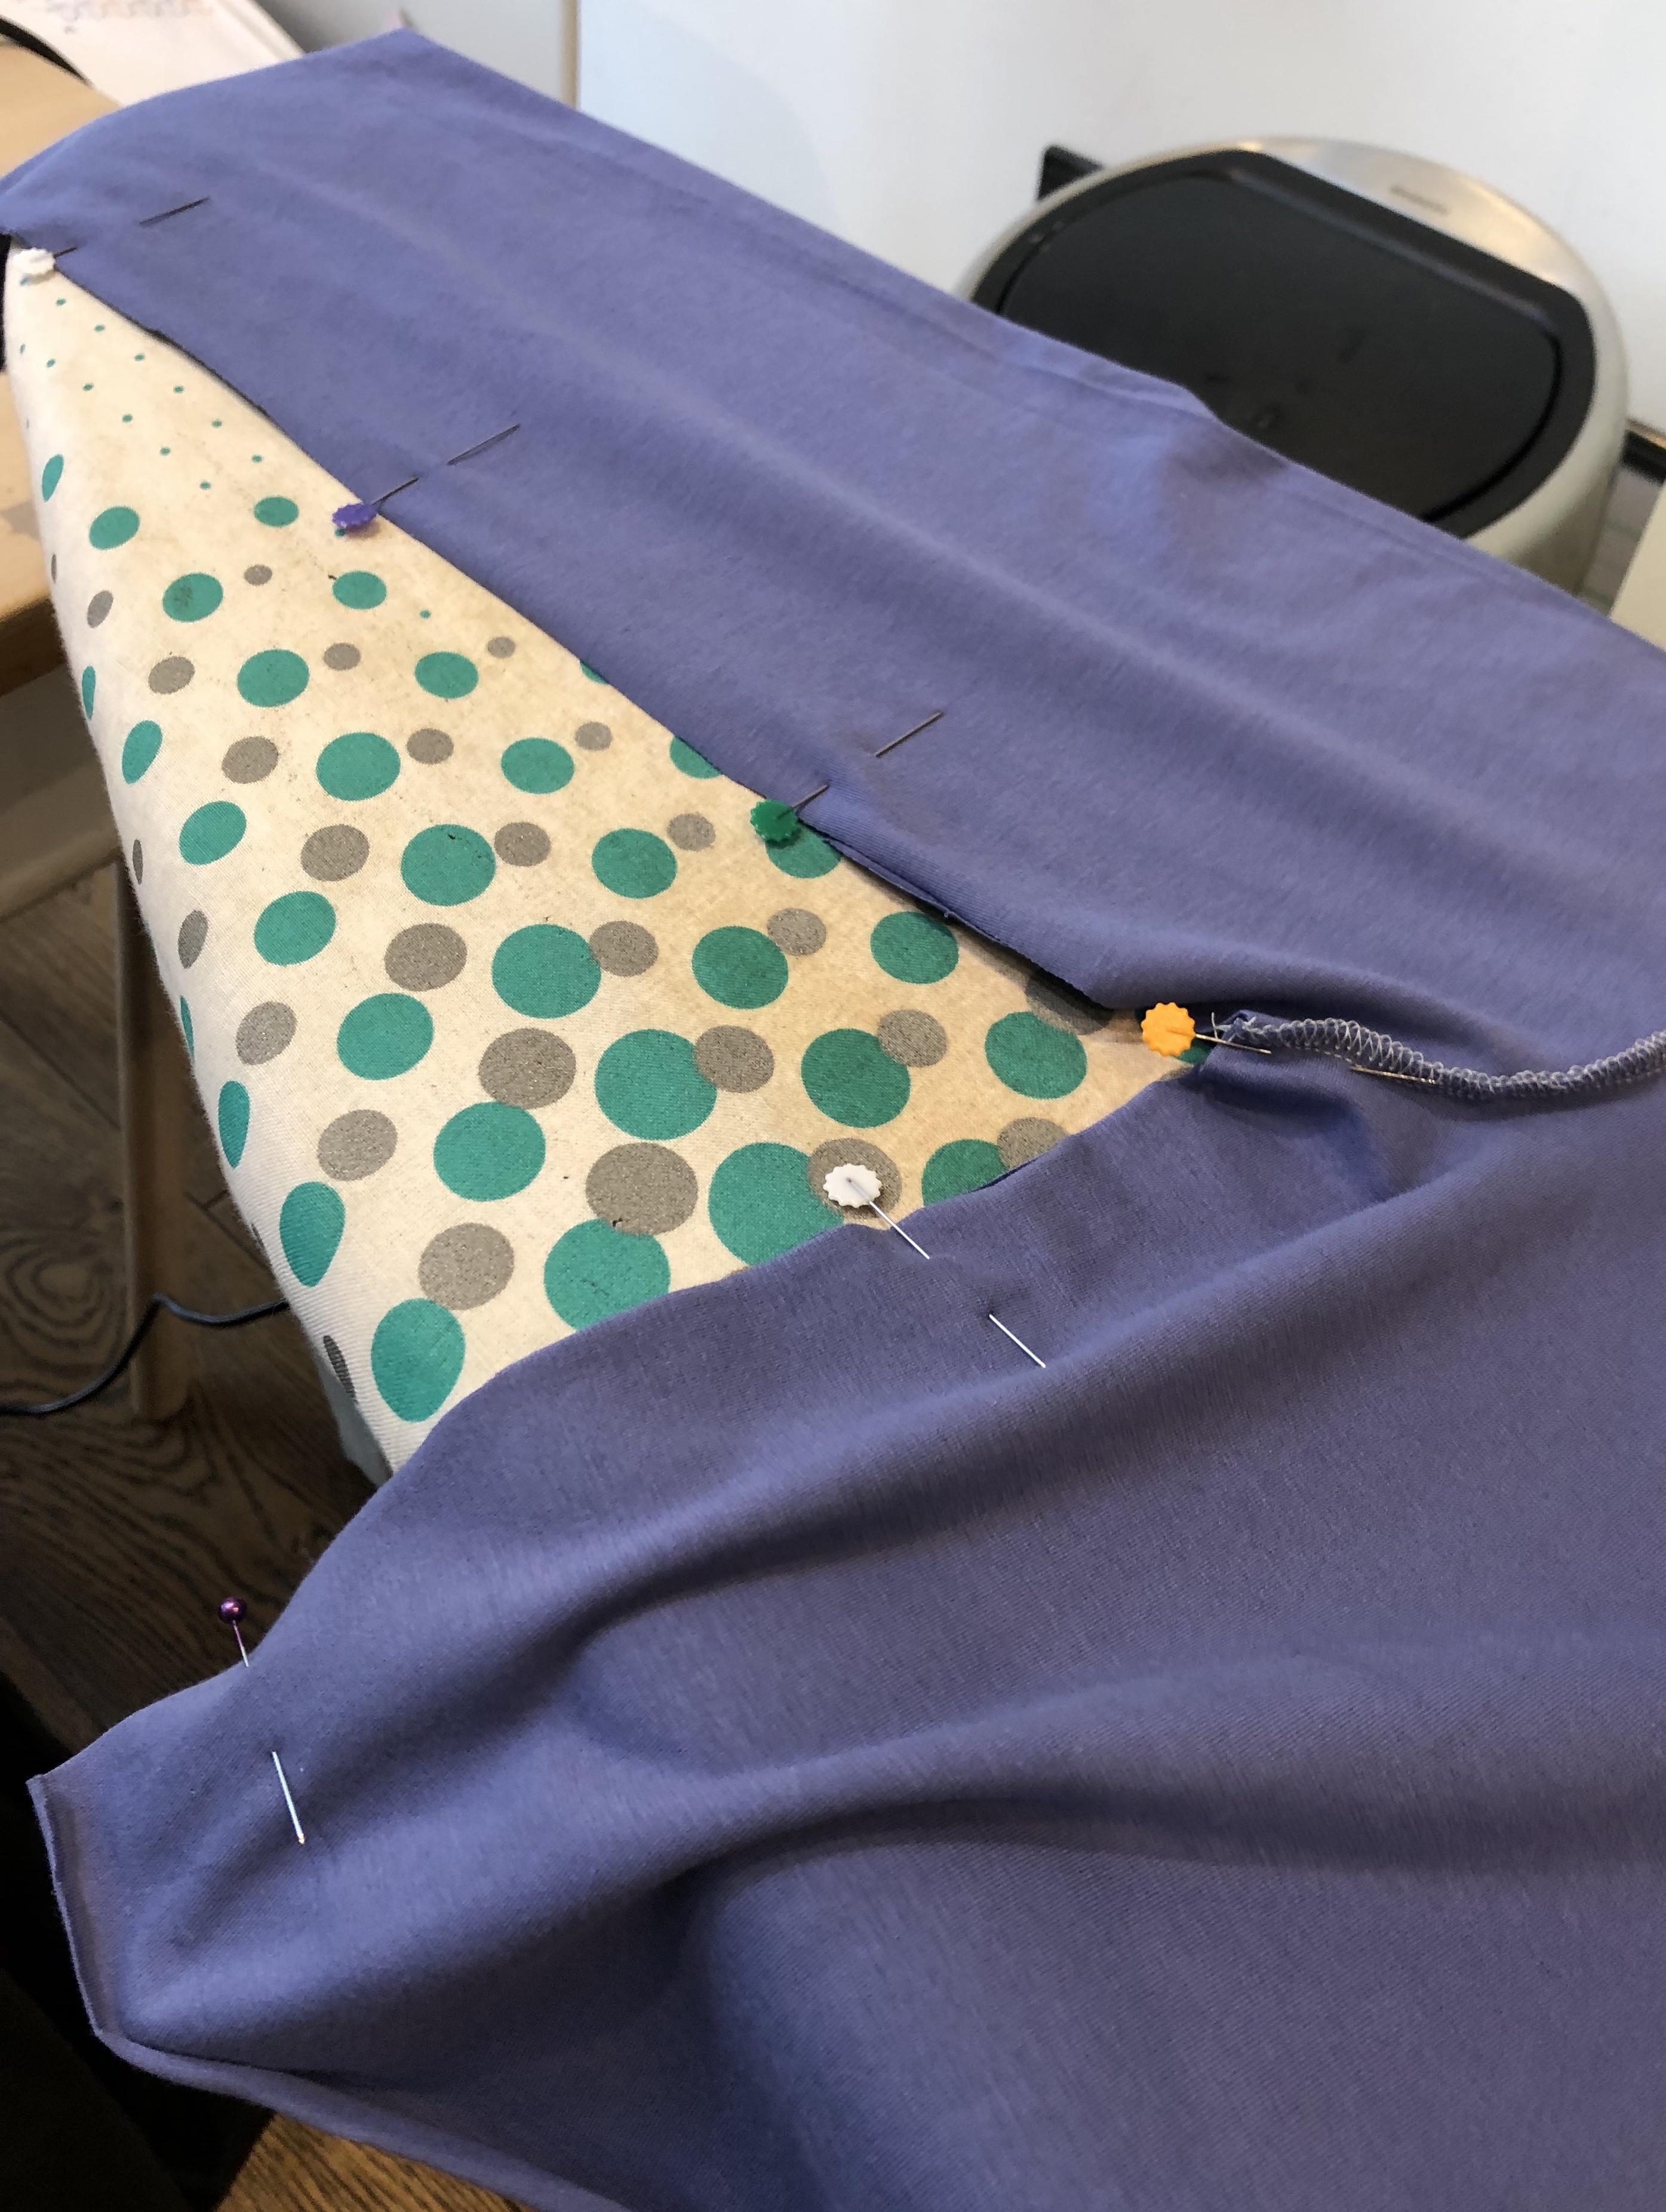
1:56 Sleeves in: time for lunch.

2:33 Lunch done – onto sewing the side seams.

2:48 Side seams sewn and quick try on confirms it’s all ok and the neckband gamble paid off. Now for the skirt side seams.

3:02 Break for words of encouragement, frustration and weeping (aka helping my youngest with her homework).

3:09 Fractions sorted. Back to attaching the bodice to the skirt.

img_23593:27 Bodice attached but with too wide a seam allowance – so the eyelets are now in the wrong place. Seam rip (bonus of using beautiful new seam ripper, gift from a lovely sewing friend from work) …

3:42 Easily distracted and bored while seam ripping – bit of time out to book tickets for next weekend’s Stitch Festival.

3:56 Back to seam ripping.

4:05 All ripped. Joining bodice to skirt #2 …

4:30 Bodice and skirt joined. Casing for drawstring sewn.

img_23604:35 Drawstring fail. Fabric not thin enough to roll into a tube so now sewing it together and turning it through – dullsville.

5:46 This long to turn through one drawstring! Albeit while helping youngest daughter to focus on her English homework but that didn’t slow me down – it’s just a slow and tedious job.

5:59 Drawstring inserted and eyelets promptly fell out. Think this fabric is just too stretchy? Either way the drawstring seems to be working still. But now I’ve tried it on, and sadly I’m not feeling it. Looks a bit sackish. Maybe I need a bit of distance from it. Now I’m in a bad mood with the whole enterprise.

6:43 Finally hemmed (obviously with the bobbin running out 20 cm before the end, because it’s turning into that kind of project) and on the dress form. Definitely a sack.

So start to finish for me was just under 8 hours. Slow sewing indeed. However let’s do the sums properly – excluding all moments of error, distraction, refreshments, laundry and tracing the initial pattern pieces (as I wouldn’t need to do that again). My back-of-an-envelope calculations put my final tally at about 4.5 hours – assuming that next time around I wouldn’t re-trace my fabric, I’d join the bodice accurately, and I’d manage to use fabric for the drawstring that would actually form a tube.

img_2431
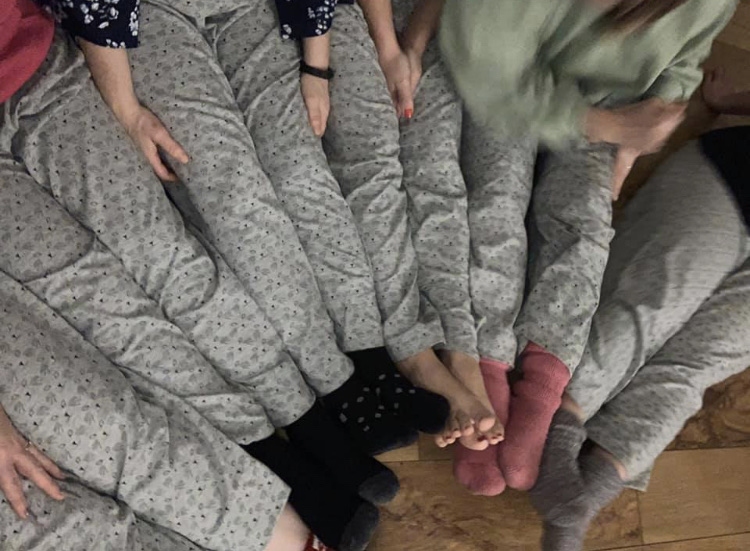
Sooo – rather higher than the 3 hours and 5 minutes estimate from Tilly – but as we can see, when bearing in mind the reality of my life, expertise and general approach to sewing I should sensibly double all future estimates! And you know, that’s really fine – sewing isn’t something I do in batch (as a rule – the six pairs of PJ trousers I recently made for a girls’ trip away with my old university friends was a definite exception) or to a schedule. I sew because I love sewing. My output may not be great, but I enjoy every (OK, almost all of the) minute(s).

In terms of this pattern – well I’m still not sure. When I put it on later for these photos, I didn’t feel half as negative about it as I did at the end of its construction. I think mostly I needed to reposition it in my mind – not a dress for work, it turns out, but one that I could wear to kick about in at home, at the weekend or in the holidays. It’s a nice relaxed outfit – and in a different fabric might feel a bit dressier.

Will I make it again? I’m not sure right now – at a guess, no, because there are So Many Other Patterns (new patented acronym #SMOP: you’re welcome). But when we have slightly sunnier weather and I’m likely to leave the house without wearing all of my warmest clothes, let’s see how wearable this one is.

I do know, at any rate, that if I do it’ll take me about four and a half hours….

img_2392-2

Sewing the precious

img_2385I’m a slow sewist but that doesn’t mean that I have a perfectionist attitude to my sewing: basically I’m just slow. I’ve been sewing for six years now and while I’ve learned a hell of a lot about making garments in that time, this is very much a hobby for me. I’m definitely better than I was, but this is a journey without a destination in mind – so there’s no route map either.

Maybe for those reasons, the Sewcialists’ challenge to ‘sew the precious’ earlier this year really resonated with me. When you know you’re not really ready to sew the good fabrics, you put them aside nervously until you feel ready. And then you don’t ever feel ready.

The fabric was one I bought a year ago – just after my fantastic class at Sewoverit, learning to sew the Francine jacket. I said firmly to my husband then that I would need to sew another jacket immediately, to cement the skills I’d learned. I went off to Fabrics Galore one lunchtime and bought the very last of some lovely black wool – with enough structure to make a jacket work, but still with enough drape to hang nicely.

Clearly, without the discipline (reassurance/confidence etc) of Julie and the rest of the class, my beautiful wool (and the dark red lining I’d also picked up) sat for the rest of the year in my stash. I thought it was time to give it a purpose. Obviously not its original purpose. Because: me.

img_2345After a small item that I wrote was published in the Maker’s Atelier magazine last year, Frances said thank you by letting me choose any of her patterns – and after much indecision (they are all lovely) I was drawn to the Swing Jacket. I loved the simple lines and felt that the styling with a classic pencil skirt would be something I’d definitely wear to work.

The next thing I did was an absolute first for me: I made a toile! Every single book, blog, expert, course or TV show that I’ve watched/read etc has extolled the virtue of making a toile. Testing out a pattern on muslin fabric, practising construction, checking fit, making adjustments – these are all excellent reasons for taking the time and trouble to make a toile. At the same time, in a sustainable sewing world, it feels awfully frivolous to waste enough fabric to make a trial garment. It also feels to me like a waste of time – when I feel like I have never-enough-sewing-time as it is, to spend some of it on a tester garment feels wrong somehow. These are my reasons – laziness and impatience with a side order of planet saving/stinginess. That’s set alongside a body that conforms to most patterns – only really requiring the use of the shortening lines for most pattern adjustments to get a decent fit – so the impetus to toile is reduced again.

img_2055So this time was a first for me. I cut the main pieces in some old heavy black cotton from my stash. I stitched them together by hand – and actually really enjoyed that part of the process. You know when you read instructions, but it isn’t until you’ve made the thing that it makes sense? Well somehow that’s a lot clearer if you’re sewing by hand and not just feeding fabric into a machine.

So having made the toile what were my earth-shattering revelations? Yup, I liked it and would go ahead with my wool. No adjustments required that were obvious. (Let’s come back to this point later.)

So, on with the show. I cut the pieces, and followed the instructions that Frances had helpfully posted on her blog about constructing a lining for the jacket. Having already made it once, it was quite straightforward to make both the woollen and lining versions of the ‘real’ thing. The wool was beautiful to work with – taking an iron in precisely the way that the lining fabric refused to.

In Frances’ post, the suggestion was to leave the unhemmed jacket and lining hanging for a few days – which in my world means until the next weekend at the earliest. It meant the fabric had time to drop – and also gave me time to scowl at it every time I went past my dress form.

And this is the bit where I refer back to what I learned and didn’t learn from my nice toile. A sample piece isn’t a finished garment. It hangs differently and the fabric is (by necessity) a lot – well, cheaper. It wasn’t lined, which again changes the way it fits. Basically it just wasn’t the same.

Now it was nearly done and I’d lived with the nearly-finished coat in my kitchen for a week, I decided that it actually needed to be quite a bit shorter to look right on me. (I know, back to the lengthen(never!)/shorten lines again.) Clearly I was still able to do this because I’d not hemmed the thing yet, but I also ended up cutting off and wasting a quite wide strip of expensive wool fabric, when I was desperately trying to squeeze a pencil skirt out of the remainder.

As well as being a slow sewist, I’m turning into a slow blogger too. I finished the jacket two weeks ago and have worn it to work several times since then. I’ve had complements which is nice – and it does feel like something that is very me. I’m a little irritated that I didn’t trim the excess fabric enough at the front edge hem – it feels bulky there to me, but I’m guessing that not many people would notice though it’s glaring to me. It’s more irritating because I wanted this one to be special, and it’s a note that jars – you know. But I’m not irritated enough to unpick the hem and redo it, so it’ll have to be something I learn to love.

So for the swing jacket – it’s a great, simple and stylish pattern that sews up quickly. If you’re drawn to that kind of shape I’d definitely recommend it. And personally I think the lining really adds something too and is straightforward to make.

For toiles – yep, I’m not yet convinced. In a world short on resources and a life short on time, I think I’ll carry on trying things out carefully, fitting as I go, measuring carefully (me and the garment pieces!) and just going for it. But in future I’ll try and stop saving the precious – it didn’t do Gollum any good after all.